Wasteland 3 The Traitor Quest - How to get the best ending and arrest Liberty Buchanan alive

Just as you're finding your feet in Colorado's post-nuclear tundra, Wasteland 3 reaches its compelling conclusion at the end of The Traitor quest. Not only do you have to find a way to defeat the cunning Liberty Buchanan, but decide where you stand on the region's figurehead - The Patriarch - as well.
There are so many different permutations involved in the ending of The Traitor, that it took me about as long to play through them all as a significant chunk of the rest of the game. Although other events from throughout the story come into play, you're essentially choosing how you want your journey to finish. So as well as guiding you through the meat of the quest, we'll try to help you decide on Wasteland 3's best ending too.
While there are shades of grey in all endings, I'm of the opinion that there is a tradition "good" ending, and definitely a less good, if not a "bad" ending.
Before you seriously start The Traitor, it's recommended that you complete any major side quests still left in the Wasteland. You won't be able to go back for them.
Without spoiling too much, regardless of whether you've captured the first two Buchanan kids alive, you still the option of siding with or turning on The Patriarch. Since it's the route we've taken so far, we'll assume that both Valor and Victory are in Ranger custody.

Wasteland 3 The Traitor quest - how to get the best ending
Following the completion of The Psychopath quest, you'll receive word of a messenger from Angela Deth waiting for you back at Ranger HQ.
Make your way home, and speak to Connie Zeng in the war room - just to the right of the station computer.

It turns out that Deth has intel on Liberty, who’s gone too far in collecting a dangerous army to topple her father. With this intel, you’ll be able to stop Liberty before innocent bystanders pay the price.
Angela wants to meet you face-to-face at a location from your past. For me it was the Hoon Homestead, which may/may not be destroyed based on your actions in the Heads or Tails quest, but could be different.
Accept and make your way to the rendezvous in the Kodiak.
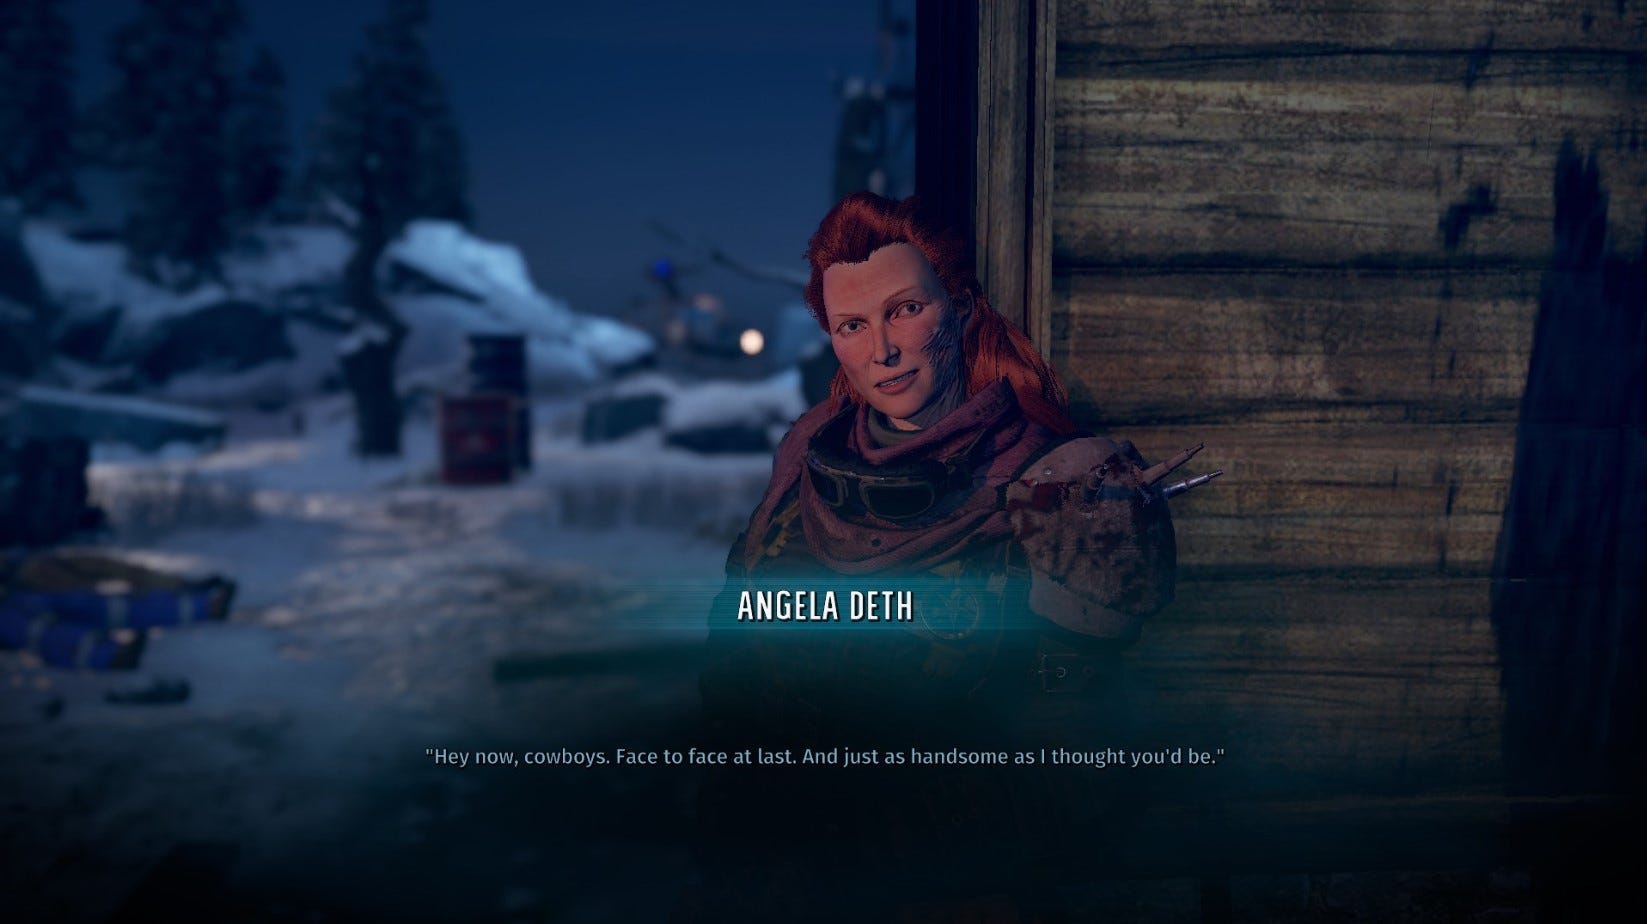
Meeting Angela Deth
Before you can leave however, Liberty's Scar Collectors storm Ranger HQ to give you a bad time, so rush out to defend your home.

There are 10 scars including a vehicle to take down, which shouldn’t be too tough with all the rangers there to help you - plus you’ll have the Kodiak from the garage.
When they’re down, transition to the world map and head the short distance to the meeting location.
As you arrive, search the area and speak to the rebel scout.
In your conversation with Deth, it works to stay cordial for now. She’ll offer you a deal to take out Liberty and the scars - but your meeting will be interrupted by another squad of Scar Collectors. There’s about another 10 to fight, but with no vehicles this time.
After the battle, Deth will outline her plans to take out Liberty and The Patriarch. The main question you have is that the whole reason you’re in Colorado is to help your family and friends in Arizona, so how can we turf The Patriarch out?

But Deth's determined to stop what she thinks is the tyrannical rule of Saul Buchanan, saying you’d only be saving lives at home at the expense of ones in Colorado.
Part one of her plan to topple The Patriarch is to help free Ironclad Cordite and let him take control of the Eastern Gangs to achieve his “bloodsoaked destiny” in Kansas. If this seems completely at odds with Angela not wanting to save lives in Arizona at the expense of others, that's because it is. (Perhaps this is your first hint that listening to Deth is Not A Good Idea, huh?)
Part two of her plan is for her team to assault Colorado Springs while you take out Liberty, then together you can take out The Patriarch and seize control.
You now have four choices:
- You can either agree earnestly and start working with Deth
- Accept, but with the intention of not following through with helping Deth
- You can refuse, but let her and her squad leave
- Or you can kill them all
Regardless of your choice, you'll receive the location of Liberty Buchanan. All of these choices also do not stop you from turning on The Patriarch at a later time, even the last one.
If you try to kill them, Angie will be whisked away before you can kill her and you'll just thin out her squad.
If you accept and want to take out Saul Buchanan, you'll need to go save Ironclad Cordite, which is the Lords of War Quest. If you already have him, then even better.
If you agree though and have Lucia Wesson with you, she’s devastated and promises to oppose you if you try and topple The Patriarch.
With all that in mind, you need to head to Yuma County Speedway, all the way in the south of the map in the eastern plains area.
Yuma County Speedway
Now it's time to make a really important choice: whether to take Ironclad Cordite to Yuma County.
If you take Cordite with you, when you reach Yuma County your objective becomes a series of quests to reinstall him as leader of the Scar Collectors.
If you don't, your objective is a series of quests where you sow discord between the rival gangs.
Again, your final choice is still in your hands whatever you pick, but your actions during the Cordite quests tend to be incongruous with what I'd consider a traditional "good guy" ending.
If you want to take Cordite, I'll assume that you want to kill Liberty and side with Deth in defeating the Patriarch.
If you don't, I'll assume you're siding with the Buchanans as per your original mission.
Click or tap the quicklinks below to skip to your chosen quest route.
Kill Liberty and side with Angela Deth
With Cordite in tow, you’ll be hailed by The Mechanic on your way to Yuma County.
He’ll say to meet at the garage when you reach the speedway.
When you get there The Mechanic, who reveals himself to be The Patriarch's spy, won't be happy to see Ironclad with you. On this path, you’ve got to kill The Mechanic, but it’s not too tough to take out him and his robots.

When they’re done, Cordite says that he needs to challenge his usurper, Steel-Trap, to a duel. This means leaving the garage once you’ve looted it and heading to the Scar Collector camp north of the racetrack.
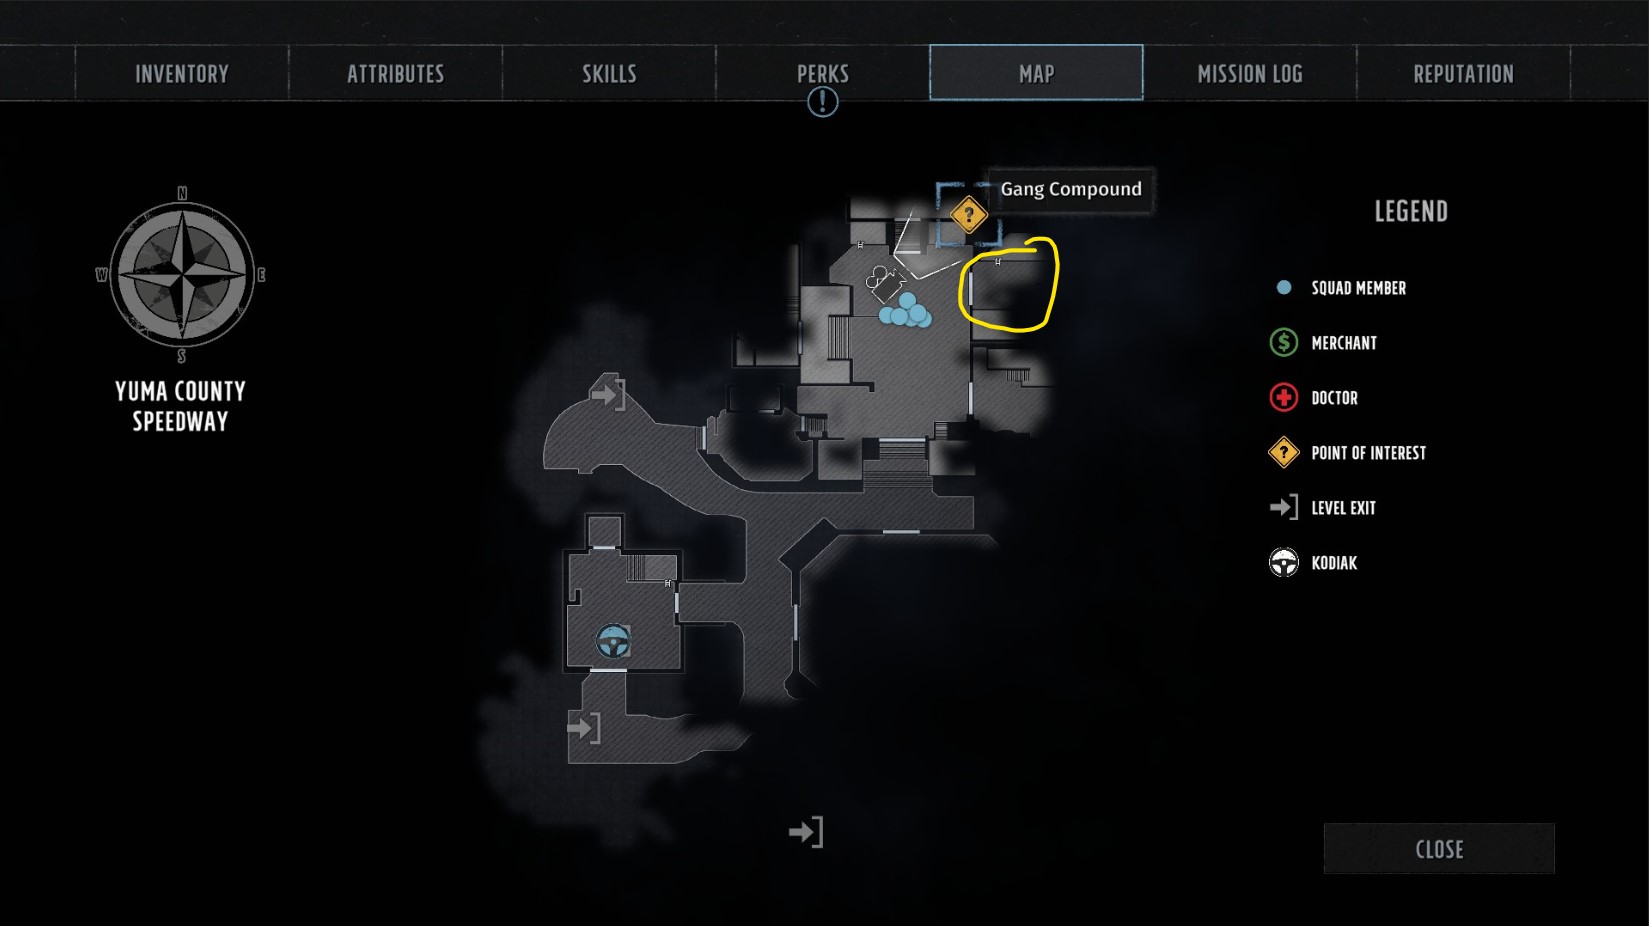
You’re not actually going to the Scar Collector mine, but the path through the middle of the area towards the large clearing and “Gang Compound”.
Steel-trap is in the top right garage. Talk to him and Cordite will issue the challenge.
To be accepted, you either have to kill a slave or accept a body mod. I already had a bionic eye from Vivisecto back at the Robot Commune, so I could skip this.
Now you need to even the odds.
Nobody's Fools and The Gods Have Spoken Quests
To get dirt on Steel-trap and convince Los Payasos and the Godfishers to turn, you first need to head to the southwest corner of the compound courtyard and find the slave pen.

Speak to Whetstone and say you’re with Cordite. He’ll tell you about Beta Master, who wants to turn Los Payasos against Steel-Trap. Ask to see his wares and he has a good selection of melee weapons and power armour to spend your end-game cash on if you need it - although you might need $2000 in a minute if you don't have Hard Ass 7.

Next speak to Patsy and Not-Yet-Skinned. Say the Godfishers sound crazy. They tell you that the Godfishers will leave if you can convince their leader’s wife that they should.
Both of the NPCs - Beta Master and Haloed Moon - are in their respective garages. Beta Master in the top right garage, Moon in the bottom right.
Go see Beta Master first. Ask him for the dirt and with Hard Ass 7 you can make him talk straight away. Otherwise, you can pay him 2000 dollars for the privilege.
He tells you about an incriminating tape at the deepest reach of the Scar Collector mine.
Now go see Haloed Moon. Float that the gods have sent you to free Star-that-Dreams from Liberty. Then say that you’re unwitting vessels.
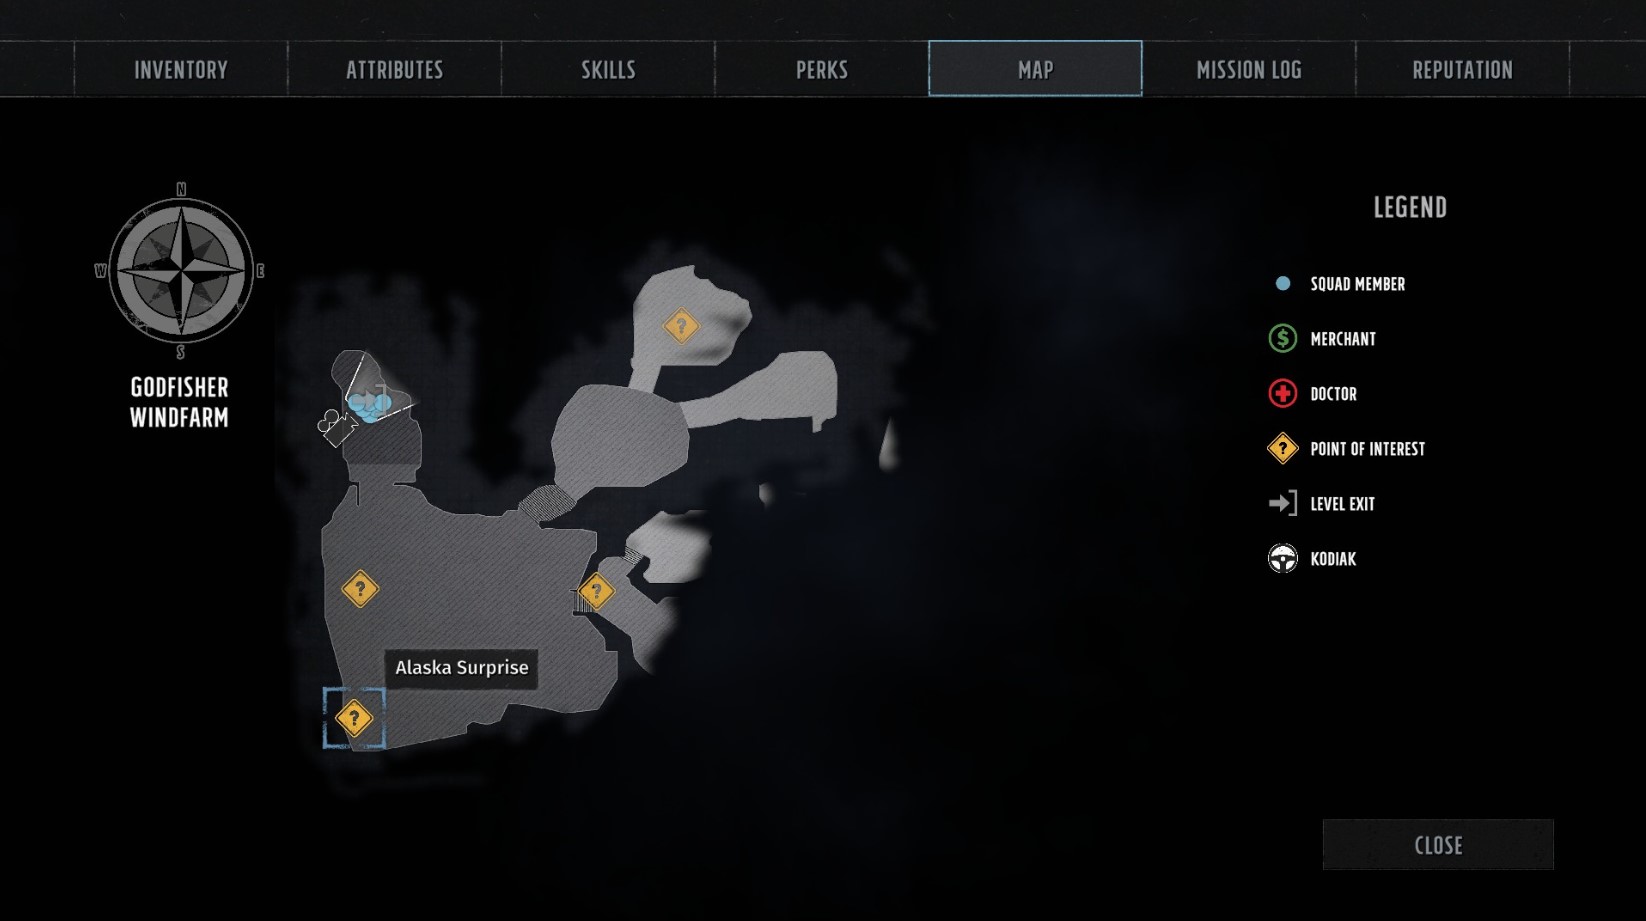
To get Star-that-Dreams to leave, you need to arrange a sign from the gods. She’ll say to meet her at the ice cream truck near the Godfisher Windfarm to the south.
Head there first and go to the bottom of the area - past the arena - to find it.
On your way you'll speak to Hangry the Clown. He wants you to kill some nearby Bison to "save" some slaves.
Take the two of them out. Speak to the slaves and they’ll say the Payasos are the reason they got stuck if you hand them over you'll be rewarded with a skill book and a unique outfit, otherwise you can fight or shoo off the gangsters.
Now head south to the Godfisher Windfarm. Speak to Risky Brisket and she’ll say your reward is buried past the meat locker if you helped out Hangry. But she'll also try and make you try a clown burger - which is made of people - to end the conversation. You can get out of it with Kiss Ass 9, and then by answering "funny". Otherwise you can take the moral blow and a poisoned status, or fight the Payasos.
To find Haloed Moon, walk south past Risky Brisket into the southwest corner of the area. The truck is hanging off the side of a cliff.
Now comes the hard part. To get a kite from the Bone Farm as instructed, you need to get through a big group of drools, then loads more waste worms.
You might need to make a trip back to the Doctor Stitches at the slave camp if you run low on health.
You can position yourself strategically on the Drools' vison cones. Then if you have a precision strike charged on the waste worms, use it on the queen because you can get roughly a 50% chance to kill her instantly by targeting her pustule.
With the kite in hand, return to Haloed Moon, kill her, and this makes Stars-that-Dream leave the alliance.

Now it’s time to head to the Scar Collector Mine. Head back to the central area, healing if you need to, then up to the mine in the northwest of the speedway.
On the right as you enter is a bar which is part of a different quest so you don't need to go in.
If you have Nerd Stuff 10, you can hack the terminal on your left to skip the whole fight through the mine. Lucky you if you have it.

If you can’t do that, you have to head around - through a huge minefield - and through the mine, fight Scars as you go.
After the minefield, you can sneak around to the right-hand side with Lockpick and Sneaky S**t 8. Inside this side path, you'll find a terminal which summons two Servitors to help you, as well as a card key that opens every door.
At the end of the mine, there's a box containing the incriminating tape up the stairs in the command room. Now it's yours, head back to Lechirito at Los Payasos' garage.
He's rightly angry with how Steel-Trap and Liberty see him, and pledges not to help out the other side.
Now you’re ready for the finale. It’s time to d-d-d-d-duel.
The Duel
In the destruction derby duel, you’re dealing with Steel-Trap, two trucks, and four regular enemies.

If you’ve got cluster bombs on the Kodiak, it’s quite easy to blast a big hole in the group on the left. Then rip off Steel-Trap’s armour and wear him down - or at least stun him.
Whatever your strategy, I'd suggest spreading out ASAP to avoid getting optilasered.
At the end of the duel, you’ll transition straight to the gate of Liberty’s compound, where Cordite holds up his end of the bargain.
Speak to Emogene Dorsey to lower the gate, then speak to the door. This is the point of no return - so make sure you’re ready.
Dealing with Liberty Buchanan
In the following conversation, you have three options. Talk her into coming in alive with Hard Ass 10, join up with her with Kiss Ass 10, or hack her with Nerd Stuff 10 to make killing her easier.
If you use the Kiss Ass 10 option and choose to surrender to her, the game ends there and then, with Liberty taking control of Colorado with an iron fist. The Rangers in Arizona will die out through lack of supplies, and the gangs will overrun Colorado Springs.
If you can’t do any, then you just have to fight. In the ensuing battle, which I could hack her robots in, I stunned her and killed the Dorsey helpers first. This let me focus on taking her out.

After she’s lost about two thirds of her health, she’ll yield. This means you can still take her to the Patriarch alive if you don’t have the talking stats - but if you’re here on Deth’s orders then you can attack her again.
This time though, the warbots will be back online.
Once you’re done, there’s a Creepy Doll in the trapped locker up in the right hand corner of the room.
If you're with Lucia Wesson, you can free her father from the room in the top left and ask him about his role in murdering the Dorsey family said. He comes clean and Lucia is shaken by the revelations. She asks what to do, kill him, exile him, let him come home, or stand him on trial.
On this path, if you plan to depose the Patriarch, you can let her arrest her father and take him back herself. This resolves her questline without having to kill her when you turn on Saul.
The Kodiak is waiting outside, so head back out to Colorado Springs.
Deposing The Patriarch
When you leave the speedway, you get one last chance to change your stance. But you’ve come this far, so you'll likely stick to your guns.
But, with the news that you're taking down Buchanan, there's a mutiny back at Ranger HQ. Everything’s gone a bit sideways, and you’ll have to make peace with your other followers to keep them onside. Return to HQ ASAP.
When you arrive, you'll speak to Deth, who informs you that about half of the base has turned against you to defend The Patriarch. First up you either have to kill, arrest, or exile your followers. This includes, Kwon, Jodie, and Lucia if she's not busy with her Dad. Cordite obviously couldn't care less.
To take back Ranger HQ, you have to reset three terminals - one in the garage, one in the brig, and one in the armoury. Depending on the characters you've recruited throughout the game, you'll have to fight against some of them now.
In the garage you have to kill General Woodson's brother, while at the front door you have to kill Rook and La Loca. In the foyer, it’s the marshals from the armoury, including Delgado.

However, you can still get heals from the Doctor in the medbay.
Once the three terminals are secure, it's time to storm the war room, where you'll fight Greatski.
Despite your efforts, The Patriarch has foiled you and the car passage won’t open. You’ll have to fight to the museum in Downtown Colorado Springs on foot to get your Kodiak into the city.
Head down there, and as you enter, the Cotters and refugees will be attacking Sheriff Daisy and the Marshal Station.
If your reputation is high enough, you can Kiss Ass 10 to get her to join you instead of killing her. When she asks what you goal is, "ensuring the safety of everyone" is the right answer.
While Daisy won’t take up arms against her boss, she’ll stop the Marshals from standing in your way. Then she says that the Patriarch is in Market Square.
On your way, you can nip into the clothes shop on your left to find Deth’s scouts. With 8 First Aid you can patch them up to rejoin the coming fight.
They’ll give you a sitrep of Market Square, saying that the Patriarch’s tank is a monster, and that your best bet is to go straight through the museum. Lucky that’s just where you wanted to go.
Head around the corner into the museum, then put one squad member on the floor pad in the bottom left corner.

This makes a button appear on the north wall - press it. This should open the door in the back room revealing the terminal.

With the terminal, you can either use mechanics or nerd stuff 8, or just rip wires out and it works.
Make a save here if you want to try out different endings.
Now the door's unlocked, leave the museum to face the Patriarch.
You’re fighting the Patriarch’s personal guards Immaculate and Adamant, as well as two elite troopers and his tank, Manifest Destiny. If you’ve got cluster bombs, this fight is rather easy since you can kill all of the human enemies in one shot.
It’s best to use the first round to spread out and prepare with your squad, since the tank is probably too far away to get a hit on without leaving yourself exposed.
With his tank down, you’ll speak to the Patriarch face-to-face.
You can then arrest, kill, hand over to the mob, or doom him to exile.
Either choose whichever suits your mood the best, or scroll down to the ending section below where we'll tell you what happens with each.
Arrest Liberty alive and side with The Patriarch
Resolved to send the Arizona Rangers life-saving supplies, make your way down to Yuma Speedway to capture Liberty Buchanan alive.
As you approach you'll be hailed by The Mechanic on the radio, who wants to meet you in his garage before you meet with the gangs.
When you enter Yuma County, The Mechanic will give you a sitrep of the area, and remark on how Liberty is going to be tough to get too.
Grill him for more info on the gangs, then fill your ammo bags by trading with him if you need it.
Sand in the Tank quest - Gods and Clowns and Canary in the Coal Mine
Once you’re done, head out of the garage and turn left. Then take the first left until you see the side entrance to the slave pen on your right.
This is where you'll get the information to clear a path to Liberty.

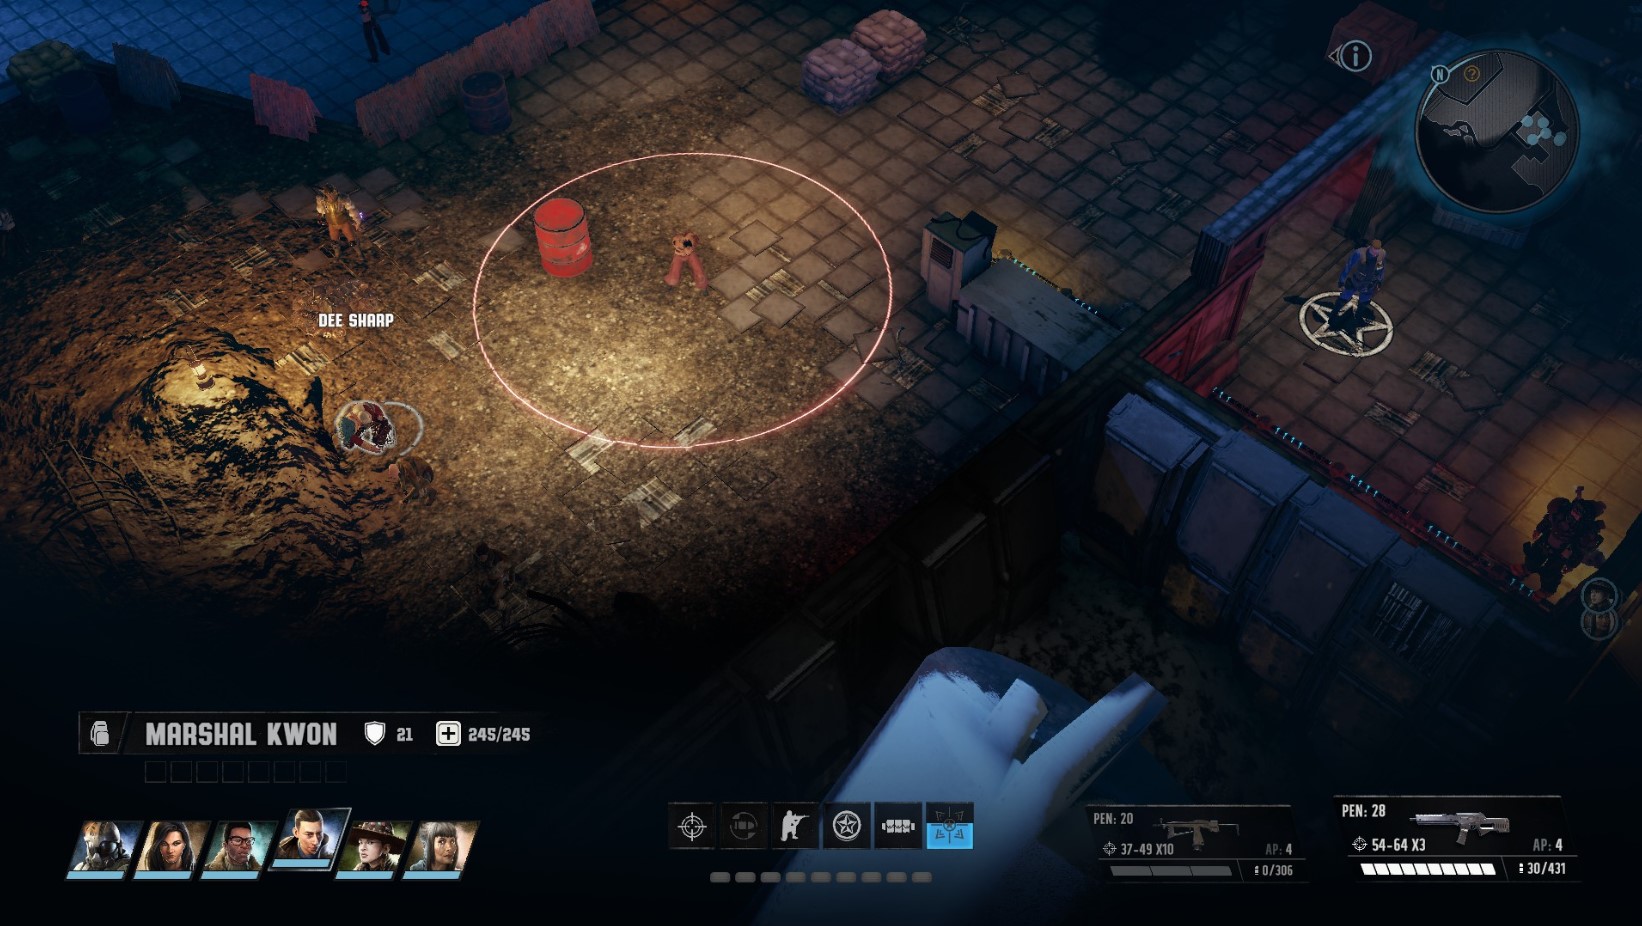
First, speak to Whetstone. He won’t believe you’re the desert rangers, so say you’re just passing through. Ask if there’s anything you should know about Steel-Trap and he’ll tell you about Dee Sharp.
You get the tip to go to the Scar Collector Mine to look for clues. It’s back out of the Slave pen door, and at the end of the path.
As you enter the mine, you’ll have the opportunity to skip ahead with Nerd Stuff 10. Hack the terminal on your left to get straight to the room with Dee Sharp, otherwise, you’ll have to make your way all the way to the back.
Either way, to complete the quest you have to kill all the scars throughout the tech mine.
First there’s a group of scars in the Company Store on your right. Just shoot them, they'll gank you with energy weapons if you try and talk.
Then you have to make your way through a mine field - just follow the track - then there are three more groups to blast through before you get to the Command Habitat. After the minefield, if you sneak around to the right-hand side with Sneaky S**t and Lockpicking, you can get some Servitor helpers and a card key that opens all of the doors in the tech mine.
The Command Habitat is where you’ll find Dee Sharp - make sure she doesn’t die.
When you’re done, she’ll be next to the door. Speak to her, then go into the Company Shop and kill Cutter Throat if you haven’t already. Then go and meet Dee in the shop, where she’ll agree to challenge Steel-Trap.
Next, to stoke tension between the Godfishers and Payasos, speak to Patsy in the slave pen. Say that you want to get rid of the gangs and you can offer them their money, pass a hardass check, or give them some beer after asking them what they want to get them to talk.
They say that the Godfishers 86ed the Payasos’ second in command. To confirm, you need to head to the Wind Farm past the arena in the south of the area and fight through the groups of payasos and godfishers.
On your way you’ll meet Hangry the Clown, who’ll try and get you to help them capture some slaves trapped by mutant animals. You can help them if you want for a skill book and an easier time in the next area. Or you can think of it as free XP and kill all the gangsters. With Hard Ass 9 you can skip the fight.
In the next area, Risky Brisket will try and force you to eat a poison clown burger. You can dodge this with Kiss Ass 9, or accept and antidote yourself. The answer for the Kiss Ass option is "funny".
The shrine you're after is in the east of the Windfarm area. You're looking for the "shrine entrance", the side paths don't lead to where you need to go.

Once you’re through the first group you have two choices: left or right. The right is heavily trapped with explosives, while the left has a sneaky s**t alarm.
Loot the area when they’re defeated, then press on to the third group at the summit.
Here you'll find a creepy doll in a Lockpick 10 box. Loot everywhere, then go over to the right - the kite you're after is on the edge of the cliff.
Show the body you pull down to Risky Brisket back at the entrance to the Windfarm area. This completes the quest.
Arresting Liberty Buchanan alive
With the gangs out of the way, it’s a straight shootout between your squad, the Dorseys, and Liberty herself.
Make your way up into the gang compound through the slave pen. Fight your way past the Dorseys and turrets, then push up north to the top of the courtyard.

Outside Liberty's hangar you'll fight more Dorseys. The turrents are the toughest opponents really, but when they're done, make a save before you open the door to Liberty. You’ll need to break down the door with melee or explosives if you don’t have good enough Lockpicking.
If you’re a big guns user, check out the scar collectors' garage on your right for a flamesaw cannon to use in the coming fight.
Confront Liberty when you’re ready.
To bring her in alive you have three options:
- Choose the Hard Ass 10 dialogue option
- Choose the Nerd Stuff 10 and wear her health down until she yields
- Fight her normally until she yields
With Liberty Buchanan in custody, you can free Lucia Wesson's father from the room in the top left of the hangar. Deal with the situation how you think is fitting for Lucia's character, because it doesn't much feature in the ending.
As you leave Yuma County, Angela Deth will hail your radio with one last plea to help topple the patriarch. Since it’s incongruous with what you’ve done in this route, refuse, and she’ll finally turn on you as well.
With that, your objective switches to saving Ranger HQ. Return there ASAP.
To take back the base, you need to reset terminals in the garage, brig, and armoury to advance - then take out Zeng in the War Room. If you sided with Deth at this point, you'd be fighting your friends and followers - but with this route it's mostly generic recruits.

Once you have the HQ under control, head into Downtown Colorado Springs.
As you enter, you’ll have to help Daisy defend her station from some rioters. Daisy will thank you for the assist and send you towards Market Square.
In the clothes shop on your left are some looters you can talk out of fighting you if you wish, but the main event is up towards the museum.
Defeating Angela Deth
In the square, you’ll see a battle raging between the Patriarch and Angela Deth. Go into the museum, then stand one character on the floor pad in the bottom left corner of the room.

This reveals a button on the north wall. Press the button, then turn off the terminal with 8 Mechanics, 8 Nerd Stuff, or just by ripping out wires.
Now's the time to make a save if you want to try out different endings, then go and join the fray.
There are two ways for this to shake out:
- With Hard Ass 10 and Kiss Ass 10, you can get Deth to stand down, and then The Patriarch to let her follow leave peacefully
- Or you can fight her, her squad, and vehicle - it's a simple fight, especially if you have cluster bombs on your Kodiak
With Deth dealt with, The Patriarch makes good on his deal. The Arizona Rangers will be supplied, but do you want to return home, or make a new life in Colorado?
Either make the decision based on your time with Wasteland 3, or make a choice based on the ending discussion below.
Wasteland 3 Best Ending
Where the original Wasteland was the basis for the first Fallout, the modern games are similarly inspired by their contemporaries' morally ambiguous endings. Much like other Fallout-style games, Wasteland 3 has many different "grey" endings rather than one specific "good" ending and one specific "bad" ending.
Similar to The Outer Worlds, your story is defined both by your choices at the end of the game and how you've resolved side quests.
For example, saving The Bizarre in the Nightmare in the Bizarre quest features in your ending, as does your relationship with the Robot Commune and other factions. This means that the "best ending" is a personal one, and you need to be satisfied with the way you've conducted yourself across your entire journey.
In terms of the ending choices at Wasteland 3's climax, we can split them into two categories: Side with Deth, or side with The Patriarch.
Take this as a spoiler warning!
Side with Deth ending choices
When deciding the fate of The Patriarch:
- If you arrest Saul Buchanan, he's tried and sentenced to prison. It's implied he soon escapes
- If you hand Buchanan to the mob, he's sentenced to death
- If you exile the Patriarch, he walks off into the sunset - never to be seen again
- If you kill the Patriarch, your ending focuses on your relationships with different characters
Then when Deth asks if you want to stay in Colorado or leave:
- If you stay to keep the peace, your ending depends on your reputation with factions - for example Gideon Reyes will become Governor and treat refugees more fairly if you're loved by the Hundred Families
- However if you stay, the Arizona Rangers will be spread too thinly and times will be hard for them
- If you leave, the Rangers will survive, but General Woodson will be displeased with the outcome and it's implied you'll face consequences when news of your betrayal makes its way to Arizona
- Without you there to help keep the peace, Deth will also lose control of Colorado Springs to the refugees after tensions turn violent
- Back at the helm of his gang, Ironclad Cordite completes his destiny of taking over Kansas
Side with The Patriarch ending choices
- Whatever your choice with Angela, she will be declared dead and Woodson will hold a service for her
- After bringing Liberty back alive, The Patriarch tries to reconcile with her, but she never says another word again
- If you return to Arizona, the Patriarch sends supplies and the Rangers flourish, Team November receive the highest honour and go down in history like General Vargas
- However, The Patriarch refuses to let go of power and it's implied that Colorado will fall into chaos once he finally dies and the Rangers will be alone again
- If you stay in Colorado, the Rangers will survive and try to expand to more of the western states
- With the Rangers in Colorado, Buchanan still refuses to name an heir, but it becomes obvious that they will be the ones to choose when the time comes
From the options available, it's my opinion that the "happiest" ending comes from siding with The Patriarch - then it's a personal choice whether you value being an honored Ranger or choosing the next leader of Colorado.
While you could see Deth's outcome as the "bad" ending, it does at least give the people of Colorado a period of self-governance; even if it's squandered.