Destiny’s King’s Fall Raid guide – How to kill Oryx, The Taken King
This is the ultimate test of staying power, concentration and combined damage-per-second in the King’s Fall Raid. It takes hours of practice channeled into mere minutes of near-flawless execution. Oryx is one of the most awesome confrontations ever created in a videogame. Here’s how to win.

Destiny’s King’s Fall Raid guide – How to kill Oryx, The Taken King
The mechanics of the King’s Fall encounter build upon those learned from the Daughters of Oryx. The four platforms are back in play, building the counter-clockwise stairway to a hovering Spark. However one helpful difference to begin with is that the Carrier is not chosen at random, meaning that you can plead with your best guy to handle the parkour sections.
This leaves you with five Guardians to assign roles: one on each platform, and the last assisting with the adds from the floor. Everybody will open fire on Oryx and in turn the Shade of Oryx when the time comes. In terms of DPS, you’ll do most damage with accurate, high-impact rifles such as scout and sniper. Heavy machine guns also work great against Oryx. Rockets take too long to stagger him.
First a quick overview of how the rounds are likely to pan out. Rounds one and two involve killing adds, activating the platforms, killing four Ogres, acquiring an aura of protection, staggering Oryx, detonating four bombs, then firing upon Oryx until he slips out of view. Immediately after rounds one and two, Oryx summons light bombs to track Guardians that run in large circles to avoid being hit. You’ll survive one blast, but not two.
Round three finds the six-man fireteam being transported, one by one, into a featureless, circular Darkness Dimension where the Shade of Oryx must be killed within a time limit or everyone dies. To assist with those inside the bubble, those that remain outside should continue clearing as many adds as possible because these make their way into the Darkness Dimension and harry those attempting to put DPS on the Shade of Oryx. Assuming that you conquer this first Shade, rounds one and two and three are repeated before finally standing before the Taken King to complete his downfall.
So, let’s look at those three basic rounds in more detail, followed by how you’ll slay Oryx.
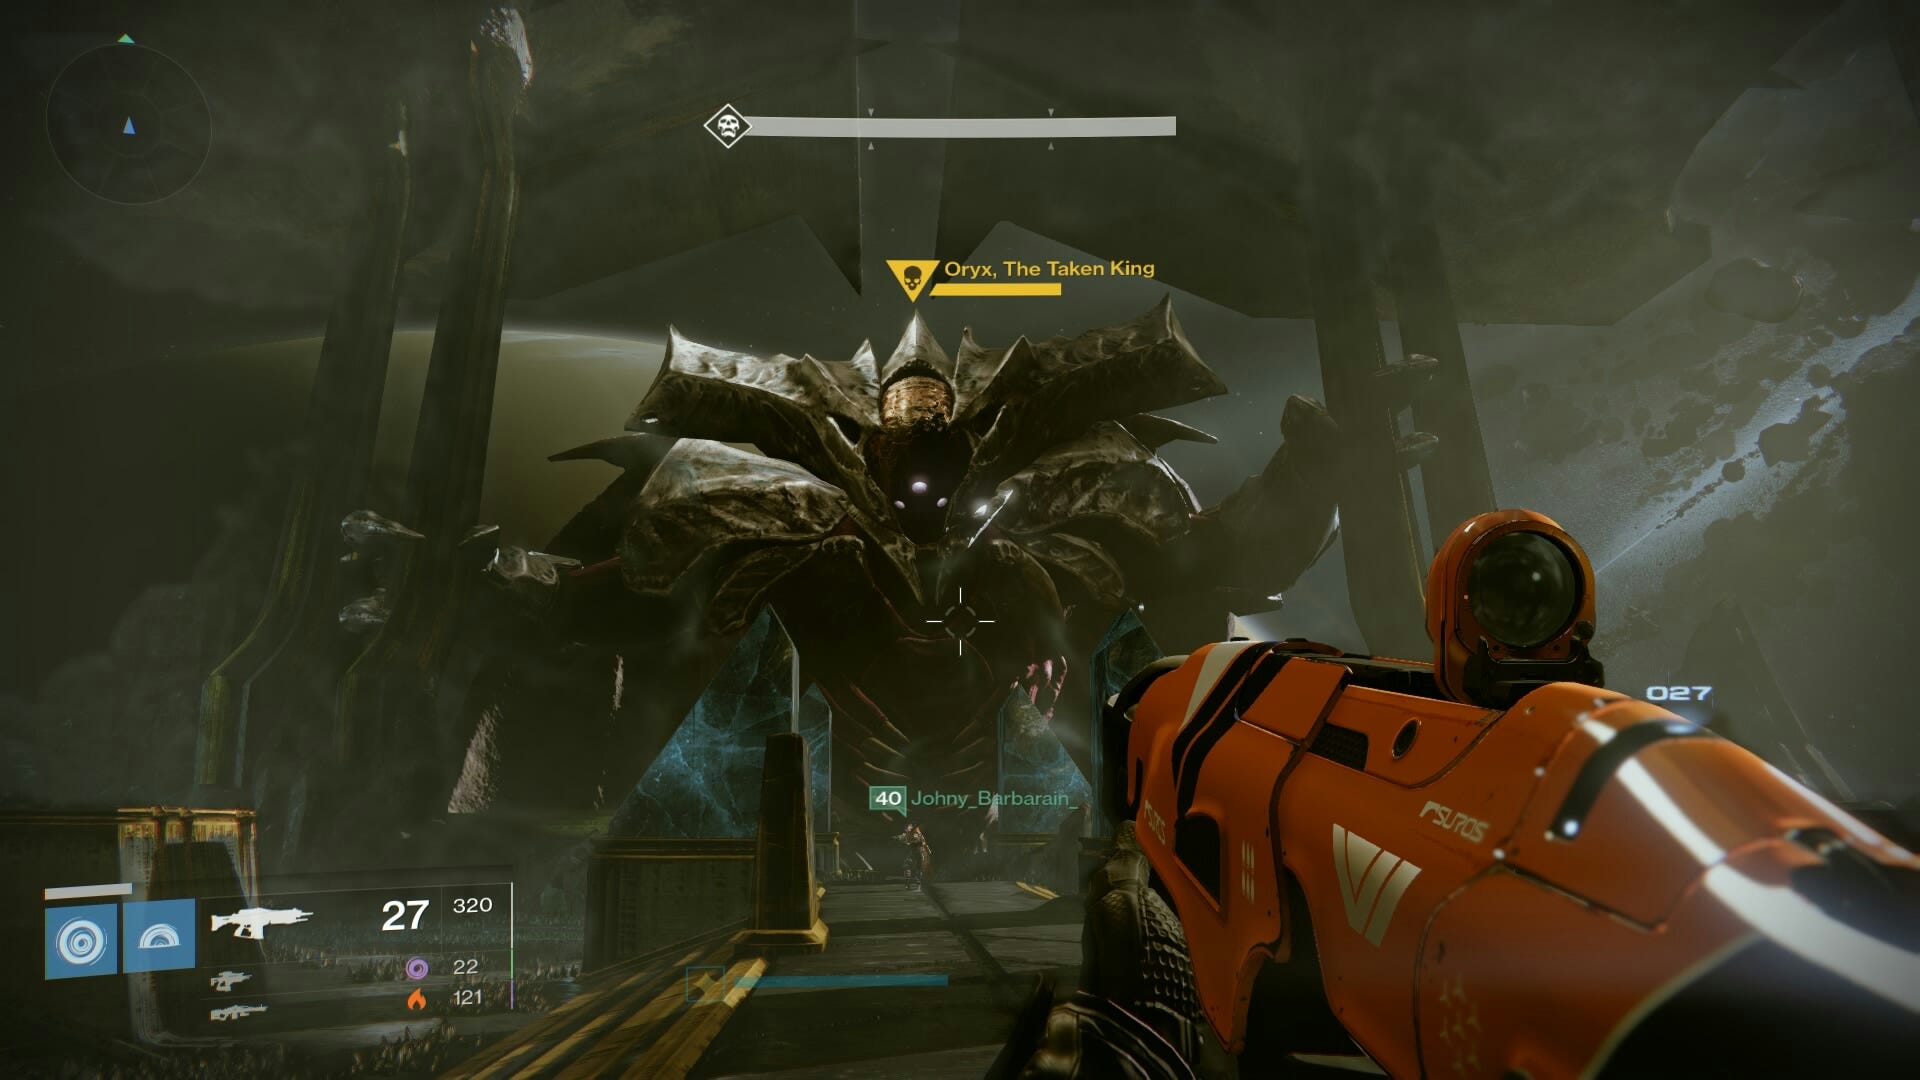
With great fanfare, Oryx rises above the far end of the map. After scaring the crap out of you for a few minutes while you clear adds – which include Taken Knights atop the four platforms – Oryx stands above one of the far end platforms and smashes his fist down onto it. This is where your star runner begins their ascent, becoming Torn Between Worlds the moment they step onto the chosen platform. Have the four remaining platform defenders hop into position, starting with the other guy at the chosen platform, in a counter-clockwise sequence, allowing the platforms to build and the runner to get on his way.

Triggering the Blight bombs at the correct moment is essential to dealing Oryx sufficient DPS.
Within seconds of starting the round, one Light-Eater Ogre appears next to each platform in the order they were activated. It's the responsibility of the platform defenders to assist with high-impact shots from range, working on getting the Ogres down as close to their spawn-points as possible. This is important for the two platforms at the far side of the map where Oryx first shows up, because when the Ogres are killed they leave a Taken Blight in their wake that functions as a bomb. These bombs, all four of them, deal additional damage to Oryx when detonated. You’ll need them all to ensure he receives as much damage as possible, but the aura of a unique Hive Knight can trigger them when he spawns if the Blight bombs are within range. There's more on him below. Meanwhile, sniper shots work great against Ogres. Call in floor-support where this task is proving trickiest.
Just as the last Ogres are being dropped, the runner should have grabbed the Spark. They'll require immediate assistance in the centre corridor. A Hive Knight appears, The Vessel of Oryx, flanked by numerous Taken adds, and the runner steals its Aura of Invincibility. The enraged Vessel then seeks to detonate the nearest Blight bomb, which triggers all the rest, so must be killed within a few seconds. Concentrate all fire on the Vessel first of all, while under the Aura’s protection. Also, aim to clear as many adds as possible while moving into position to target Oryx – pay extra attention to the Acolyte’s Eyes.
Oryx now moves to the far side of the map, left or right, depending on which platform he whacked earlier. If it was the far-right platform, he appears on the far-right. The team assembles beneath the Aura, waiting for the precise moment that Oryx “calls upon the Darkness," exposing a weak point that glows white within his torso as he does so. Apply as much DPS as possible to stagger Oryx. You’ll soon know if your team is capable without the assistance of a Defender Titan’s Weapons of Light. If the Weapons of Light proves essential, work your strategy so that the adds-clearing phase generates Orbs of Light to boost your Titan’s Super ability around this central area.
With Oryx staggered, and the runner continuing to apply DPS on Oryx alongside the designated adds-clearing guy, have the four platform defenders rush out to detonate the Blight bombs beside their assigned platforms. They simply stand within the Blight for 3-4 seconds, observing a state that reads Channelling Reclaimed Light, waiting for a message saying that he has detonated a Corrupted Light, before rushing back to the Aura, safe from the blasts that follow while applying as much DPS on Oryx as possible. Heavy machine guns and even auto rifles are decent for this. Scout rifles, and sniper rifles are excellent if you can aim at the dark spot seen faintly amid the glowing light of Oryx’s belly.
Phew. If all goes well, this first round should takes around 25% of Oryx’s health. You’ve chance to make up for a shortfall in the next round, but not by much. Consider wiping if you’re nowhere near close.

Now or never. Stay calm on the final approach and pummel Oryx's weak spot.
Before the next round starts, Oryx summons light bombs that seek each member of the fireteam individually. To avoid running into a fellow Guardian’s targeted missile, spread out as best you can. The easiest way to manage this is have the platform defenders dash around their platforms, and the remaining guys running in the central areas being careful not to overlap. You may even choose to trail one of the platform defenders. Just keep running until the attack subsides.
Congratulations, you have mastered the most difficult mechanic in the Oryx encounter.
Now you’re going to do it all over again, only this time at the other end of the map closest to the entrance. Clear all the adds, including Taken Knights on the platforms, wait for Oryx to smack his platform of choice. This is where the runner starts, and the area where Oryx will re-appear to take damage once the Vessel is slain. Stagger Oryx, have your platform defenders rush out to detonate the bombs, then return to keep hammering Oryx in his gut until he slips away.
After evading the tracking missiles for a second time, Oryx begins to teleport Guardians into the Darkness Dimension. Adds continue to spawn on the original map, as before, including Taken Knights. Those outside the Darkness Dimension should kill adds while waiting for their turn to be claimed. When it’s your turn, clearly announce your arrival in the Darkness Dimension and immediately look for where the Shade of Oryx is shimmering just beyond the wall. The Shade doesn’t remain still for long, so if your fellow Guardians are firing, it’s sometimes best to look around for where he next appears. As with the story mode, the Shade of Oryx occasionally swoops into the central area of the Darkness Dimension, swiping with his sword. Be ready to evade when it does.
You absolutely must defeat the Shade of Oryx before the Darkness Dimension dissipates, or the battle is lost at this stage.
Those that survive face an exact repeat of the first three rounds, starting from the far side of the map. The Darkness Dimension is summoned one last time, followed by two final rounds of the platforms plus Vessel and Aura of Immortality mechanic. Should your entire fireteam emerge victorious yet again, Oryx will rise defiantly on the brink of defeat at the spot where he first appears. You must get this next part right, or there will be rivers of tears cried in anguish.
When Oryx makes his last stand, walk steadily toward him with your best DPS weapons equipped that have enough ammo already available – no time to use a synthesis, not really even to reload. Wait for his chest to open, and at that precise moment give him everything you’ve got. There is no turning back from this point. Not after so long, and trying so hard. You will kill him. And that is all.

Head back to our King’s Fall Raid guide, part of our complete guide to Destiny: The Taken King.