Batman: Arkham Knight - Save Oracle, Crash Site, Catwoman, Penguin
Find Simon Stagg and figure out where Scarecrow is holding Oracle.
This page contains the second main objective in the City of Fear missions for Batman: Arkham Knight. We'll be showing you how to save Oracle, investigate the crash site, as well as covering encounters with Catwoman and Penguin.
Rescue Oracle from the Arkham Knight.
Objective: Meet Gordon outside GCPD Prisoner Detention.
Take the Batmobile to the next waypoint, which is GCPD. There are a few tanks along the way that will need to be destroyed as well. Once you reach the GCPD, head through the garage door to meet Gordon at the bottom. Get out of the Batmobile and speak with Commissioner Gordon.
Objective: Escort Gordon to the Oracle's Clock Tower.
Follow Gordon as you make your way toward the clock tower. Several enemy vehicles will try to stop Gordon. Stay behind them long enough to get a lock-on, then fire a missile to take them down. In some cases it will take two missiles, or you can ram them after the first missile strike. Once all of the enemy vehicles are down, pull into the highlighted area to park and allow Gordon to get in the Batmobile.
Objective: Take out the Arkham Knight's militia forces occupying the Clock Tower.
As you approach the clock tower, take down the tanks surrounding it. Once they're cleared, eject from the Batmobile and take out the guards around the tower. If you have trouble finding them, head to the tower rooftop where you entered before to view a short cinematic showing enemy locations.
Objective: Investigate the Clock Tower for clues to help locate Oracle.
With the enemies down, head to the roof of the clock tower and use the same entrance from before. You're treated to a flashback of Oracle getting shot. Try to leave and you find yourself back in the clock tower speaking with Joker. Once he disappears, pick up the wheelchair in the middle of the room for another cut scene, then walk to the middle of the room and access the computer.
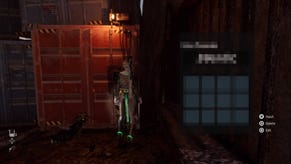
It's time to scan the video footage for evidence of who took Oracle. Move to the screen in the upper right corner and fast-forward the footage to roughly 36:42. Scan for evidence in the grid on the second row, second column from the left; the man in the white coat. Move forward to 43:06 and examine the grid in the third row, second column from the left to highlight the vehicle.
Objective: Track the Arkham Knight's vehicle using the Batmobile Forensics Scanner to locate Oracle.
Shut down the clock tower base, then drop down to the ground and summon the Batmobile. Enter battle mode and press Up on the d-pad to activate the Forensics Scanner. This highlights the trail of the vehicle that took Oracle. Follow the trail until you're treated to a quick cut scene of the militia dropping a device on the road.
Objective: Investigate the militia device.
Objective: Defuse the bomb with a controlled explosion.
Get out of the Batmobile and example the device. Tanks have now been deployed, so get back into the Batmobile and take them out. The catch here is that you can't move too far away from the bomb or it will explode. Stay right around the bomb as you strafe to avoid attacks from the tanks.
Once all of the tanks are down, use the Power Winch and rev the engine to control the explosion. Keep the needle in the orange section until the bomb detonates. This also unlocks the mission, Most Wanted: Campaign for Disarmament.
Objective: Track the Arkham Knight's vehicle using the Batmobile Forensics Scanner to locate Oracle. (continued)
Objective: Proceed on foot to the militia access point at Grand Avenue Station and regain control of Mercy Bridge.
Continue to follow the trail to the bridge, then glide to the next waypoint on the map. Take out the enemies at the waypoint, then access the computer near the middle of the area. You're treated to a cut scene featuring Riddler.
Objective: Head to Riddler's orphanage to rescue Catwoman.
Glide to the next waypoint and take out the thugs. When you get down to the last thug, interrogate him to find out the information you need. Head inside to find Catwoman in the room below. Walk around the outside of the room to avoid the electric floor in the middle and rescue Catwoman on the far end.
Take out the enemies and head back outside. At this point, you can continue the Most Wanted: Riddler's Revenge missions, the Most Wanted: Gotham on Fire missions or go back to the main City of Fear missions. Head over to our Riddler's Revenge or Gotham on Fire articles to continue those mission sets, or keep reading to continue the City of Fear missions.
Objective: Return to Mercy Bridge to resume tracking the Arkham Knight's vehicle.
Head back to the bridge and get inside the Batmobile. Move a bit closer to the bridge to trigger a conversation with Alfred, then take out the tanks on the far side. You can continue to take them out with the 60mm Cannon, or use the Vulcan (R1 / RT) and target the senor array at the top of each tank to quickly take them out. During this battle the tanks also fire homing missiles, but you can easily take them out with your Vulcan before they hit the Batmobile. In the worst-case scenario you can use the pillar in the middle of the bridge to take cover from the homing missiles.
Objective: Track the Arkham Knight's vehicle using the Batmobile Forensics Scanner to locate Oracle. (continued)
Objective: Investigate the crash site to find out what happened to Oracle and the Arkham Knight.
Once all of the tanks are down, continue to follow the vehicle tracks. You'll encounter several more tanks along the way, but keep working through them until you reach the end of the tracks. Get out of the Batmobile and activate the Detective Mode evidence scanner to examine the crashed vehicle.
Rewind the accident to find the location of the driver and examine his body, then inspect the passenger seat of the vehicle. Rewind the crash to determine where the passenger side door landed, then head down the ramp to the right to find the door and examine it. Follow where Oracle's body landed, then track the bullet’s trajectory by examining the impact point right next to Oracle's body. Finally, go back over the footage once again to discover where Oracle threw the evidence and scan the boxes nearby to complete your search.
At this point, you can start the Most Wanted: Heir to the Cowl missions, or go back to the main City of Fear missions. Head over to our Heir to the Cowl articles to continue that set of missions, or keep reading to continue the City of Fear missions.
Objective: Head to Wayne Tower and analyze the Arkham Knight's encryption protocols.
Glide to Wayne Tower, which is the next waypoint on your map. When you reach the balcony, Batman automatically opens the door here. Head inside for another short cut scene. Access the computer behind the desk to upgrade your Batmobile weapons system, then access the statue on the shelf to get a new weapon.
Objective: Infiltrate the tunnel network under Miagani Island.
Head outside and use the Batmobile to make your way to the next waypoint. Take down the tanks waiting outside, then park in the highlighted area to open the entrance to the tunnel. When you can go no further, back up slightly in Battle Mode until you are prompted to fire the Power Winch at the grate above.
Get out of the Batmobile and grapple to the newly created opening. Apply explosive gel to the boarded area just ahead, then again to the boarded area on the wall in the next room. Head through the grate to the left, then use the Line Launcher from the gadgets menu to make your way across the fan ahead.
Select the Remote Controlled Batarang from the gadgets menu and look to the right (in Detective Mode) to find a switch behind the fence. You need to get the batarang around the fence, so aim it to the right of the fence and then control it to swing around to the left, avoiding the fence, and hit the switch.
Switch back to the Line Launcher and aim it into the newly opened door behind you, across the fan. Head right and climb up to the higher area. Use the Line Launcher again to cross the fan, then turn around and use another Remote Controlled Batarang to hit the next switch. There's a large hole to the right of the switch. Send the batarang through the hole, then down to the left to hit the switch.
Now you need to use a double Line Launcher. Fire the first back in the direction you came, then while surfing the line, fire a second into the newly opened doorway. Head down the corridor to the right and around the corner to find a Riddler Trophy.
To the left of the Riddler Trophy you can grapple over to get in a better position to ambush the enemies below. Turn around and grapple from down the corridor, staying off the ground and high above the enemies. After three grapples there's a grate to the right so you can get under the enemies.
Head into the grate and down below the surface and make your way around to the right, following the grate path until you reach the far room. Exit the grate for a short cut scene with the Arkham Knight, followed by an ambush from a large number of enemies. You need to use the Beatdown attack (Circle / B, then rapidly press Square / X) to clear the enemies quickly, but stay away from the doorway to avoid machine gun fire.
When all of the enemies have been cleared, a tank wedges itself into the doorway. Move to the corner of the room where the tunnel gate control is located and access the wall panel. Switch to the remote-controlled Batmobile and blast the door ahead or power slide through it. As soon as the door is cleared the tanks on the other side will open fire. Clear the tanks, including the tank blocking the door to the room Batman is in, then resume control of Batman and get back into the Batmobile. Drive to the far end of the tunnel and then hop out of the Batmobile and access the panel to the right.
Follow the vehicles as they speed away, picking them off until you get to the lead vehicle. Take it down, then get out of the Batmobile, interrogate and intimidate the driver.
Objective: Rendezvous with the Batwing to equip a new Secondary Weapon for the Batmobile.
Head to the rendezvous point on the map to meet up with the Batwing for the Batmobile upgrade. Immediately following the upgrade you're ambushed by several tanks. Defeat the tanks, then head to the next waypoint to meet up with Nightwing.
Select the Disruptor from the gadgets menu and fire at the highlighted box next to the van, then zoom in and shoot the weapons on the two men next to the box. Drop down and take out the enemies below, then use the Disruptor to tag the van.
Objective: Follow the weapons truck to locate Penguin's secret hideout.
Knock on the back of the van, then grapple up and glide around, following the van. When the van comes to a stop, grapple up to the rooftop of the building and take down the men guarding the roof.
Objective: Access the weapons cache and interrogate Penguin.
Head inside to the waypoint and drop down into the building. Go left to find the ventilation shaft and move under the surface until you're close enough to Penguin to interrogate him. You must fend off attacks from a few of his thugs before Nightwing finally comes to help out. Take down the enemies to clear the area.
Objective: Destroy Penguin's weapon cache.
Move over to the vault and open the door. Use explosive gel on the weapons cache, then close the vault door, back up to about 30 meters and detonate. This unlocks the Most Wanted: Gunrunner side mission set. If you wish to continue that mission set, head over to our article that covers the Gunrunner missions. To continue the City of Fear missions, continue reading.
Head back up to the roof where an ambush is waiting for you. Grapple to the beam above, then use the remote Batmobile to move around to the garage entrance. Go up to the top floor of the garage and take out the men waiting on the balcony across the way. Take control of Batman again and drop down to the ground. Walk out to the balcony for another short cut scene.
Objective: Identify a way to infiltrate the Stagg Enterprises airships.
Objective: Disable the watchtower guarding the airships.
Watch out for the helicopters as you glide over to the next waypoint. You need to clear the men guarding the tower, but one is able to sense when Batman uses Detective Mode. Move around the tower and take out the enemies, then use explosive gel to destroy the equipment in the middle. This unlocks the Most Wanted: Occupy Gotham side missions. Head over to our Occupy Gotham article if you wish to complete those missions, otherwise continue reading to keep working through the City of Fear mission set.
Objective: Collect the Remote Hacking Device from the top of Wayne International Plaza.
Head to the next waypoint and activate the door on the rooftop to acquire the Remote Hacking Device. Glide down to the top of the closest airship and activate Detective Mode near the hatch. Use the Remote Hacking Device to hack the access panel below the right of the hatch. Rotate one of the analog sticks until it starts to rumble, then rotate the other analog stick until it rumbles as well. This syncs up the security code and allows you to complete the hack.
Drop down into the hatch, then drop onto the glass below. Look behind you to find a grate. Open the grate, then head to the left and drop down to the corridor below. There's a Riddler Trophy in the gated area here. Use the Remote Hacking Device to hack into the panel inside the room and open the gate. Collect the trophy and continue through to the other side.
Walk up to the window on the left and hack into the guard controlling the drone, then hack into the drone itself to incapacitate the guards. Drop down through the gate and hack the control panel in the adjacent room to open the door. Continue through the doorway and circle around to the left, then access the airship stability controls.
Tilt the airship so the large yellow canister in the next room slides out the window. Drop down through the hatch and tilt the airship to the left to move the passenger pod out of the way. Across the room is another hacking point. Use the Remote Hacking Device and then drop down to the platform below and hack into the yellow canister on the lower platform to remove the magnetic lock.
Access the airship stability controls and move the three canisters to the left, then to the right to reveal a grate behind them. Open the grate to find another Riddler Trophy just beyond.
Hack into the canister again to reactivate the magnetic lock, then access the airship stability controls and tilt the ship to the right (facing the canisters) to move the right-most canister, revealing a doorway behind it.
Continue through the doorway to find a Riddler Trophy behind the gate. Use a Remote Controlled Batarang to hit the button at the bottom of the question mark beyond the gate. It's a little easier to do if you stand on the Riddler question mark on the other side of the hallway.
Collect the trophy, then grapple to the upper level where you must face off against a formidable enemy. Watch out for his blades and use the Beatdown attack (Circle / B, then rapidly press Square / X) to quickly take him out.
Hack into the panel to the right to open the door ahead. Move out to the ledge and then glide down and take out the enemies below. One is wielding blades, so be sure to counter his attacks and focus on him first. Once they're all down, speak with Stagg in the middle of the room.
Attack the enemies as they stand back up and continue attacking until they turn into Jokers. When one tackles you, prepare to shake him off. After a short cut scene, hack the panel in the corner to open the door, then walk toward the open door.
Objective: Destroy the weapon turrets on the second airship.
Hack the airship stability controls on the far side. There's a grate to the right of the controls, but you need to move the canisters on the level below to clear your path. Two of the canisters have red panels, indicating the magnetic lock is engaged. Access both canisters to remove the magnetic lock, then slide the ship to the left (facing away from the stability control panel). Now activate all of the magnetic locks except the second to last canister on the far side (away from the stability control panel).
Drop through the gate next to the stability control panel, then head through the maze of canisters to the far side. With the movements listed above, you should have a clear path. Climb up when you reach the far side, then head up the stairs and hack into the panel on the far side to open the door.
Grapple to the upper level, then head left and hack the panel in the left corner to open the doorway here, but you're not going through it yet. Instead, head in the opposite direction and grapple twice to reach the ventilation duck above.
In the next room are a number of enemies. Take them out, then access the computer terminal on the side of the room (on the upper platform). Zoom in on the screen in the upper left corner and move the footage to 8:51, then scan the cell on the second row, third column from the left. Shift to the panel in the upper right corner and move the footage to 22:71, then scan the third cell from the left on the bottom row. Shift to the panel in the lower left corner and move the footage to 37:21, then scan the cell on the far right column, third row from the top. Finally, shift to the panel in the lower right corner and move the footage to 51:59. Scan the second cell from the left on the bottom row.
Objective: Reconstruct Simon Stagg's right hand print to access turret control system.
Objective: Pursue Scarecrow across to the second airship.
Continue to the left, scanning the four places where Stagg left fingerprints. Access the computer terminal again, then head back to the cargo bay (you can go through the door you hacked open earlier but never went through). The guards are back in the cargo bay, and this time you can't hit some of them while they're electrified. Focus on the medics first (the enemies in white), then handle the rest.
Once the enemies are down, hack the panel in the corner and glide kick the window through the freshly opened hangar door. Take down the men in the next room, then use explosive gel to break through the cracked wall.
Access the stability controls in the next room and tilt the ship forward and back until the canister breaks the glass so you can get into the next room. Head through the broken glass to see a Riddler Trophy dead ahead that you can't access yet. Continue to the left and down the stairs, then use explosive gel on the cracked wall ahead.
Continue into the next room to find several canisters above. Remove the magnetic locks to move all of the canisters with the help of the stability control. There's a Riddler Trophy in the middle, but you can't get it just yet. Head to the right of the trophy and grapple up to the level above. Once you're up top, make sure all of the canisters do not have the magnetic lock and tilt the airship to move all of the unlocked canisters to the right (facing away from the stairs). Lock the canisters and tilt the ship in the opposite direction to move the one canister that does not have a magnet lock at all. This allows access to the grate below that drops down into the room with the Riddler Trophy.
Claim the trophy to open the gate, then head back the way you came and continue down the glass hallway to the left. Make your way to the end of the hallway and access the computer terminals as you progress. Use the computer at the very end to open one of the doors and allow access to the Riddler Trophy within.
Pick up the trophy, then head to the door to the left of the computer. There are several guards inside. Use the ventilation system to the left to take them out from the shadows, then head to the far side of the room and speak with Simon Stagg. Continue through the next door and try to take down one of the two Scarecrows ahead. Fight off the remaining enemies to watch another cut scene.
Objective: Rescue Oracle from Scarecrow's safe house.
Make your way to the roof of the safe house at the next waypoint and head through the door. Walk toward the glass prison for another cut scene that completes this main objective.


