GTA Online: The Cayo Perico Heist setup | Madrazo Files, Scoping Targets, Prep Missions


For the first time since 2013, GTA Online has left the mainland. The Cayo Perico Heist takes players to a private island off the coast that plays host to elegiac drug lord El Rubio and the Madrazo Files, which you need to steal as part of the multiplayer mode’s latest big score.
Given the scale of the operation, setting up and pulling off The Cayo Perico Heist is no small feat, especially if you’re flying solo. That’s why we’ve put together this guide to help you figure out how to carve a clean path through the scoping sequence and the heist preparation missions.
With our help, you should be able to topple El Rubio’s militia in any fashion you choose, returning home with millions of GTA Dollars in your duffel bag.
How to find the Madrazo Files on Cayo Perico

Before you start the prep missions, you need to scope out the island, but first, you need to secure passage there. Once you purchase the submarine, start the ‘Gather Intel’ mission at the planning table and use the on-board fast travel to move to Vespucci Beach.
You’ll need to head to the airport to reach Cayo Perico, so use the Services menu to summon a Dinghy and travel to the yellow marker.
After several cutscenes, drive El Rubio to the party and dance to the Keinemusic set for as long as you see fit. Once you’ve had your fill of doing Big Fish, Little Fish, Cardboard Box, you need to sneak out of the South Gate, which should be simple enough. The guards patrol in a predictable path — just be patient and make your way around them.
Once outside, if you get spotted from here on out you will be dragged back to the party, so watch out for the vision cones of guards on your mini-map. You won’t have any weapons here, and using vehicles is useful but dangerous. If the guards hear the engine they’re going to come after you, so use cars and bikes sparingly.
At the first checkpoint to your right, watch for CCTV and sneak past the guards directly by heading through the trespasser-marked door.
Keep away from the roads and follow the yellow marker to sneak to the main gate, and Pavel will tell you to find the island’s communication tower. As you might imagine, it’s relatively easy to spot, but the game will give you a yellow circle to help out regardless.
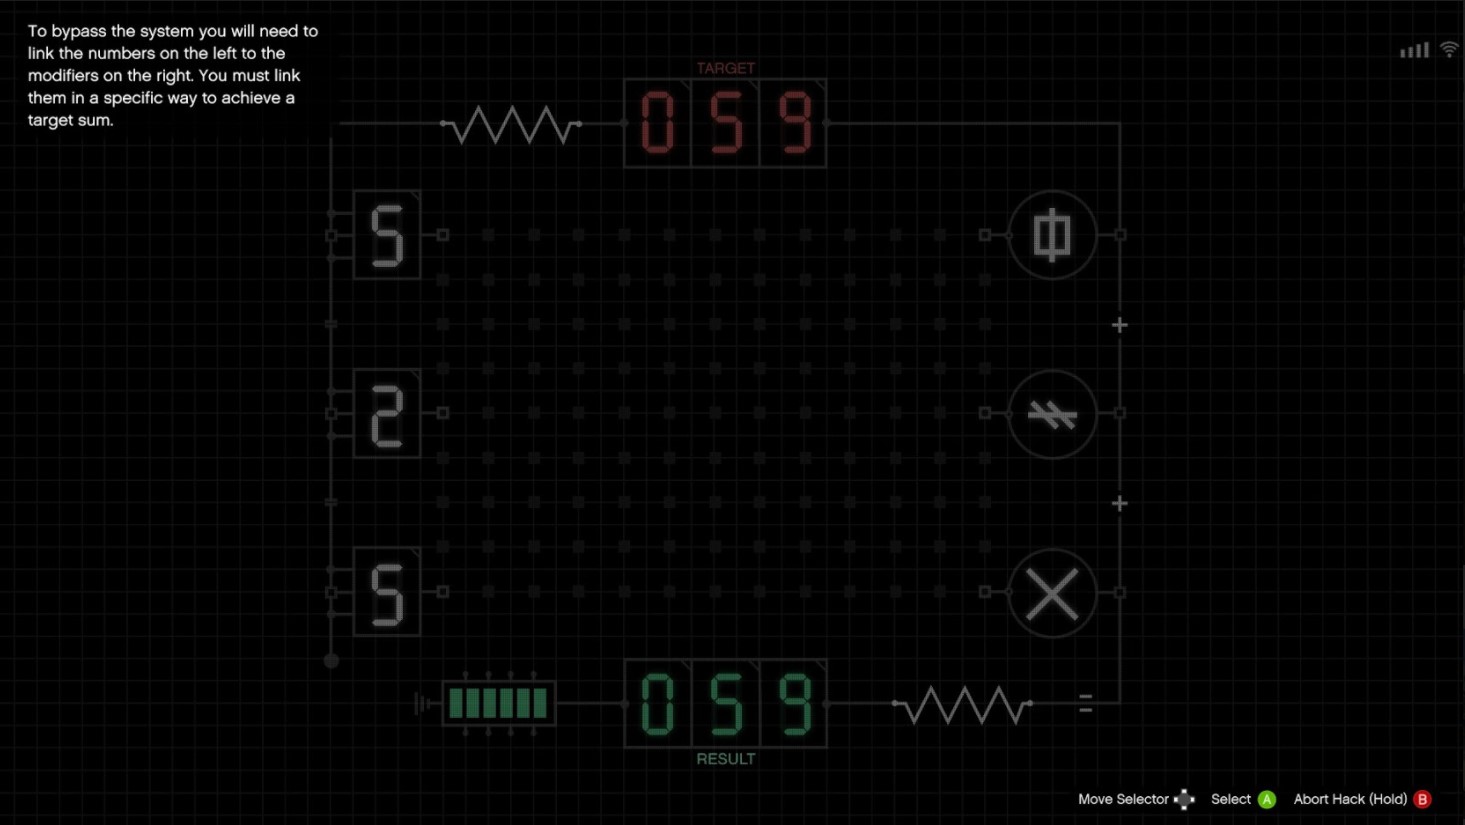
Sneak over to the gigantic tower, climb up and then solve the signal puzzle. You’ve got to match the number at the top of the screen by combining the numbers on the left with the symbols on the right that double, divide or spit out other mathematical solutions. The results are random, so keep trying different combinations until you get it.
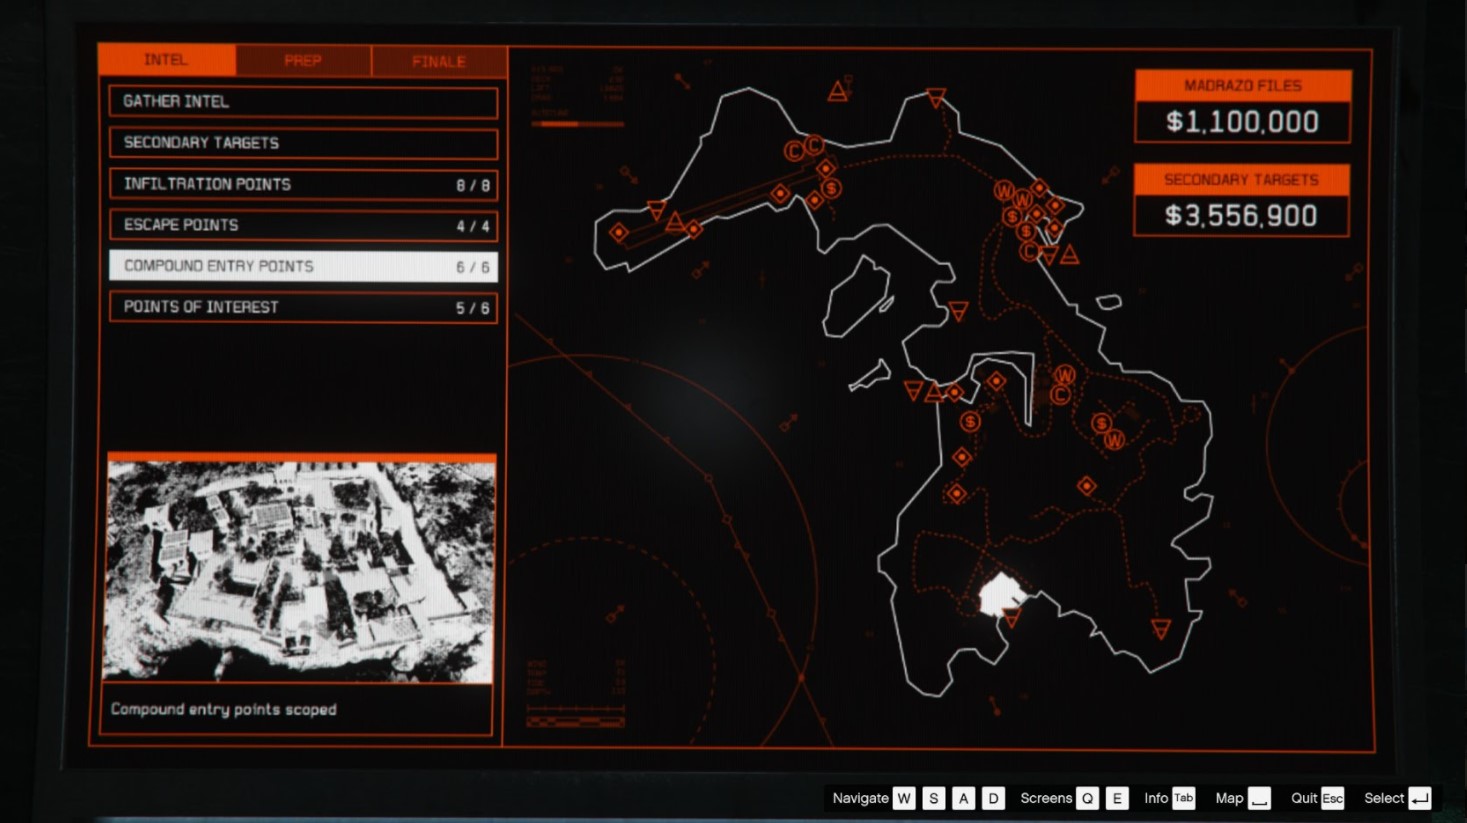
Once you’ve done that, you’ll be able to access the island’s security cameras and scope El Rubio’s compound. Make sure you move the camera as far left and right as you can in every viewpoint.
Doing so will unlock several infiltration points for the inner sanctum. You should also look for paintings, gold, blow, and weed to add to your secondary loot targets when you’re on the cameras. They’re difficult to miss, honestly, so don’t worry too much about it, just be thorough.
You’ll eventually get to see the Madrazo dossier you need to steal as part of a scripted camera sequence. Once that’s over, you’re left to look through all the cameras. After another pass to make sure you’ve seen everything, jack out.
The Cayo Perico Heist Scoping Missions
At this point, the island is your oyster. You can explore to your heart's content, and you should because just like The Diamond Casino Heist, you’ll have far more options when you start the heist if you thoroughly scope it out.
Just keep in mind that you’ll get sent home if you get caught by the guards too many times — or if you get spotted by the search helicopter, which arrives if you spend too long on the island.
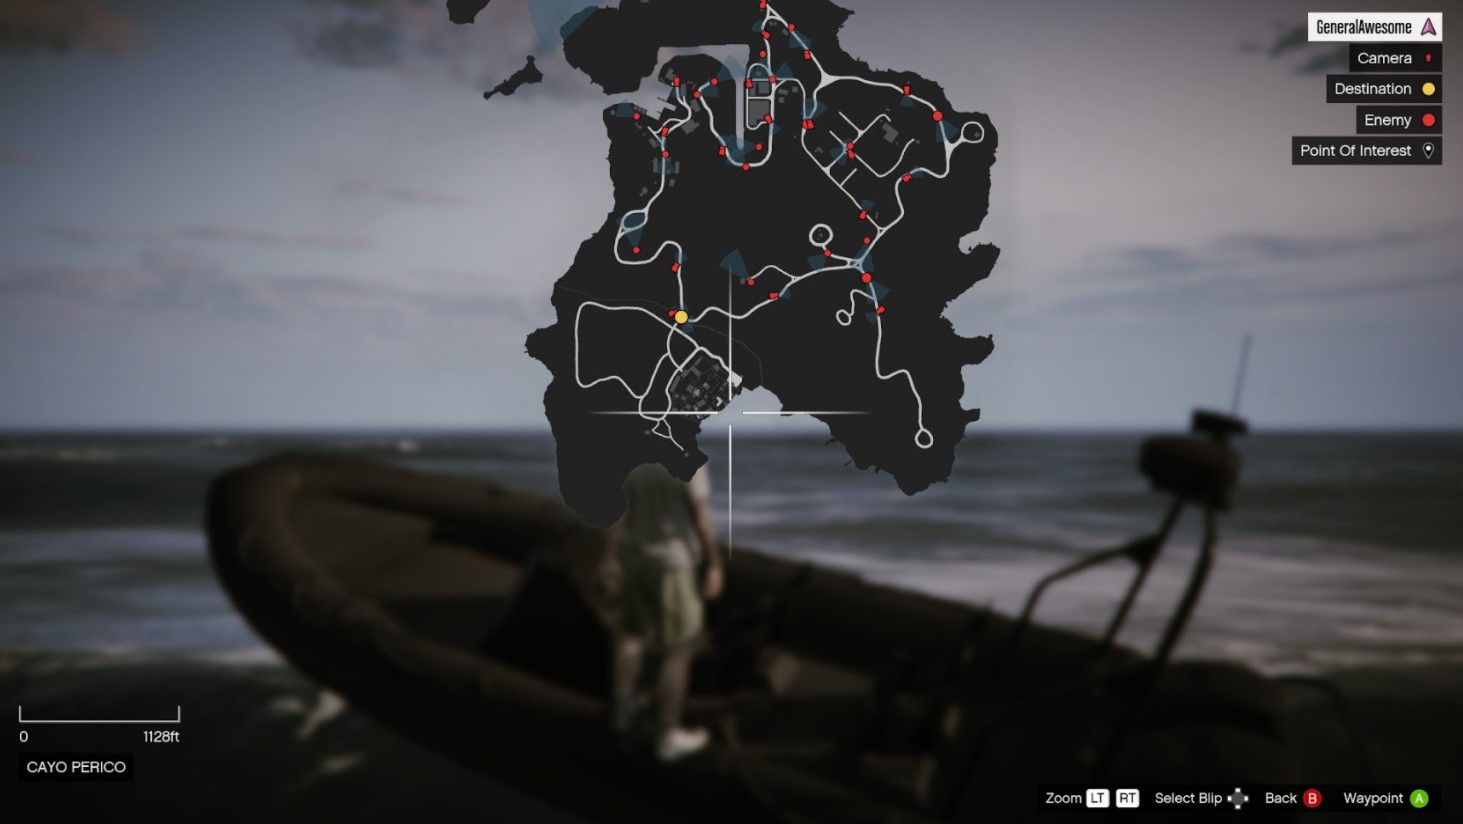
You can photograph Infiltration Points, Escape Points, Secondary Targets, Compound Entry Points, and Points of Interests on Cayo Perico using the Snapmatic app on your phone.
Pavel will lead you to some of these locations before you leave as part of a mandatory sequence, but the lion’s share of these scoping targets will have to be found by the player via exploration. You can return as much as you like if you need to head back to Los Santos first.
These hidden extras lead to optional preparation missions and extra avenues for success during the finale. You don’t have to find them all to complete the heist, but it’s worth finding a few of them after completing Pavel’s mission to smooth out the entire experience.
Keep in mind that for items like the Bolt Cutters, Guard Clothing and Grappling Hooks, you only need as many as there are people in your heist team. So don’t fret about getting them all if you plan to take the heist solo, or in a duo or a trio. You’ll only have limited space in your duffel bag if you’re playing solo too, so it’s not worth finding every secondary resource as you won’t be able to carry it.
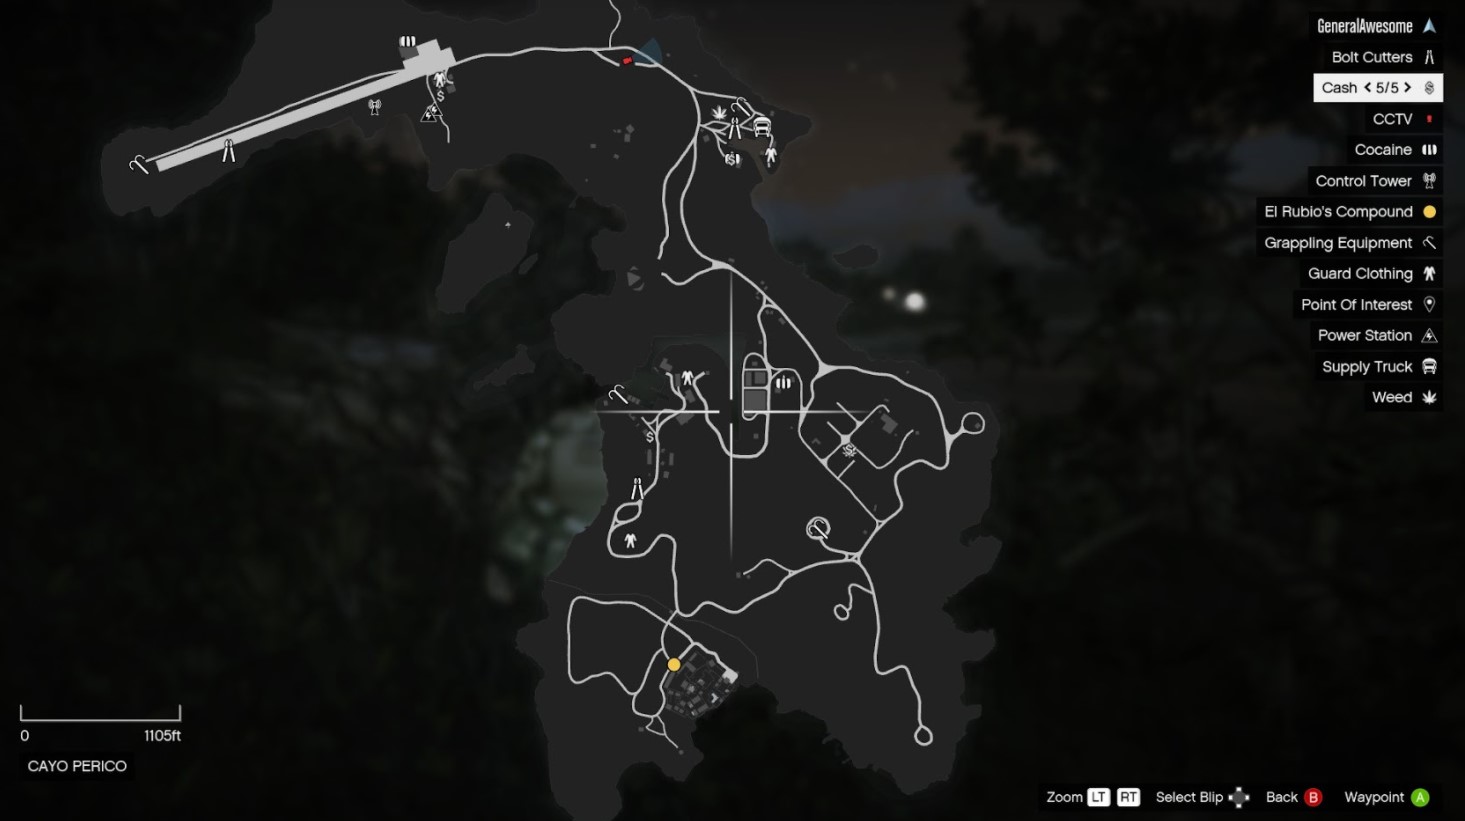
You can see my completed map of the island above, which should point you towards all of the scoping targets I’ve found. This handy Reddit map will show you all of the randomised spawns too if you’re struggling.
Infiltration Points, Exfiltration Points and specific Points of Interest are static for everybody, but secondary targets like Weed, Cash and Cocaine and tools like Bolt Cutters and Grappling Hooks are placed randomly for every player.
Essential Cayo Perico Scoping Targets, Explained
Control Tower

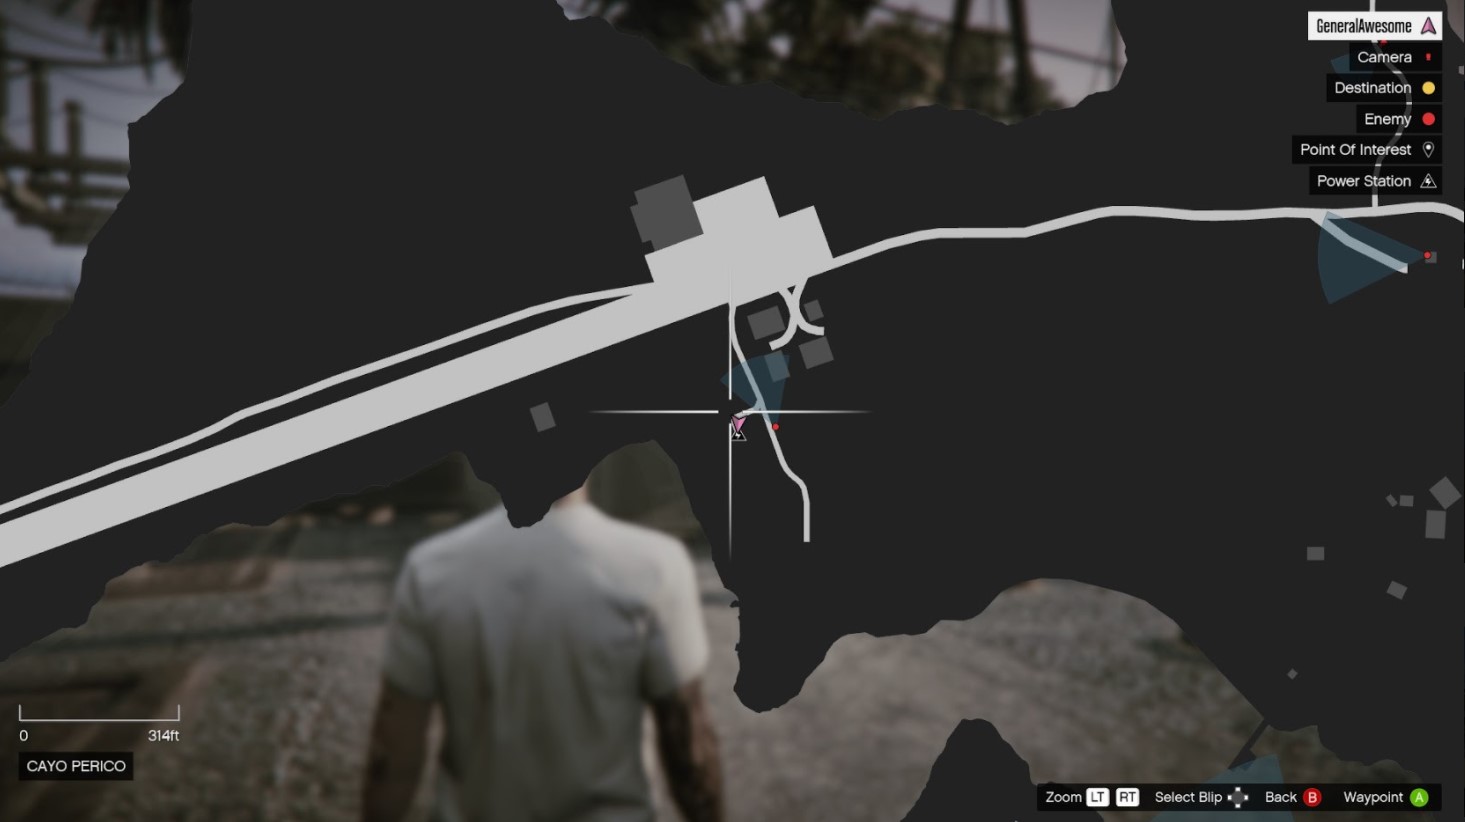
If you head left from the starting gate back to the airstrip where you came in, you can find a Control Tower on the left at the end of the strip. Scan this, and when you take on the actual heist, you can sneak in and deactivate El Rubio’s air defences, which allows you to summon airstrikes, helicopters and other Support Crews.
Power Grid
Just east of the Control Tower there’s a road that leads out towards the rest of the island. Follow it and snap a picture of the caged power grid. This will let you deactivate all of the lights and CCTV when you land on the island for the final heist, which makes sneaking around so much easier.
Drainage Tunnel
If you swim to the back of El Rubio’s Compound at the bottom of the map, you’ll find a dinghy. Hop in and get close to the inner sanctum to unlock the underwater Drainage Tunnel Infiltration Point. This is the best way to stealthily heist the island, using the Kostaka as your approach combined with a scuba suit. You’ll need to do the Cutting Torch optional prep mission to make it inside.
Supply Truck
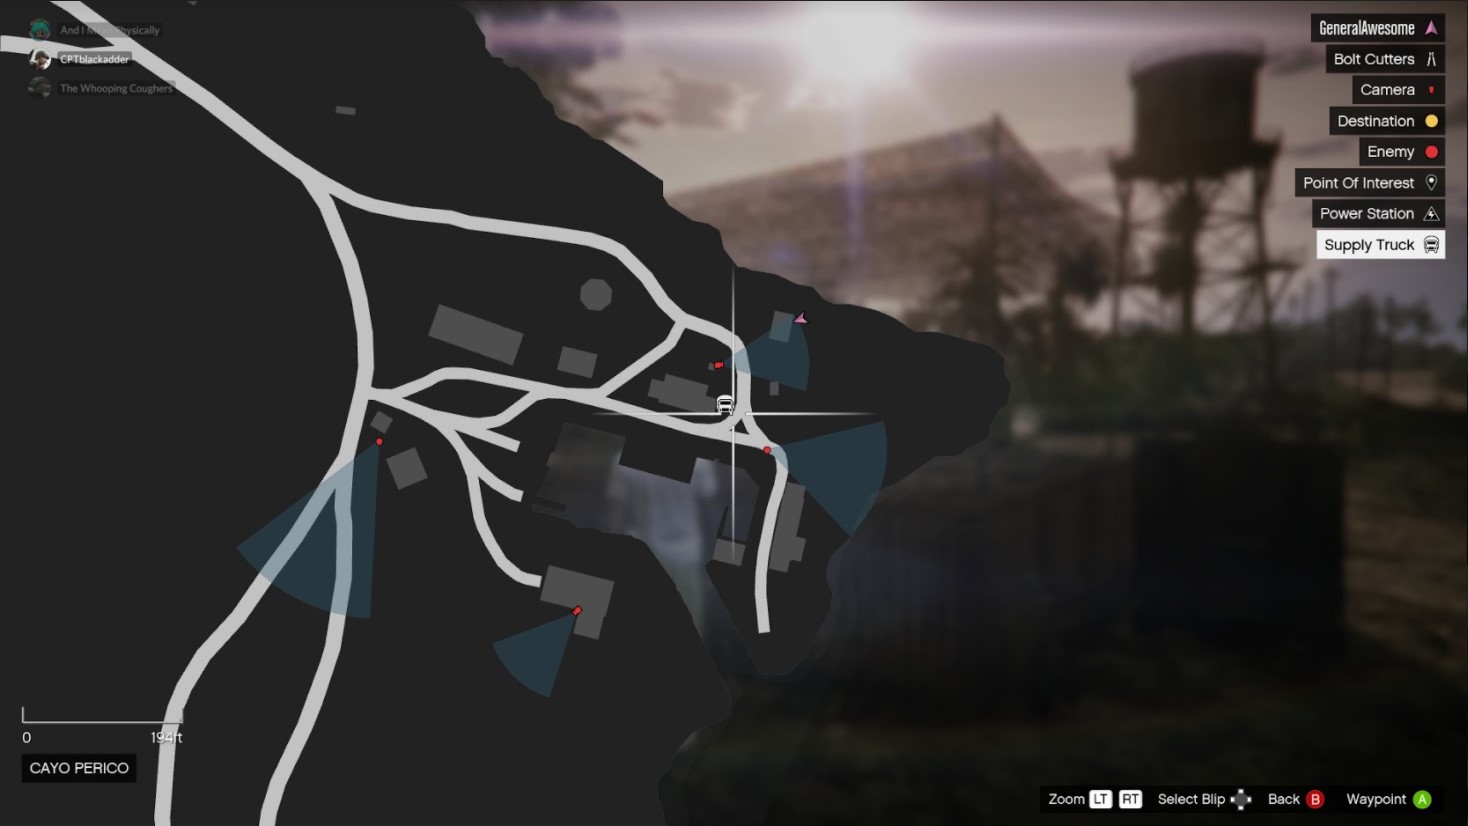
Like the tools, this POI appears in random spots. I found mine in the North Dock in the top-right corner of the map. If you steal it, you can disguise your way through the main gate of the compound, if you drive with confidence.
Cutting Powder

Another randomised spawn, I found mine on the farm at the far right of the lower map. If you head to one of the island’s water towers, you can damage the water supply and weaken El Rubio’s guards.
Guard Clothing

There are four pieces of Guard Clothing on the island, one for each heist member. I found mine in the cafe area on the airstrip. If you change into them, you will be less likely to be detected by El Rubio’s guards.
Bolt Cutters
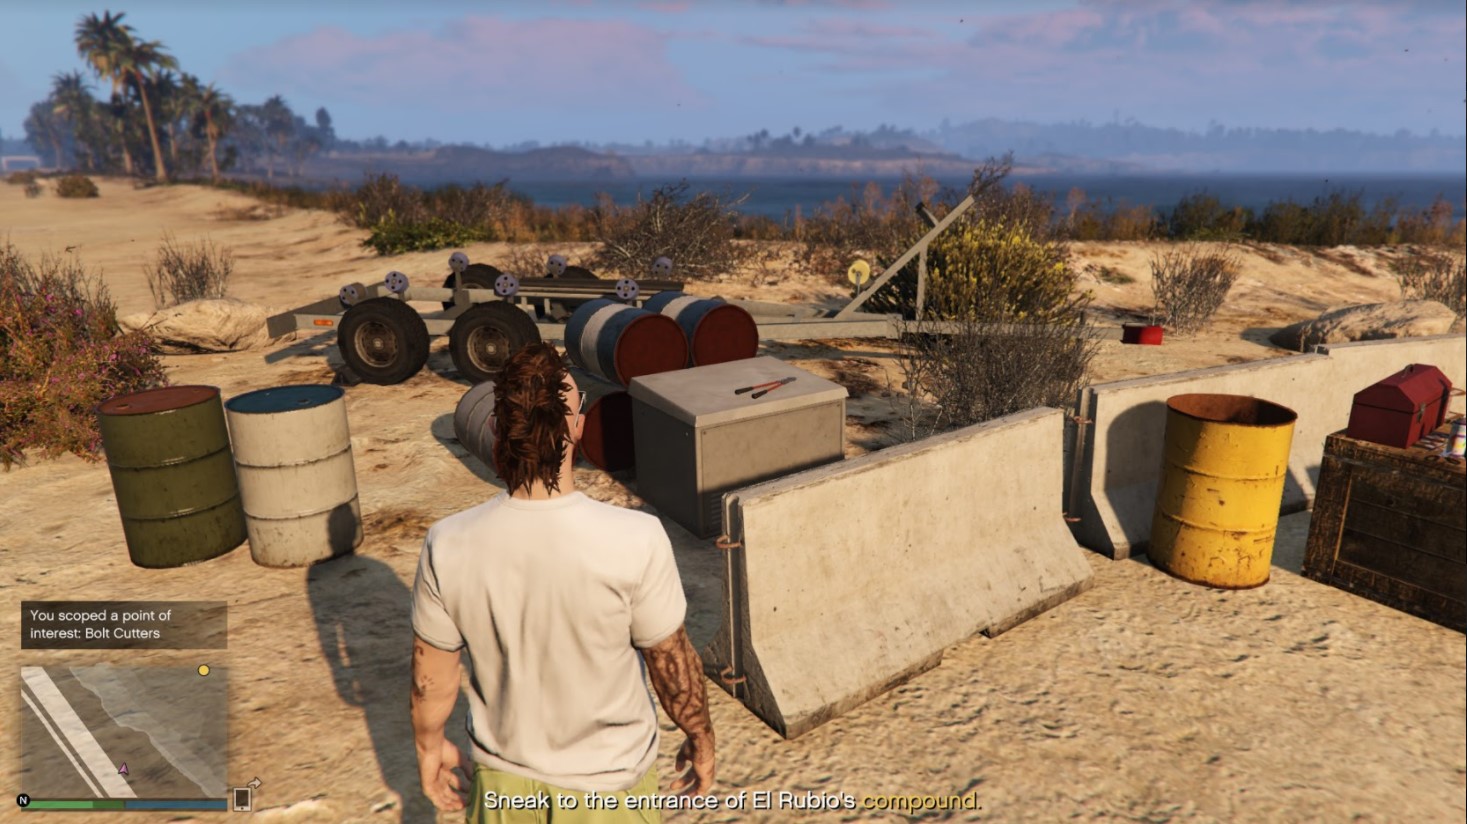
There are four pairs of Bolt Cutters on the island. I found mine halfway up the airstrip, on the left. You need them to open gates to get the Cash, Weed or Cocaine you have marked, and access the Power Grid to turn off the cameras.
Grappling Hooks

Four Grappling Hook bags can be found on the island. I found mine by climbing up the water tower at the North Dock. This will let you climb over one of the walls of El Rubio’s compound, which is better than going through the front door!
Secondary Targets
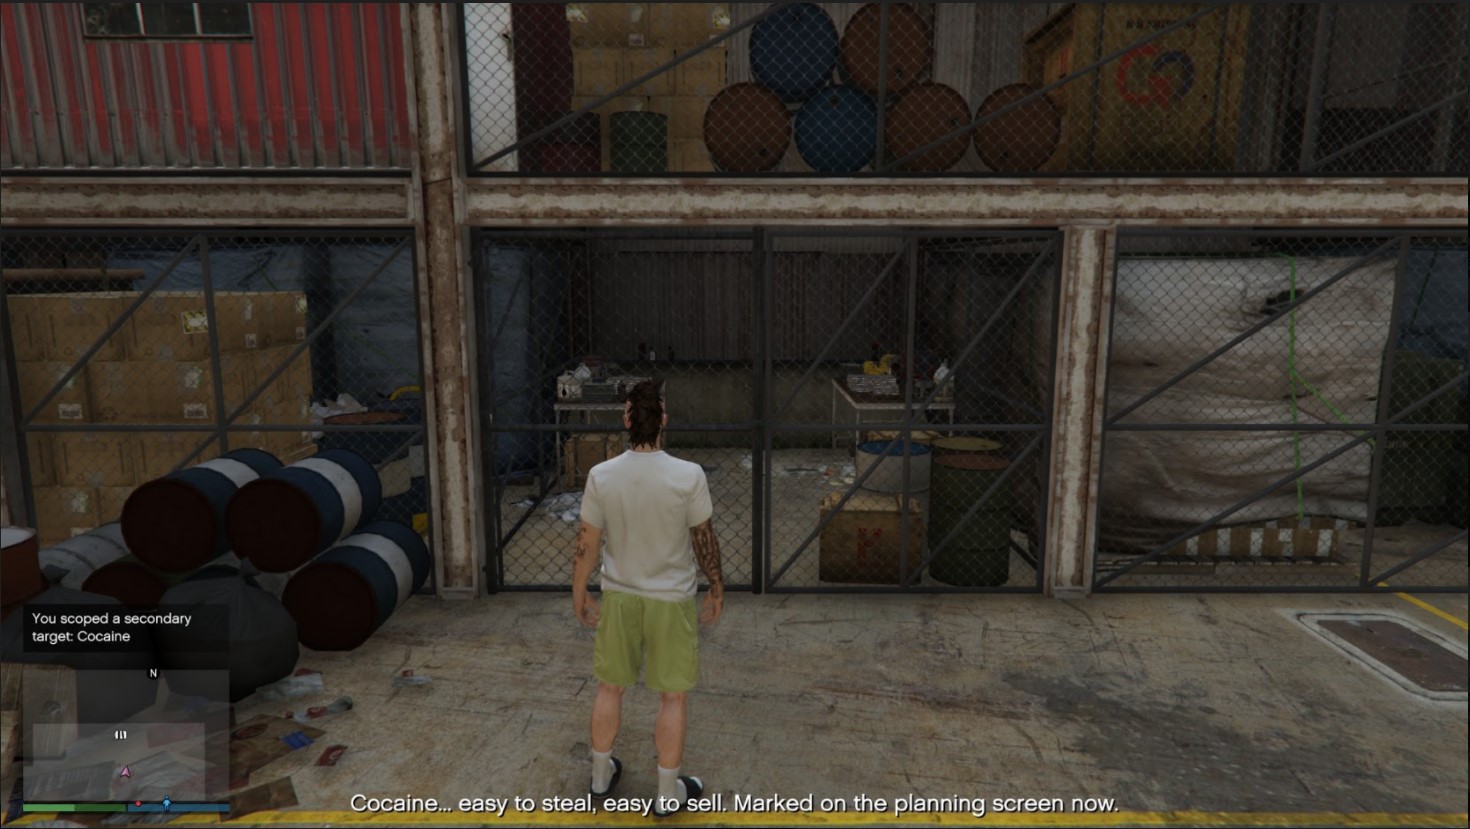
You’ll find Cash, Weed, Cocaine, Gold and Paintings in warehouses all over the island and on the cameras (accessed by the Sightseer app on your phone). I’ve found that you can stash two secondary targets in your loot bag before its full, so that’s roughly eight potential secondary targets for a full team of four.
Infiltration Points

Use the map above and take pictures of each clustered zone on the island to find the missing infiltration points following the first mission. Picturing an Infiltration Point also unlocks it as an Escape Point. The Drainage Tunnel is the only tricky one - it’s at the back of El Rubio’s compound, underwater.
- Airstrip
- Halo Jump
- West Beach
- Main Dock
- North Dock
- North Drop Zone
- South Drop Zone
- Drainage Tunnel
Escape Points
- Airstrip
- Main Dock
- North Dock
- Kosatka
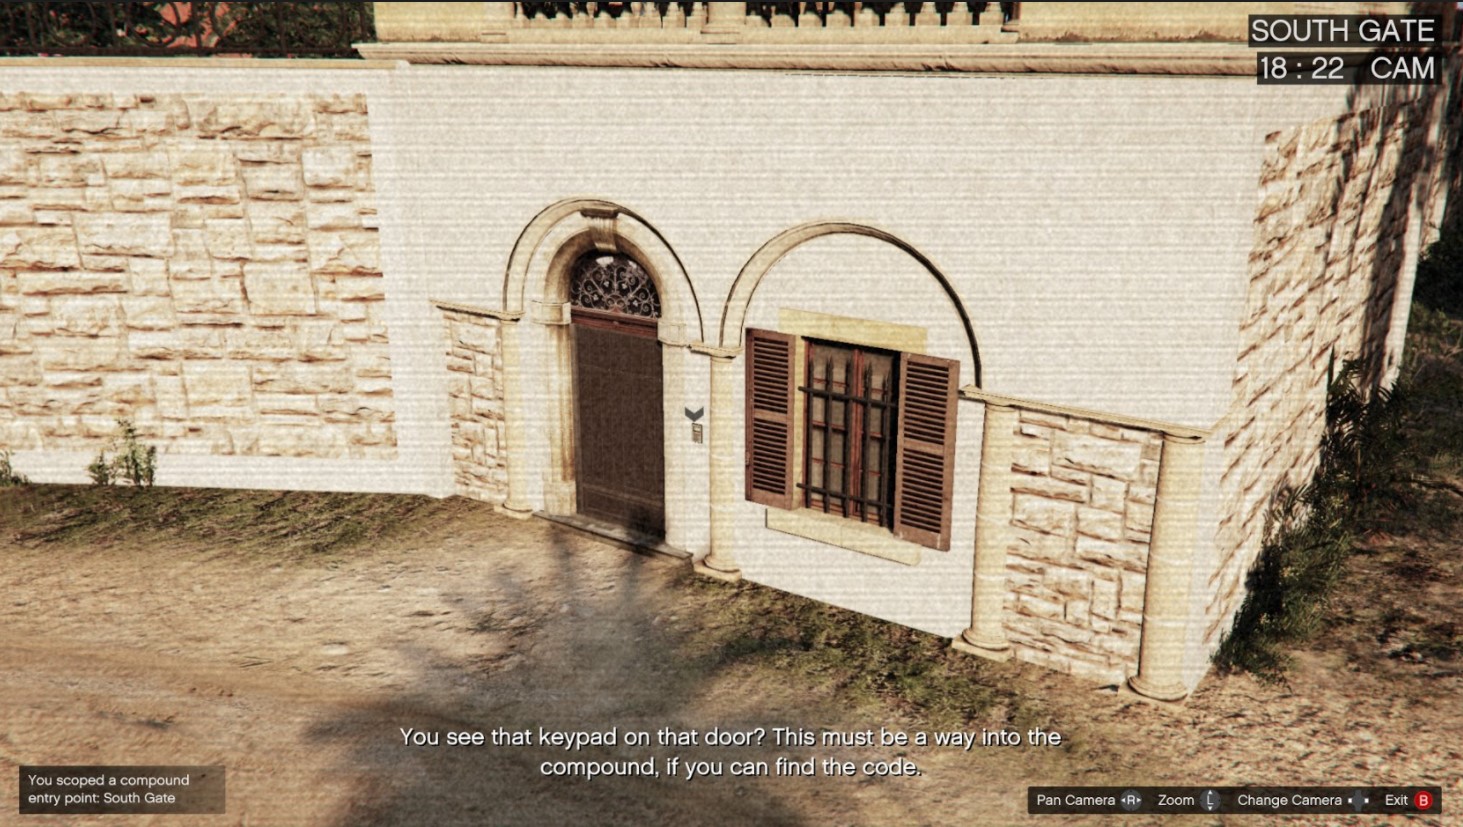
Compound Entry Points
You’ll unlock them all by thoroughly viewing the cameras in the first mission, except for the Drainage Tunnel.
- Main Gate
- North Wall
- North Gate
- South Wall
- South Gate
- Drainage Tunnel
Cayo Perico Heist Prep Missions Guide
The Cayo Perico Heist’s prep missions are split into four sections, each with their own sub-missions.
Approach Vehicles
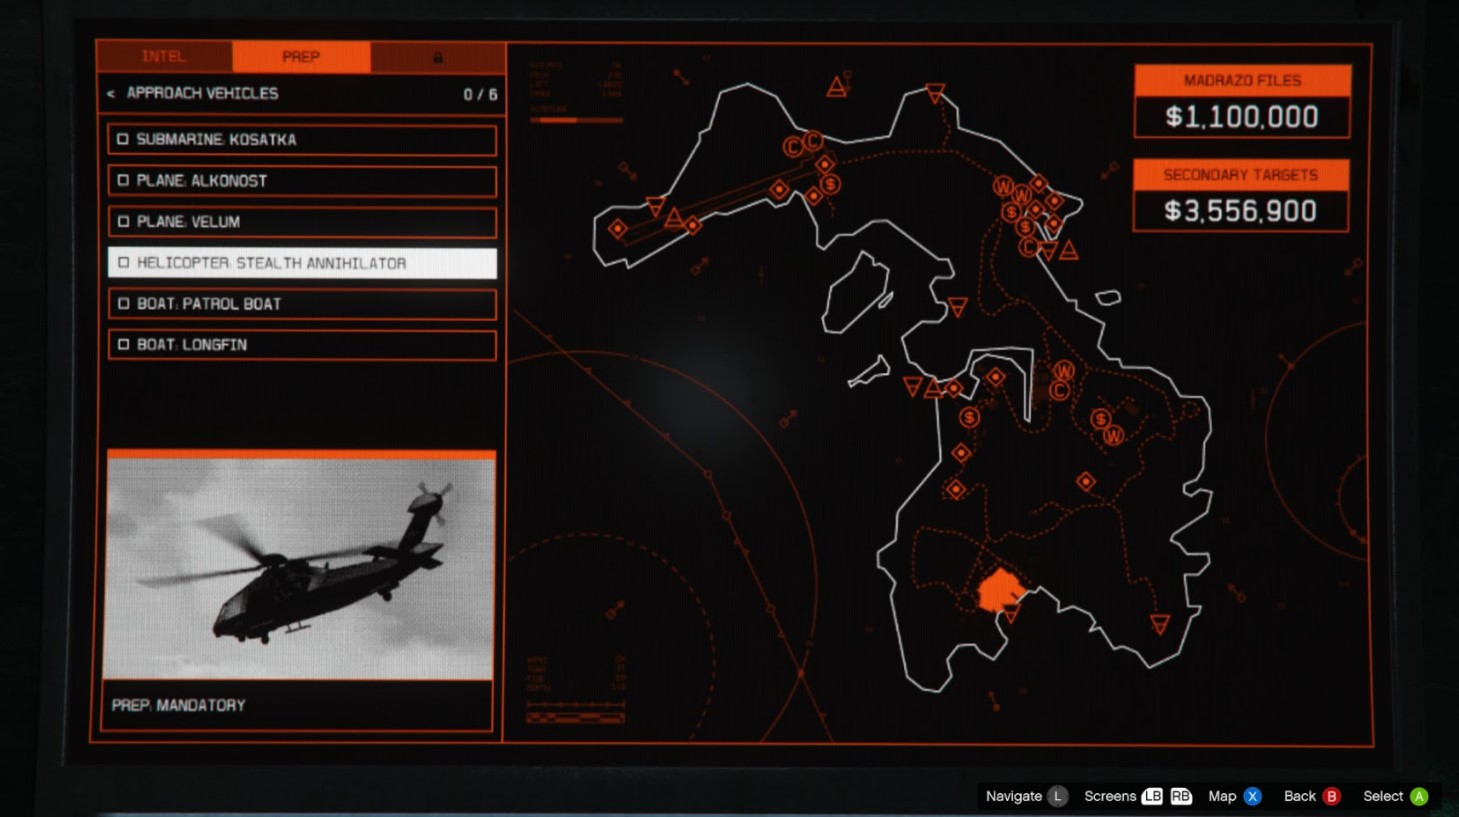
- Kosatka
- Alkonost
- Velum
- Stealth Annihilator
- Patrol Boat
- Longfin
You need to complete one Approach Vehicle mission to prep the heist. I picked the stealth helicopter as my approach vehicle, purely because it’s the only option with a two-part mission — and it’s a stealth helicopter!
The Cayo Perico Heist preparation missions are all very straight forward. You’ll be sent to kill agents on a boat, deactivate air defences and then fly the chopper to a hanger nearby. It takes a few minutes.
The pilot mission that follows has you killing creditors in Vinewood Hills, and then escaping the cops. You’ve seen it all before. No danger!
Weapon Loadout

- Aggressor
- Conspirator
- Crack Shot
- Saboteur
- Marksman
- Suppressors (bought with cash)
In this section, you need to complete one Weapon Loadout prep mission. You’ll have to follow a helicopter from Merryweather HQ to an Avenger aircraft. Clean up the area, head inside the Avenger and pick up your loadout. You can then take it to your submarine.
Equipment
Demolition Charges
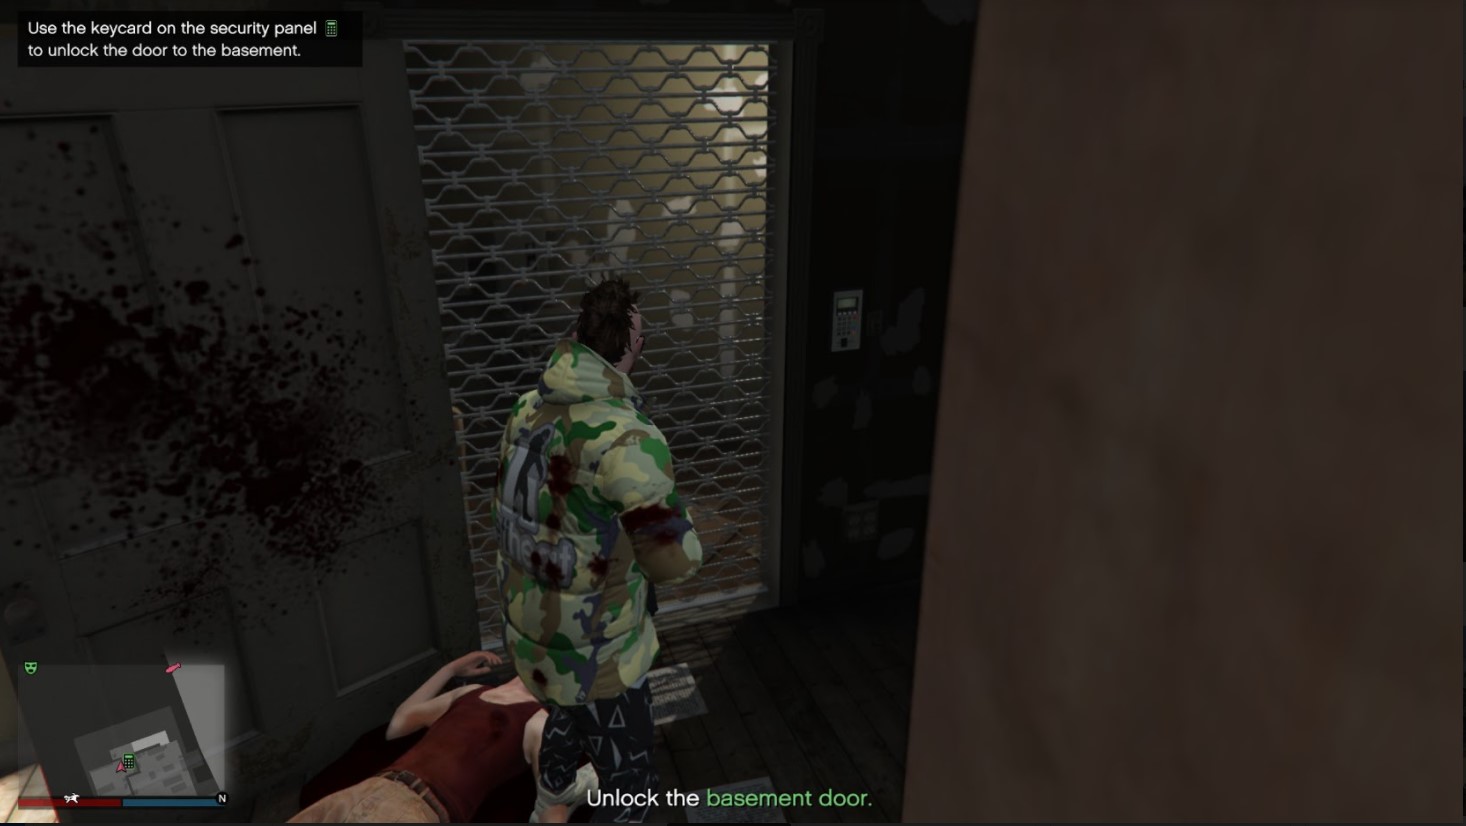
In this mission, you head to the O’Neill Ranch and wipe out an army of guards. You need to collect a keycard to unlock the basement where you’ll find the charges, which you then have to take back to the Kosatka.
Safe Code
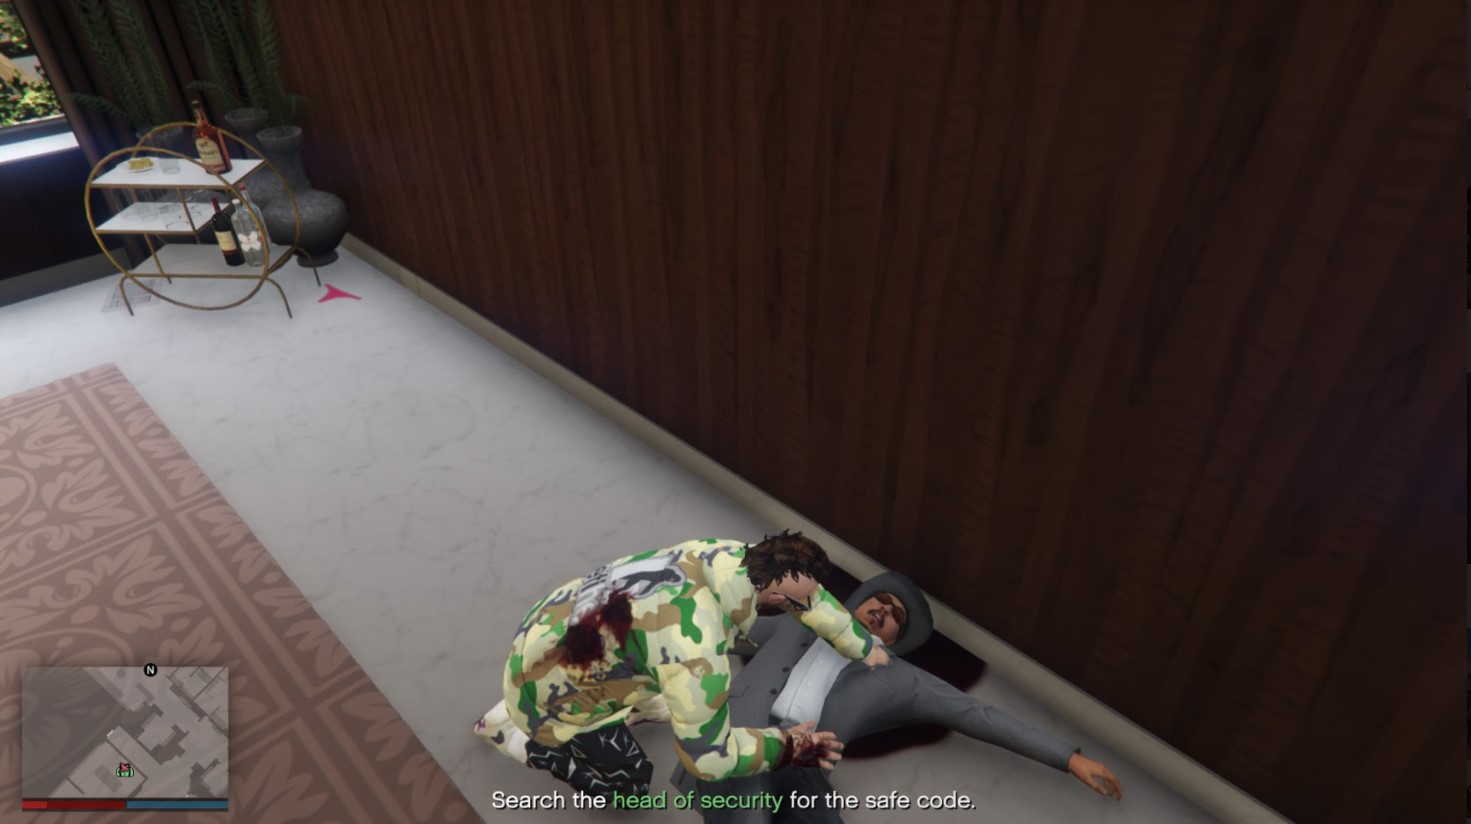
Go to the casino and Pavel will text you an image which you must use to find the head of security inside the penthouse. Kill everyone and retrieve the codes from his corpse.
Fingerprint Cloner
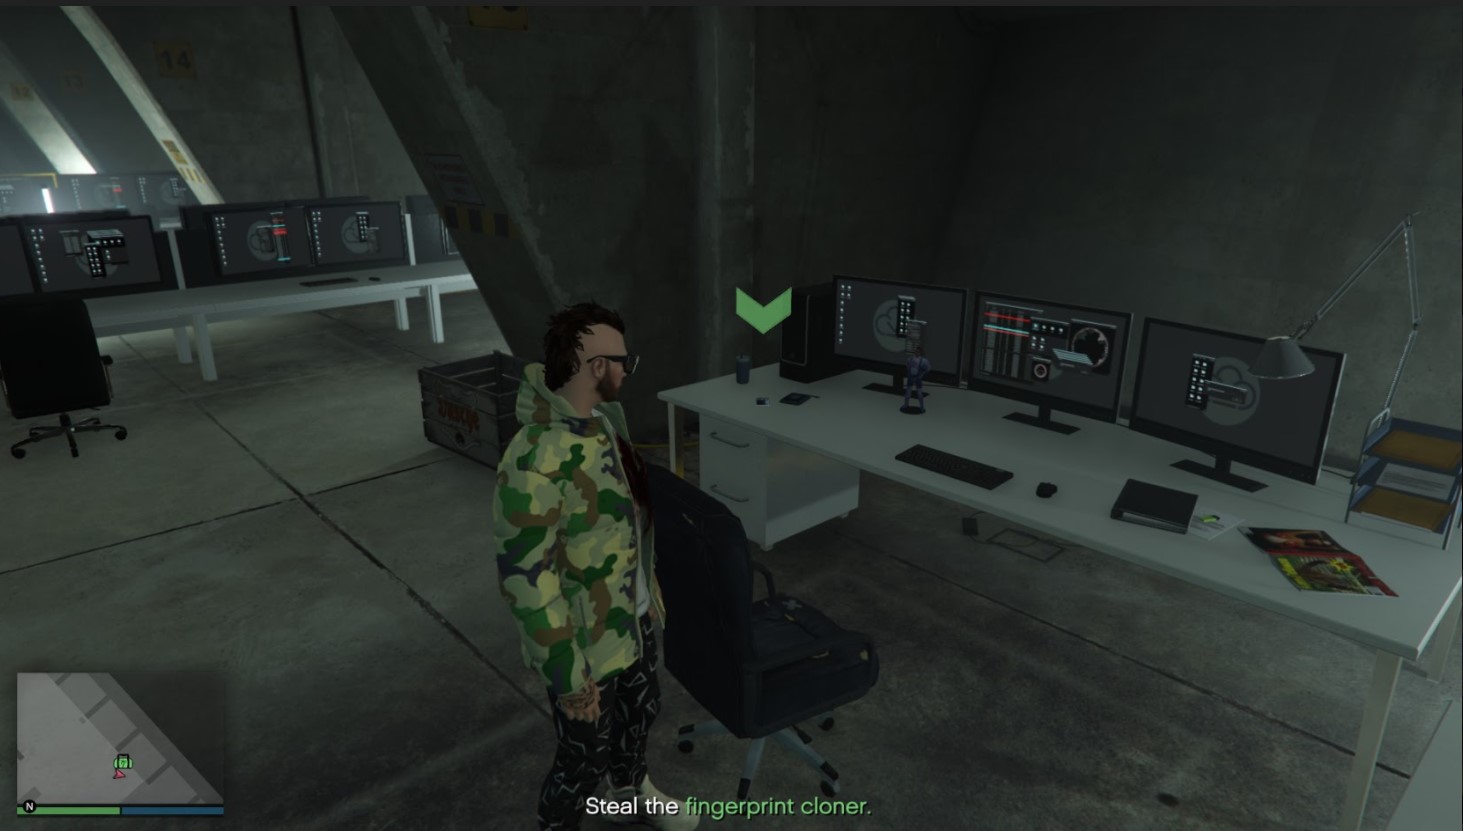
You’ll head to a warehouse to hack a laptop and then make your way to an archive, where you need to find a small fingerprint cloner. Waltz around the desks until you see it — it’s tiny!
Cutting Torch - Optional
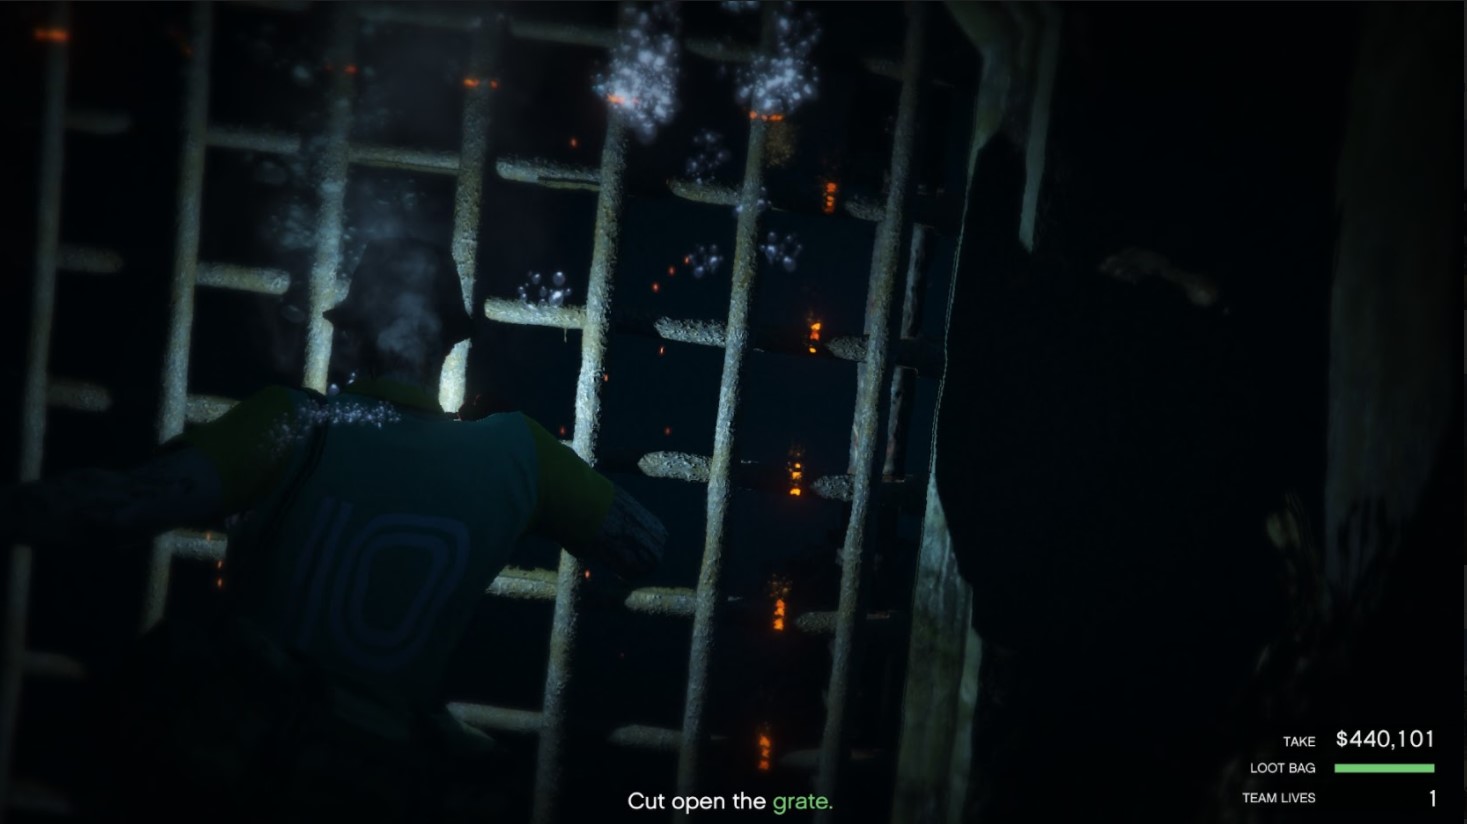
You’ll be sent to a warehouse full of guards. Wipe them out and search the toolboxes to get a cutting torch, which you need to use the Drainage Tunnel Infiltration Point.
Disruption

- Weapons
- Armour
- Air Support
These final few missions are optional but very useful, as they weaken El Rubio’s defences on the island. You’re taking out arm dealers, buzzards and shipments on a 10-minute time limit.
Keep in mind that you only have one shot at each of these missions per Heist Prep, so try not to make any mistakes. Before you kick off any Disruption mission, get your submarine near the shore, and make sure your personal vehicle is close by so you can quickly zip around the map.
If you have an Oppressor Mark II or any other weaponised flying craft, these are a piece of cake.
Hire Support Crew
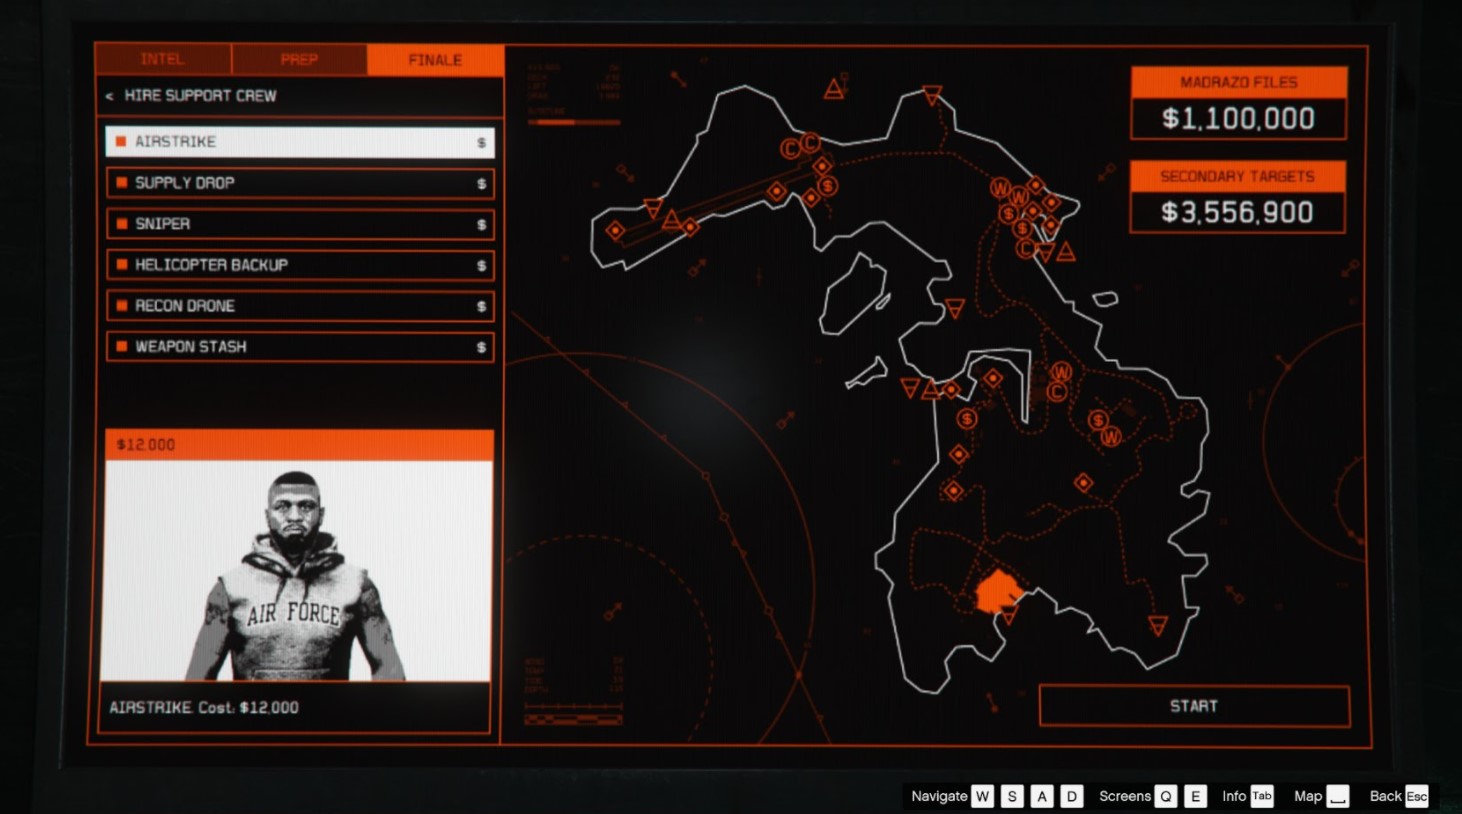
- Airstrike
- Supply Drop
- Sniper
- Helicopter Backup
- Recon Drone
- Weapon Stash
When you start the finale, you’ll also be able to pay to unlock a series of Support Crew teams to make things a little easier, accessible from the services menu in-game. However, for the air-focused Support Crews, you need to disable the Air Defences via the Control Tower we mentioned earlier, once you infiltrate Cayo Perico.