Resident Evil 2 Remake - S Rank Leon A walkthrough Part 3: return to RPD and meet Mr. X

You’ve got the first Electronics Part in Part 2 of our Resident Evil 2 Remake walkthrough, and now you’re back inside the Police Station looking for the second one.
First up, you need to leave the safe room and head back around to the Watchman’s Room - but be careful, there are loads of new zombies around. Deal with them and use the Electronic Part you grabbed from the safe room to open the shutter ahead.
Leon A Guide Parts 1-6:
- Part 1: RPD
- Part 2: Parking Garage and Kennels
- Part 3: Mr X
- Part 4: Kendo, Alligator, Ada Wong
- Part 5: Sewers and Chess Puzzle
- Part 6: Nest Lab and Plant 43
Resident Evil 2 Remake S Rank guide for Leon A - Meeting Mr. X

Once you’re through the Watchman’s Room, you want to run outside to your left and up the fire escape. Follow the corridor around, past the Art Room, and use the Tool on the shutter mechanism ahead. You can discard the Tool afterwards. Once through the shutter, head straight up the stairs ahead and to the right. Check the lockers at the top for some ammo and a flashbang.
Now head through the door that leads to the storage room, not outside. There are some enemies in here, but they can be easily avoided - you just need to grab the Large Gear. Now head back to the room with the lockers in it and head outside onto the balcony. Climb down the ladder to trigger a cutscene.
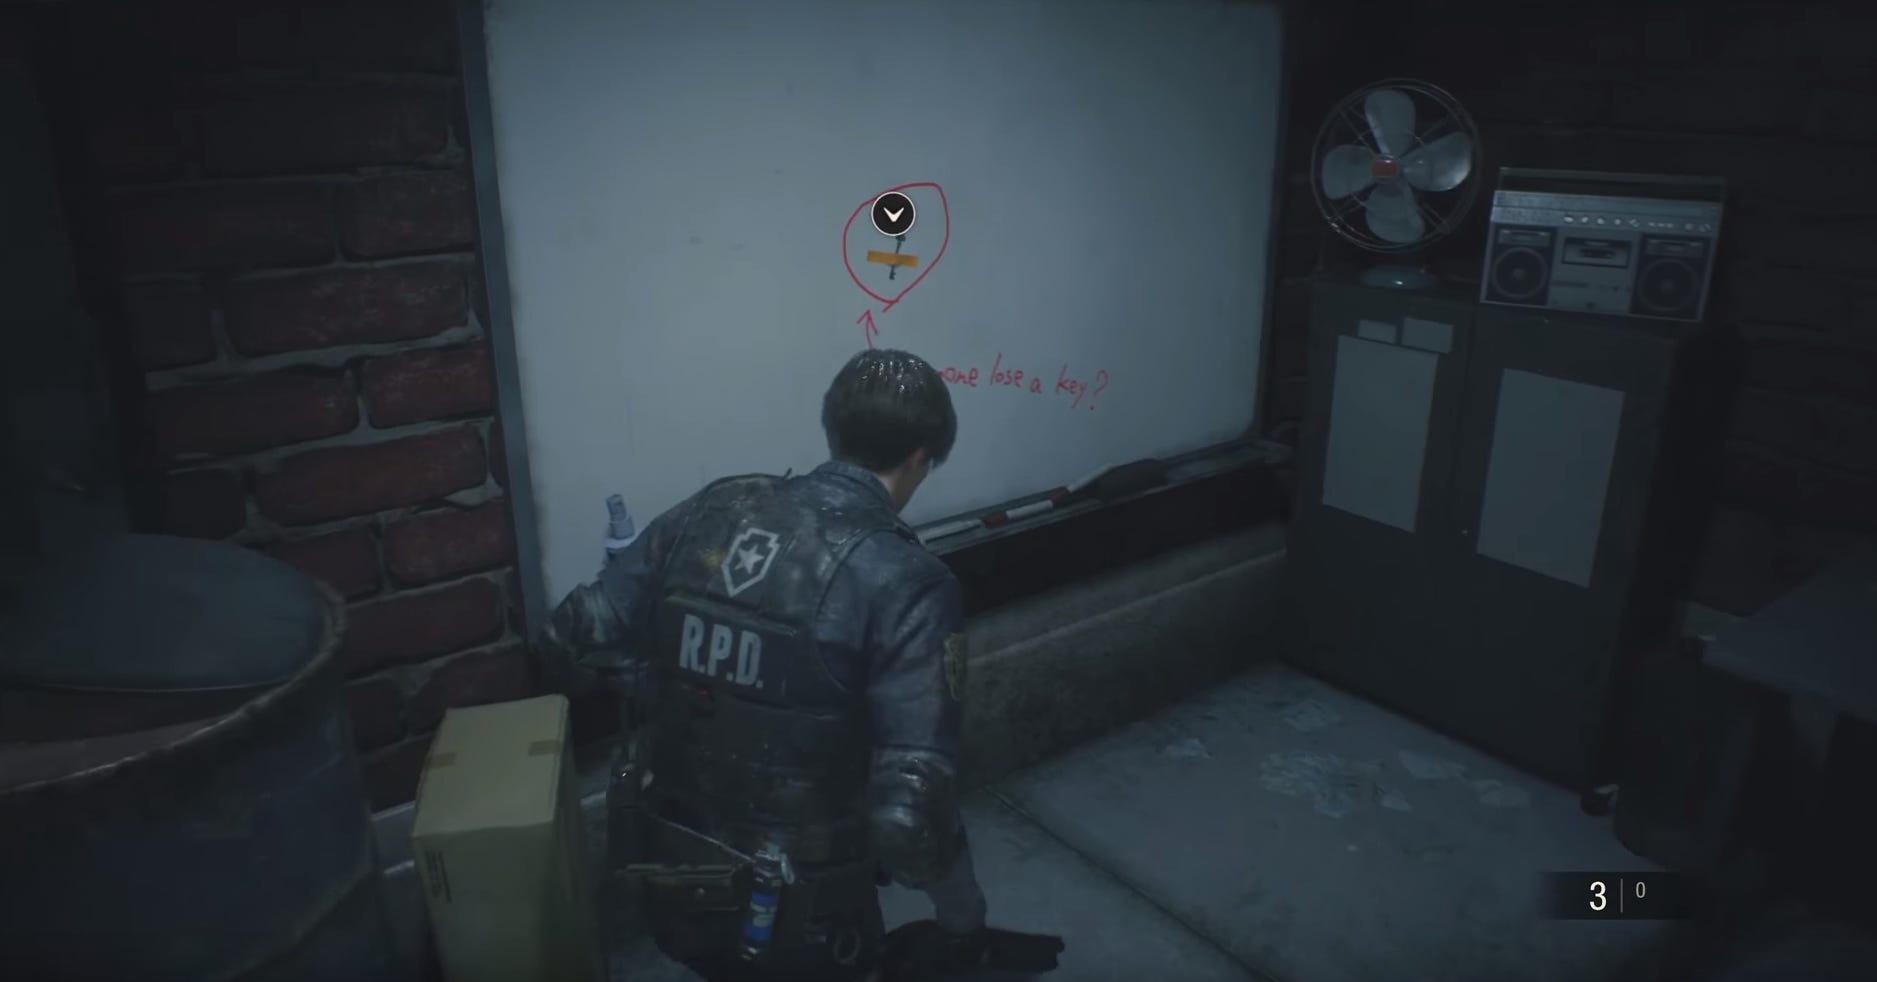
As you can see, your route forwards is blocked by a flaming helicopter. You need to head down the stairs opposite it. You can find two Green Herbs at the base of the stairs. There’s a door opposite the herbs and some zombies trying to break through. Get close to and wait for them to open the door, then take them out, pull the lever to the left of the door, then head into the room. There’s a safe room inside so you can organise your gear - keep the key items on you that I mentioned in Part 2 of this guide and store away any Wooden Boards or other stuff you don’t need. Make sure you grab the Club Key from the whiteboard and keep that on you as well.

Now head back up the stairs outside and pull the lever to the right of the helicopter. Now you can enter the door to the left of the chopper, which will trigger the arrival of Mr. X. Shoot his hat off for a Trophy, then run back outside, kite him around, get around him, then back through the door where he appeared and follow the corridor.
Head back down the fire escape and past the Watchman’s Room, then head through the East Office and back to the Main Hall. From here, head through the West Reception towards the Records Room, which you can now open with the Club Key. Be careful, the west corridor is filled with threats. Run past what you can and deal with anything blocking your way, but be aware that Mr. X is still dogging you. You need to grab the Tool from inside, which you need to use on the bookcase in the Library.
Head out of the Records Room and follow the corridor around to the north. Head through the Operations Room and jump through the window on its east side. The corridor here has two lickers, zombies, and probably Mr. X in it. It’s pretty brutal, but you can either leg it through our try take the lickers out first. Either way, you want to make it up the stairs near the Dark Room and through the locker room where the steam vent was earlier. Keep following the corridor around until you reach the Laundry Room, then use the Diamond Key to get inside. You can discard it once you have.
There’s another Portable Safe in the Laundry Room - solve it to get the second Spare Key needed for the Safety Deposit Room. Now head back into the corridor and through the door where the Unicorn Statue is, then into the Library. Head to the movable bookshelves. If you moved the other two earlier as I suggested in Part 1, you simply need to use the Tool on the bookshelf that’s stuck, then drag it right once, grab the one to its left and drag that right once. Now you can head up the nearby ladder and cross over the top, bringing you onto the upper balcony.

Follow the balcony along, deal with the zombie ahead, then enter the door on your right and go into the Clocktower. When you enter, use the Large Gear on the machine to your right, then immediately remove the Large Gear and carry it up the stairs with you. Go right to the top, remove the Small Gear from the machine up there and replace it with the Large Gear. Now take the Small Gear to the middle level and use that on the machine there. This should cause the bell to ring, knocking a box of Electronics Parts to the lower level of the Clocktower. Head down, pick it up, and examine the box to dig out the part.
Now head back onto the balcony and follow it around to the other side. You can enter the East Storage Room from here by unlocking the latch on the door. Head straight through, then go down the stairs two floors. There’s a door locked with the Club symbol down here. Use the Club Key to enter, then discard the key. Grab the Blue Box from off the table ahead. You can also jump through the broken glass and grab some Handgun Ammo, and there’s some Gunpowder in the first room. Once you’re done, head back up the stairs to the next floor up.
From here, head west, through the Waiting Room and back into the Main Hall. Go to the storage container, get out the Red Jewel and the other Spare Key. Combine the Red Jewel with the Blue Box to get the STARS Badge. Now head through the West Office and to the Safety Deposit Room. Use the two Spare Keys on the keypad inside and press these numbers: 203, 102, 103, 109, and 208. This will open the most important lockers, getting you some Shotgun Shells, Handgun Ammo, a knife, and, most importantly, another Hip Pouch.

Leave the room and head left, following the corridor north and up the stairs. We’re heading to the STARS Office now. Go through the locker room and follow the corridor around until you reach it. Examine the STARS Badge and press the button on its back side to reveal a USB dongle. Pop that in the computer, then interact with the monitor to open the armory and grab the Lightning Hawk Magnum. Interact with the PC tower again before you leave to take the USB Dongle back for use again later.
Leave the room and follow the corridor around to the left, through the Library and back into the Main Hall. You want to head down the stairs and through the east side shutter. Run through the East Office and head through the Watchman’s Room, follow the corridor around. If you don’t have the Electronics Parts on you, grab them from the safe room before you head down the stairs.
When you reach the bottom, you need to head through the Parking Garage and back into the Prison, right to the end where you’ll interact with the circuit board, pop the parts in it, then solve a wiring puzzle. Watch the guide video at the top of this page from 24:08 if you get stuck on it. When you’re done, head into the nearby cell and get the Parking Garage Keycard from the corpse. Make sure you grab the First Aid Spray from near the sink.
In Part 4 of our Resident Evil 2 Remake S Rank walkthrough, we take you through the Kendo Gun Store and play as Ada Wong.
Leon A Guide Parts 1-6: