Horizon Zero Dawn: The Frozen Wilds - how to beat the new machines

Horizon Zero Dawn: The Frozen Wilds introduces some new machines. Don't worry, you can take them down.
The Frozen Wilds is a lot of fun to tackle on your own, and we'd encourage you to at least have a go at battling the new machines - maybe after re-familiarising yourself with Horizon Zero Dawn's controls.
The first time you encounter one of the new machines in The Frozen Wilds it's a bit humbling, but don't worry - you'll soon get the hang of things. As noted in our Horizon Zero Dawn guide, you can score yourself some sweet new weapons by collecting Bluegleam, and that makes a bit of a difference. Also, if you're coming in from an endgame save, you should have tracked down all the Power cells and gotten the Shield-Weaver outfit, which will really save your bacon with these aggressive robo-dinos.
If not, well - we're here to help you sort through your problems with the new machines in Horizon Zero Dawn: The Frozen Wilds. Read on!

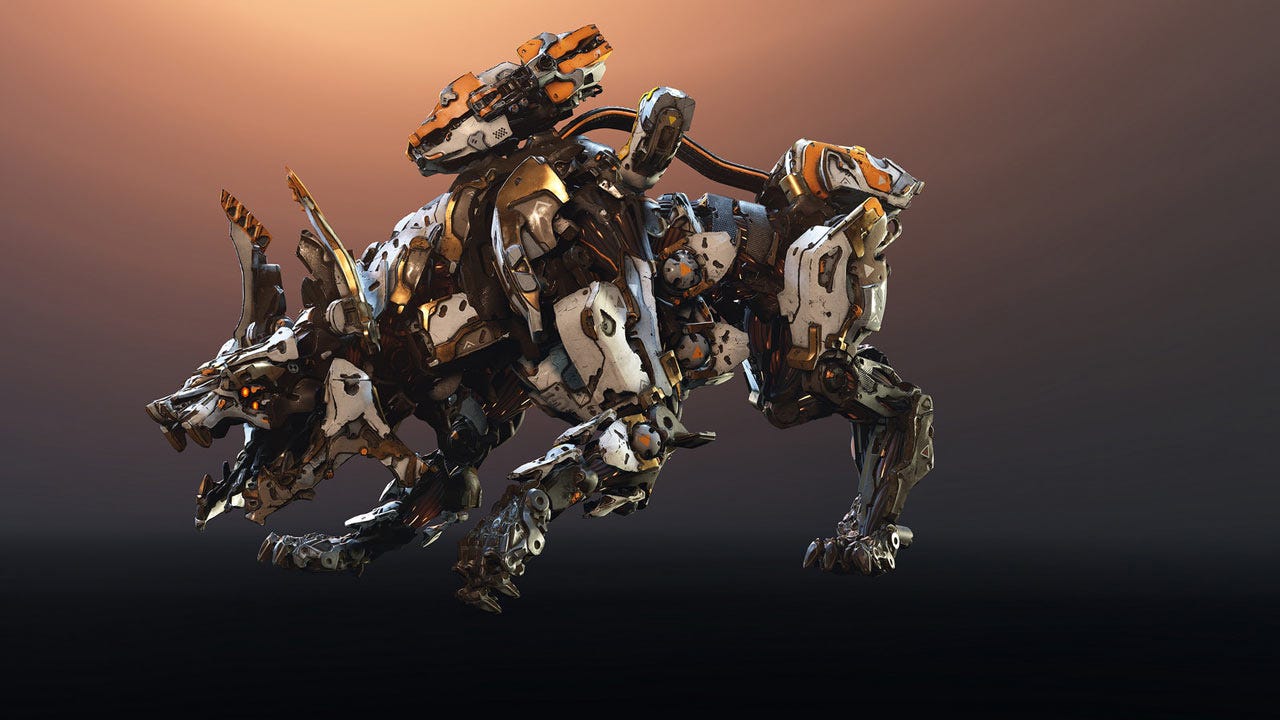
Scorcher
Scorchers are large wolf-like machines with powerful fire attacks, both melee and ranged. They're well-armoured, very agile and tenacious, and have a mine launcher which is quite a pain. Like all Daemonic enemies, they are strong against Shock and Corruption, but also strong against fire.
Scorchers are relatively easy to stun once you knock a bit of armour off. Hit their power generators for extra damage, or even better, use a fire arrow on their Blaze canisters.
At close quarters, as in your first encounter with a Scorcher, your best bet is to hit it as hard as you can with the Tearblaster to strip away its defences and maybe its shoulder fire sacs, then hit it with Heavy attacks to stun it so you can go in for a critical or lob fire arrows into its Blaze canisters - make sure you get away before the explosion! If you're lucky enough to knock off the mine launcher, pick it up and turn it on your enemy.
When you have more room and can use stealth, it's best to take things slowly and methodically. Knock off the mine launcher first, to stop it randomly firing into cover, then go for the armour plates on each shoulder and along its flanks. This should give you a clear shot on its fire attack unit, and once you've dropped that, the Scorcher is no more dangerous than any other large beast machine.
Frostclaw
A huge and powerful new machine, The Frostclaw looks something like a bear. It has an enormous health pool and takes a heck of a beating, even after you knock some of its armour off. As well as being strong against Shock and Corruption, its elemental proclivities mean it is strong against frost damage. Luckily, the Frostclaw is weak against fire, and has several critical points you can exploit.
The Frostclaw has two Freeze Sacs you can destroy or knock off, one on each side - they're easiest to hit from the side after you've removed a bit of armour. The Freeze Unit on its chest is harder to target, but if you can drop it you will disable all the Frostclaw's ranged attacks; luckily, when threatened or curious, the Frostclaw will often rear up on its hind legs, and that's when you should be putting three notched arrows (or at close range, something like a Rattler) into it. You can also give the Frostclaw a bit of trouble and stun it by shocking or destroying the power cells on its butt; shoot from behind for best results. When you've cleared all the components, set it on fire repeatedly, and let nature do its work.
The Frostclaw is definitely best tackled after you've eliminated other nearby Machines (override or corrupt them, if you can!) and after you've scouted out an area to find all the stealth possibilities. Use guerrilla tactics: hit it hard, then run away and let it cool off, since this is not a machine you want to duel with if there are any other options. The good news is it moves slowly except when charging, so you can easily circle rock formations or hills to break line of sight and baffle it.
Fireclaw
The Fireclaw is an upgraded version of the Frostclaw with reversed elemental attributes - it has fire attacks, is strong against fire and weak against frost. It also has more armour and a bigger health pool, so each one should be approached like a boss battle.
In general, the same tactics apply, but once you've exhausted the possibilities of the Fireclaw's weak points it's time to take advantage of its frost weakness. Use the Icerail you get during the main Frozen Wilds quest chain - preferably the upgraded version you can get by speaking to Varga at Longnotch - or failing that try frost bombs from the sling and arrows (notch three!) from your war bow.
When you do freeze the Fireclaw, take advantage - hit it with your most powerful weapons, as quickly as you can. In my case that was the Blast Sling obtained via the Hunting Grounds quests in the base game, modded for extra damage. You will definitely still need to run away and disengage before repeating the process; these things have huge health bars.
Control Towers
Control Towers are a real pain. While active, they will intermittently repair damaged hostile machines in their radius, knock over and damage machines friendly to Aloy, and blast away the Shield-Weaver's force field.
There are two ways to take down a Control Tower. The first way is to get close and override them. This will cause the Control Tower to emit one last pulse, which will stun all nearby hostile enemies briefly. This is nice, but it's sometimes very tricky to get in and go undetected long enough to complete the override, and the stun doesn't last long enough to take down the many enemies likely to be in the area.
Our preferred method is just to destroy the Control Towers from a distance. There's a power box on the rear side, easy to spot with your Focus, which you can snipe. Knock three hardpoint arrows (charged, if you have the Banuk hunter bow) and it should only take you three shots at most to drop the Control Tower. With any luck, and a bit of care, you won't even aggro the nearby enemies, and can then either engage them or just leave.
Daemonic Machines
In addition to all new machines, you'll meet new variants of familiar robo-dinos in Horizon Zero Dawn. You can identify these at a glance because they glow with purple light rather than blue (regular) or red (corrupted), and your Focus will also note when a machine is Daemonic.
Daemonic Machines have more health, and hit harder, than the regular or corrupted variants, but otherwise they seem to be much the same, with no new abilities to fox you. However, all Daemonic Machines are strong against shock and corruption, and you need to hit them with more elemental damage to trigger a status effect like Burning or Frozen.
In general, battling Daemonic Machines is a matter of being a little more tactical than you might be with a regular variant. Try to override or corrupt nearby regular Machines, use stealth to your advantage, lure the Deamonic Machines away to fight one by one, and use Tearblast arrows to knock away vital components.
Interestingly, although Daemonic Machines are difficult to shock, they're relatively easy to stun. When one closes on you, try a few Heavy melee attacks; when the machine is knocked over, you can go in for a critical hit, or use it as a chance to run away and hide before sniping and repeating the cycle.
For best results, complete the side quest A Secret Shared, after which you can upgrade your spear with mods for greater damage. Nice. However, you can also stun Deamonic Machines with Tearblast arrows; hit one in the foot with three notched arrows for best results.