Destiny 2: how to blast though The Inverted Spire Strike
Destiny 2 players may be experiencing Strike missions for the very first time. Bless their little hearts!
Now that Destiny 2 is here, we can all get together and discover the joys of blueberries. That's Destiny veteran slang for randos in strike matchmaking, by the way.
We're not sure whether we'll be putting together walkthroughs for every Strike for our Destiny 2 guide, but we made one for The Inverted Spire while covering the beta and it serves as a good introduction to Strikes in general if you've never experienced these challenging three-player missions before.
Strikes tend to have pretty good loot until you reach the 260 Power soft cap and need to level up through other means so if you're not a fan of PvP and have somehow run out of open world content, you'll be spending a lot of time in them. You should probably know what you're doing, hey?
If you''re playing in premade fireteam rather than matchmaking, have a glance through out trips for combining class abilities to maximise DPS in Destiny 2. If you and your pals coordinate you can take down bosses and mobs much, much faster.

Destiny 2: The Inverted Spire Strike guide
Investigate the Cabal, Defeat All Hostiles, Access the Conflux, Press Forward
After you spawn into Nessus, get a wriggle on and head down the path on the left before waves of Cabal and Vex show up to usher you down there. There's no sense in wasting good ammo.
A shielded Quantum Minotaur and his buddies are whooping some Cabal butt, so break up the party and activate the white tower at the edge of the platform to spawn a set of floating platforms; just stand in the ring until the platforms appear.
Head across the platforms and jump through the portal at the end. You'll be greeted by a small group of Legionaries, and up on higher ground, three sniping Psion and a Colossus outfitted with the usual missiles. Have someone snipe the Psion and Colossus while the others focus on the Legionaries before lending a hand.
Hop through the portal and continue into the cave.

Traverse Deeper, Eliminate the Vex, Press Forward
Push on and you'll reach The Anchor. It's a restricted zone so be careful not to have your entire Fireteam wiped out.
Drop down to the area below where the Cabal and Vex are at it again. Watch out for the Blood Guard Centurion, and sniping Psion.
It's handy to have a sniper to hand to take out the Hobgoblins and Psion from afar, while the others take out the Phalanx shielding the Blood Guard Centurion, before turning their attention to him.
The Vex surrounding the barrier are the next order of business. Once again, a sniper can make short work of the Hobgoblins. The rest of the Vex is made up of a couple of shielded Minotaurs and a throng of Goblins.
The barrier will come down once they've been dealt with, so continue on into the next area.

Approach the Drilling Site, Eliminate Drill Site Security
We're back out into the relatively fresh air of the Legion Drill Site. Drop down to the platform below and deal with the Gladiator.
It's worth taking out the two Psion directly opposite so that they don't cause you any problems as you traverse the platforms to reach solid ground again, but they can be avoided with relative ease, so it's your decision on whether you think they're worth the ammo.
There are a couple of Gladiators on the platform directly below them, so jump over and kill them sharpish.
Two Legionaries await on the next platform down. Clear them out and jump over into the crowd of Hobgoblins on the other side to do the same.
Follow the path and drop down into the warzone below where you'll meet the cuddly new War Beasts, whose speciality is tearing everyone to shreds. Fight your way through the battling Vex and Cabal to the Drill Site Security. You need to kill the two Drill Officers who are hiding out in the two buildings.

There are a couple of Psion sniping from the roof of each building as well as Legionaries, Phalanx, and a Colossus who will drop in to join the fray. Take out the Psion and Colossus first so you don't have to worry about a sniper round or missile sneaking up on you. Once the enemy troops have been thinned out, head to the markers to find the Security Officers, who are shielded Blood Guard Legionaries.
Their guard detail is made up of a couple of Phalanx and Legionaries, but it's nothing a grenade launcher can't handle.
Board the Cabal Drill, Reorient the Transit System, Repel All Attackers
Drop down to the ledge below to activate the two switches that will turn on the gravity lifts. They're guarded by a couple of shielded Centurions.
The lifts will propel you onto the drill and right into the sights of a group of Cabal. Clear them out and then drop down to mop up the rest.
Interact with the switch and hold off the waves of Cabal while the Transit System resets. The waves can include Legionaries, Gladiators, War Beasts, and Blood Guard Legionaries. Once the gravity lift is active and the enemies have been dealt with, hop through.

Cross the Digsite
Follow the path and take out the Incendiors by shooting their tanks so that they explode, because it's tremendous fun. There are Psion up on the right and while it's possible to whittle them down with an auto rifle or other mid-range weapon for a slow demise, a sniper or scout rifle will expedite the process.
Navigate the platforms to the bottom where you'll find more Incendiors and Phalanx, as well as a Blood Guard Incendior.

Get Clear of the Drill
Arguably the most fun part of the Strike, you need to avoid the multiple drill arms by jumping up and down to the different levels, and hiding behind large rocks, all the while avoiding Cabal forces. You can engage them if you want to, but as we're heading towards the boss fight and speed is of the essence to get past the drill, there's no point getting too sidetracked with them.

Investigate the Digsite
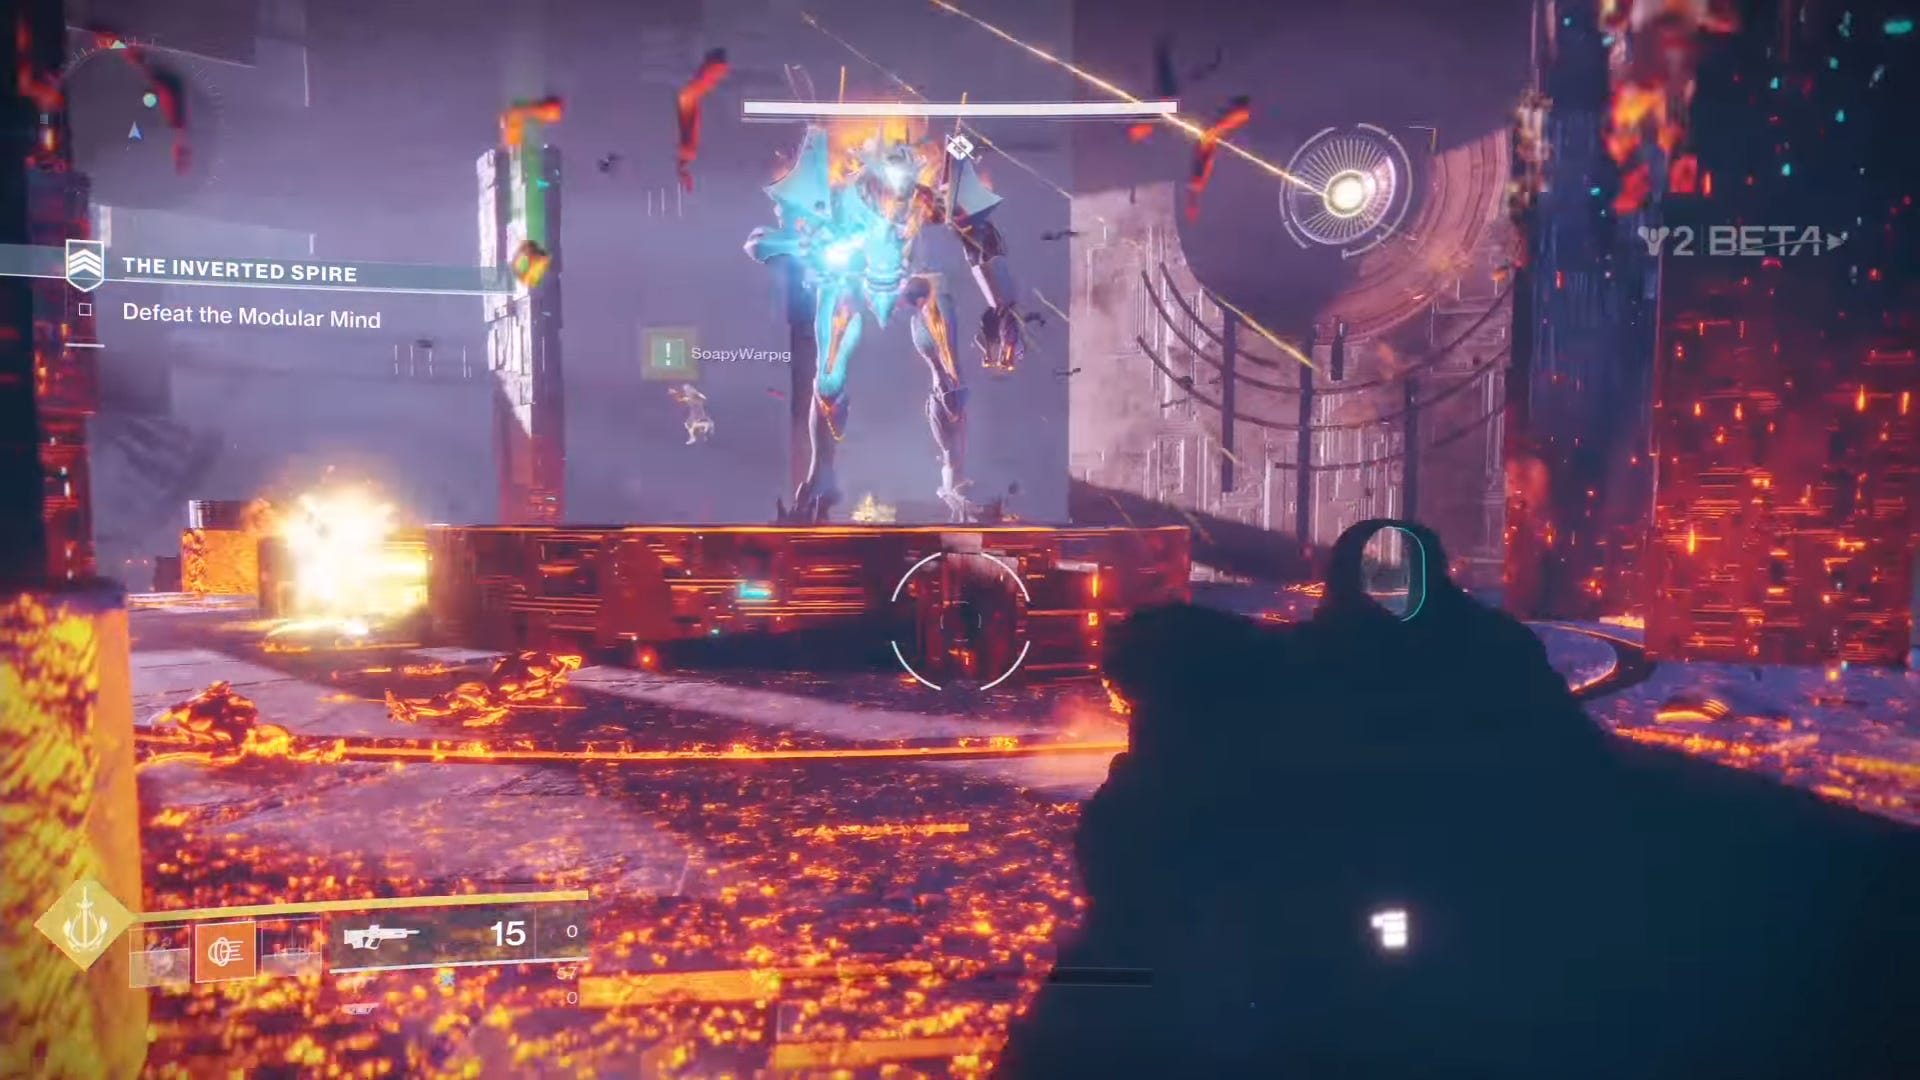
Successfully surviving the drill run will bring you to a tunnel. Follow it to The Inverted Spire, a restricted zone and the stage for the boss fight with Protheon, Modular Mind.
Drop down, take out the three Harpies, and cross over to the platform they were on to spawn the boss.
Defeat Protheon, the Modular Mind
The boss's weak spot is his glowing eye headlamp, so keep shooting him in the face, while taking out the ads. Modular Mind will teleport like the Vex Minotaurs, so stay on your toes and utilise the cover in the area.
Because he moves around so much, mowing down ads is crucial to every stage of this battle so that you don't get overwhelmed.
Once you've chipped off almost a third of his health bar, both he and the floor will disappear, dropping you down to the platform below. Any surviving Vex will drop down with you.

Modular Mind boss fight phase 2
On the second platform, the boss will remain in the middle, Hobgoblins will spawn on the edge of his platform, and Goblins will spawn in ring around the centre. The best place for cover is the outer ring.
Always keep one eye on the Modular Mind - when he smashes his fist into the ground, the floor of the inner rings will turn red, then they'll return to normal as the outer ring turns red. Then the entire floor will flash red, launching anyone standing on it up into the air and potentially off into the abyss.
When he does this move, stand on the outside to avoid the inside ring, then hop over to the inside while the outer ring is red, then double (or triple) jump to avoid the floor entirely for the last flash.
When another third of this health has almost been chipped off, the platform will disappear, dropping your Fireteam and any surviving Vex to the final arena.

Modular Mind boss fight phase 3
Don't stray off the platform as the Vex milk will damage you.
Warlocks can take advantage of the infinite ammo cheese for the Riskrunner Exotic by utilising the unique class skill Healing Rift. Healing Rift counteracts the damage from the Vex Milk, but as standing in it is technically causing damage, the Riskrunner perk will keep kicking in, refilling its ammo. This exploit has been rebalanced for the PC beta, so don't rely on it - and don't expect it to work at release.
Modular Mind will stick to the outside of the platform during the first phase, wading through the Vex milk. Ads will spawn in the milk by the stairs, so stay on top of them to prevent the platform from getting overrun.

Once his head pops off, he'll join you on the platform, so stay out of his path to avoid getting stomped on. Persevere until he's popped his clogs once and for all.
Hopefully the boss loot is worth all that effort.