The Surge: 12 tips for farming upgrades, implants, scrap, armour, core power and more


12 tips for farming upgrades, implants, scrap, armour, core power and more
The Surge is a game that wears its inspirations on its sleeve. Quite a bit of the Surge's structure, world design, combat mechanics, and so on take after elements established by the Souls series of games.
For this reason, many of the tips we would provide for newcomers to the Souls series will apply here, but there are enough mechanics in The Surge that everyone will be introduced to for the first time, Souls fan or not.
We’ve played over 30 hours of this hardcore RPG and returned to bring you some crucial tips and tricks that we wish we knew when we started. These tips are essential for surviving the game’s unforgiving world, and, in some cases, will save you a lot of time.
Oh, and one more thing. You can change your starting EXO rig (the one with eight slots) to a better, 12-slot one, and once again for another one with 16 slots. These help make things much easier, and we can tell you exactly where to find them. Read up our guide at the link and improve your odds of success.

Smash all boxes
When a Souls player sees a stack of wooden boxes in a game, they know exactly what to do. Breaking boxes doesn’t just feel good, it often confers other benefits such as revealing previously-unseen items.
This golden rule applies in an even bigger way in The Surge. Boxes in this game can hide valuable items, audio logs necessary for making sense of the story - and more importantly, hidden passages and shortcuts.
There are two types of these breakables in the game. The wooden, brown boxes you’ll recognise as breakable the second you see them, and one other type that doesn’t immediately strike you as something you can smash.
Those boxes are mostly blue, but sometimes can be black or white, depending on the level. They look like part of the scenery, and don’t really stand out. It’s in these you will find stacks of Scrap and other helpful items such as Implants.
When in doubt, one dash through the stack in front of you, or even a couple of swings, should do the trick.

Invincibility frames are inconsistent, always leave enough space between you and your opponent
Generally speaking, The Surge won’t just ignore a hit you took just because it connected while you were in the middle of the dash animation. Other games do, which is what’s referred to as Invincibility frames, or 'I frames'.
As a result, you’ll find yourself dying over and over to hits you feel shouldn’t have connected - seeing as you were dashing - but registered anyway and robbed you of a decent chunk of HP.
To avoid this, you should always maintain a good distance between yourself and the opponent so you have more room to dodge out of the way of their most reaching attacks. This is especially helpful when dealing with security personnel, a mid-to-late-game enemy type. Their staffs have a long reach, longer than you think they would, in fact.
Sometimes it’s best to dash twice, so be prepared to do that too. We also don’t recommend dashing into an enemy, unless you want to get frustrated very quickly. This tactic may work in other Souls games, but not here.
Bank your Scrap every chance you get
Like Lords of the Fallen, The Surge offers players the ability to bank their remaining Scrap (Souls) for spending later. This is an exceptionally helpful feature that means your progress is never truly lost.
It’s always a good idea to do this when you’re going on a farming run for a particular item or material. You should never have too much Scrap on you to begin with, unless it’s been a while since you’ve come across an OPS centre.
Banking Scrap not only lowers the risk of losing it upon death, it also teaches you the layout of the level in the process, because you’ll be running back and forth many times.
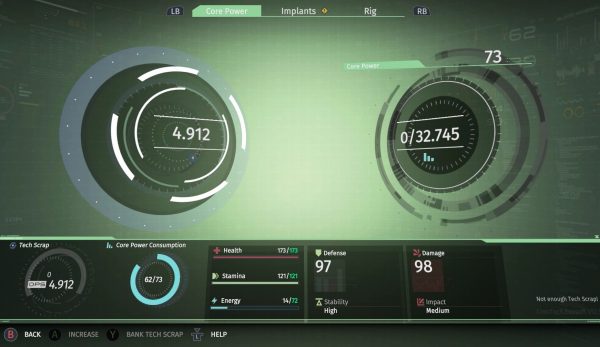
To do this, simply hit Y/Triangle when at a Medbay or Gear Assembly station. Notice the 4.912 in the image, that's how much I have banked, leaving me with zero Scrap on my person.
Beyond the practical use, it feels good when you return to the OPS centre and find a stack of Scrap you’ve previously deposited waiting for you.
Use up as much of your Power capacity as you want
Upgrading your Core Power capacity is what you do when you level up in The Surge. But, like we mentioned in our review, you don’t spend points on individual stats here.
Instead, you rely on your Power capacity to shape your character build. How much power you have determines the type of Implants and armour pieces you can equip. We recommended not leaving any power to spare. There’s no benefit in doing so, so you shouldn’t worry about using up all the juice.
Of course, depending on which Implants and armour you choose to go with, some power may yet go unused. This is fine, of course, but you should be aware that there are no downsides to using it all up.

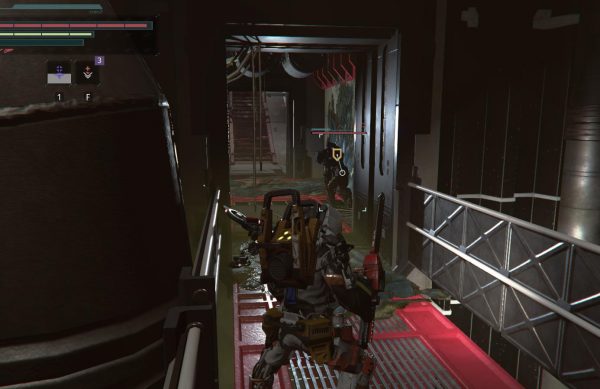
Don’t fight these bots unless you have to
These security bots may just be the game’s toughest enemy. Their weak point is the tail, which they will always protect.
Going after the tail will trigger their backflip attack, which is nigh impossible to escape. Attacking the front legs does pretty low damage, which means you’ll be spending a long time fighting them.
What's more, their attacks do massive damage, one slip up and you’re toast. For all these reasons, we recommend just sprinting past them early on.
They only really become a problem in the Resolve Bio Labs part of the game, but even then you can avoid them if you’re careful. Fighting them, especially as a low-level character, is no fun. Trust us. There's an even more beefed up version of them in the game's penultimate level, though by that point you'll have enough health to eat up their hits.
That said, we recommend going back to the areas where you first saw them once you’ve climbed the ranks a bit, just to check if you missed anything the first time through while you were running for your life.

Equip the Medi-Voltaic Injection Implant as soon as you find it
There’s an Implant in The Surge that lets you turn the energy you gain into health. It’s called the Medi-Voltaic Injection, and you should definitely slot it in the second you get it.
There’s no limit on the number of heals you can perform, so long as you have enough energy. Energy is gained by landing successful hits, but instead of using it for finishing moves, you can turn it into HP, which is something you’re going to need to do. In fact, you should always use this before touching your other HP consumables.
There aren’t many healing Implants in the game, and the ones there are, don’t offer a lot of uses from the get-go. This Implant will make your life easier when dealing with almost anything in the game, provided you can get a couple of hits in and retreat to heal.

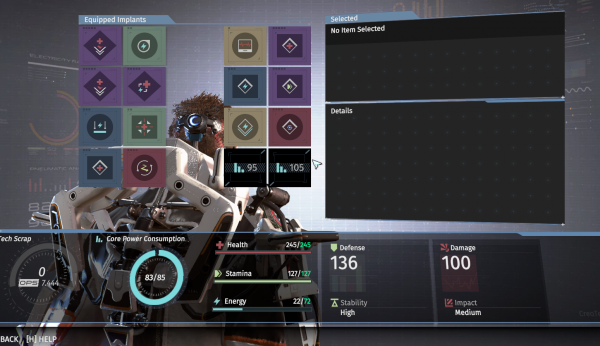
Don’t destroy duplicate Implants
While we’re on the subject of Implants, you’ll notice that you'll be coming across duplicate versions of some of the Implants you already have. They can be of a higher level, or just straight dupes.
In either case, you shouldn’t destroy any of the extras you don’t need, even if it’s a buff you don’t think you’ll ever equip. Dismantling an Implant grants you a few Scraps, but the amount is so small it’s comparable to killing a couple of enemies.
What you should do, however, is check to see if you can equip two identical Implants. Some of them, like the Vital Injection (HP consumable) do stack, meaning you get six instead of three uses when you have two of them equipped.
The Implant that increases your maximum health, Vital Boost, also stacks, and you could slot a few of them to greatly increase your HP.
Not everything stacks, of course, but it's important to remember not to destroy the extras the next time you feel like the dupes are cluttering your inventory.

Higher Stability armour can slow you down
There is no consideration for weight in The Surge, so it may look like all armour is essentially the same in that regard, other values not withstanding.
This is sort of true, in that there are no weight values to worry about, but you should keep an eye on the Stability stat on your gear. Stability comes in three types: High, Medium, or Low. This stat dictates how many hits will knock you down, and whether or not certain enemy attacks will do the same.
However, what the game doesn’t make very clear is that the more gear pieces you have on you with High Stability, the heavier your character will be. The effect of this will be visible in the way you walk, dash - and more importantly, attack.
Too many pieces with High Stability will increase your stamina consumption, which means you won’t be able to perform as many attacks as you would have with no gear, or using with Low Stability.
Too High a Stability will also slow down attack animations, and you really, really don’t want your basic attack to have two seconds of windup. You should experiment with this, though, because while some may favour High Stability gear with a fast weapon, others are content with Low or Medium Stability gear and a slow weapon.
Consult the Stamina stats under the Specs page for a quick look at how your current build is performing.

Use the ranged drone as a way of pulling enemies
The Surge gives you your first drone for free in the game’s second level. This drone, like all of the ones you’ll eventually find, relies on energy to work.
The amount of energy needed to activate the various drones varies for each one, but the very first one you get, the Focused Infra-Blaster drone, can operate on zero energy.
It does negligible damage when you don't have any energy, but that’s okay, because you’ll be using it to pull enemies and separate them from their bodies. Since The Surge doesn’t offer any throwable items like rocks, you can use this trick to make almost all fights one-on-one, and avoid getting ganked.
Of course, how far an enemy will follow you before leashing back varies, but you should always keep that in mind the next time you see two or more enemies covering one spot.

Make note of items and locations you couldn’t access on your first time through a level
Your first visit to any level in The Surge won't be the only one. The Surge has a Metroidvania component that means certain parts of the level will be off limits to you on your first way through.
These sections are gated in two ways. The first has to do with your Core Power. Some circuits will require a much higher Core Power than you currently have to overcharge. There are also these security doors that will scan you. Those will only open after you’ve acquired a particular item from a late-game boss. So you shouldn’t bother with these until you have this item.
These are all good reasons to just make a note of the circuits you couldn’t overcharge and so on, in every level as you go.
There are a lot of them in all levels, so unless you like to return to level again later looking for that circuit you could swear you saw ten hours ago, you should keep note of how many, and what level, these circuits were.

Pay attention to the signage if you're feeling lost
The Surge's levels are not very distinct from one another. You'll find yourself getting lost a fair bit, especially if you're returning to an area you left hours ago.
To help you navigate, designers created signs pointing towards the most important areas all around the levels. The most crucial ones show you the way to the OPS centre, which is just invaluable when you're hauling a large chunk of Scrap and need to get back there quickly.
This also comes in handy when discovering shortcuts, as you'll instantly known where this or that shortcut leads from the signs around them.
Farm upgrade materials by focusing on a particular limb
The Surge allows you to target specific limbs. Using a finishing move on an armoured limb means you have a higher chance of getting schematics for that piece of gear.
This is also the same way you get upgrade materials for any piece of gear you have on you. Because the vast majority of armour pieces are acquired this way, you will find yourself regularly looking for upgrade materials.
The best way to upgrade a chest piece you have is to look for the type of enemies that wear it, and keep bashing their chests and cutting it off until you have what you need. You’ll know you got upgrade materials when the item log says "broken [insert piece name here]."
This process is relatively straightforward, and you shouldn't really have to do it that much until late-game. Even then, upgrade mats are relatively attainable.