Dishonored 2 M04: The Clockwork Mansion part 1 - Upper and Lower Aventa District

Dishonored 2 is winding up. Get it? Because clockwork? Oh, I'm wasted on you.

Aventa District key objectives and items
- Take the carriage to Upper Aventa District
- Reach the Clockwork Mansion
- A Man of the People (special action)
- Black Market Heist (special action)
- Looted Aventa Station (special action)
- Blueprint: Pyrosonic Casing
- Blueprint: Alloy Polarization
- Painting: The Spymaster’s Axis of Asymmetry
- Painting: Ramsey’s Stochastic Eyes
- Painting: Jindosh Considers an Odd Numerator
- Bonecharm x 3
- Rune x 5
- Outsider Shrine x 1
General layout and tips
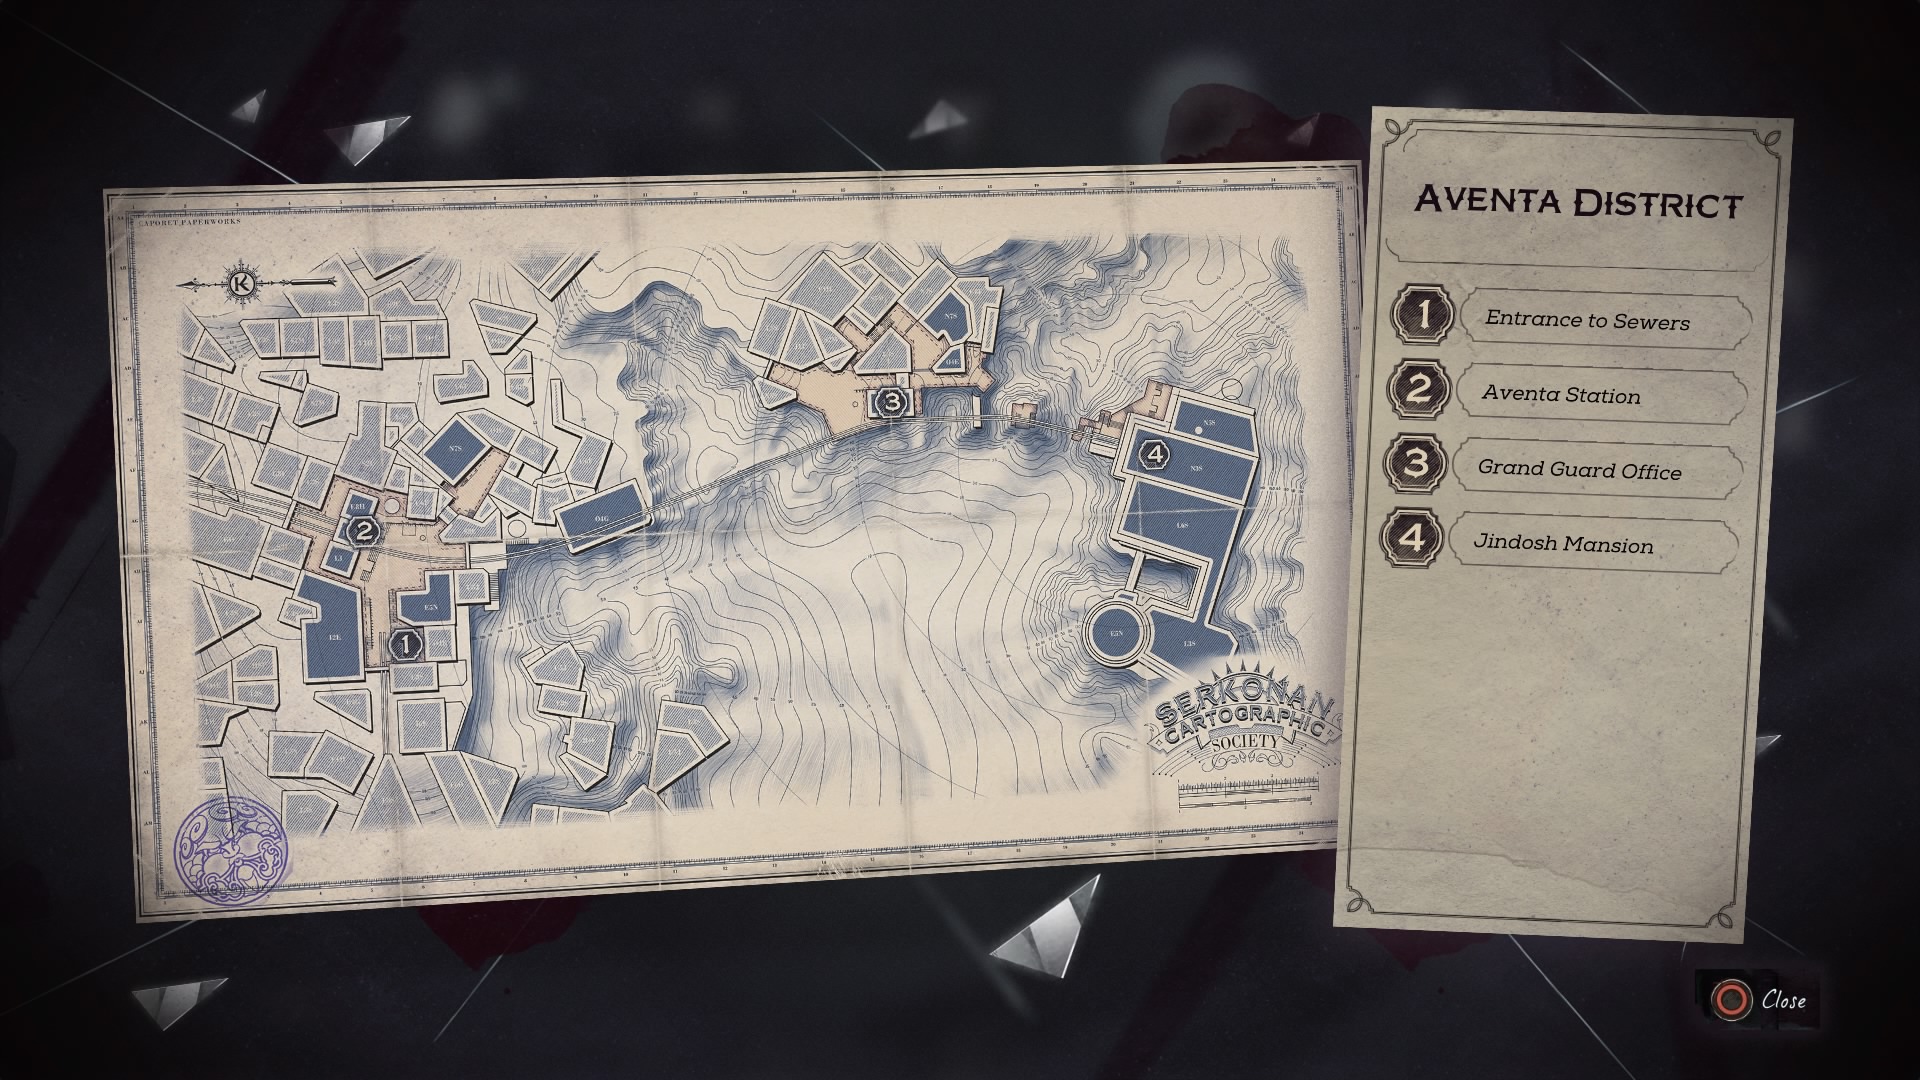
The map below shows the layout of both Lower and Upper Aventa Districts; here's a zoomed in version for closer study.
The level begins in the sewers in Lower Aventa District. You can tick off three special actions before leaving. There's a wall of light at the station which acts as a choke point, gating off the next section - you must take the carriage to Upper Aventa to proceed.
There are two paths from Upper Aventa to the Clockwork mansion - unlock the gate so the carriage can continue, or use your mobility ability to walk over. There are n
Walkthrough
The Dreadful Wale
We begin with a little wander on our ship. With three missions down, Dishonored begins to branch - what you see on this new visit to The Dreadful Wale depends on your choices so far. This walkthrough assumes you have achieved all the special actions in the game so far, but notes things that vary between branches.
Collect Document: Note from Meagan Foster from the desk in your cabin (this varies, and comes with some money). Outside, find a new Document: Maintenance List on the table (this also varies).
If you saved Dy Hypatia and unblocked the cabin door, you can go in and talk to her for an achievement. She has a large supply of Addermire Solution elixirs if you ever need to resupply between missions. Collect Document: Dr Hypatia’s Notes from the table by the door.
Go into Meagan’s room and look for new books and documents - you should have all the books. On the pin board you’ll find Document: Clockwork Soldier Basics, though.
Go towards Sokolov’s room and pick up the crank from the workbench just before it. Carry it down to the engine room and walk up to the pipe to attach it, then turn the crank to stop the leak. Go back to Sokolov’s room and collect Book: A Reflection on my Journey to the Pandyssian Continent [2]; if you missed volumes 3 and 4 earlier they’re now also in here, but the first volume has wandered off.
Climb up to the top deck to read Book: Meagan Fosters Notebook, then grab any consumables and ammo you want from around the ship before speaking to Meagan to kick off the mission proper.
Lower Aventa District
By this stage in the game you should have plenty of runs and unlocked a few powers. If you intend to stay stealthy, you’ll want to have something like Slow Time, Doppelganger, Mesmerise, Domino or Shadow Walk; the choice is up to you, but you’ll encounter more and more scenarios where you can’t just walk around the guards and still achieve your ends. (If you’re doing a power-free walkthrough, you’ll just need to be very good with distractions and stealth.)
Before moving into the level, swim across to the campfire near the boat to take the raw whalebone. Return to the starting dock and search the locker area for some minor loot. The path back the way the boat came is a deadend with a health elixir, if you need it. The other paths here both lead onwards to Lower Aventa District.
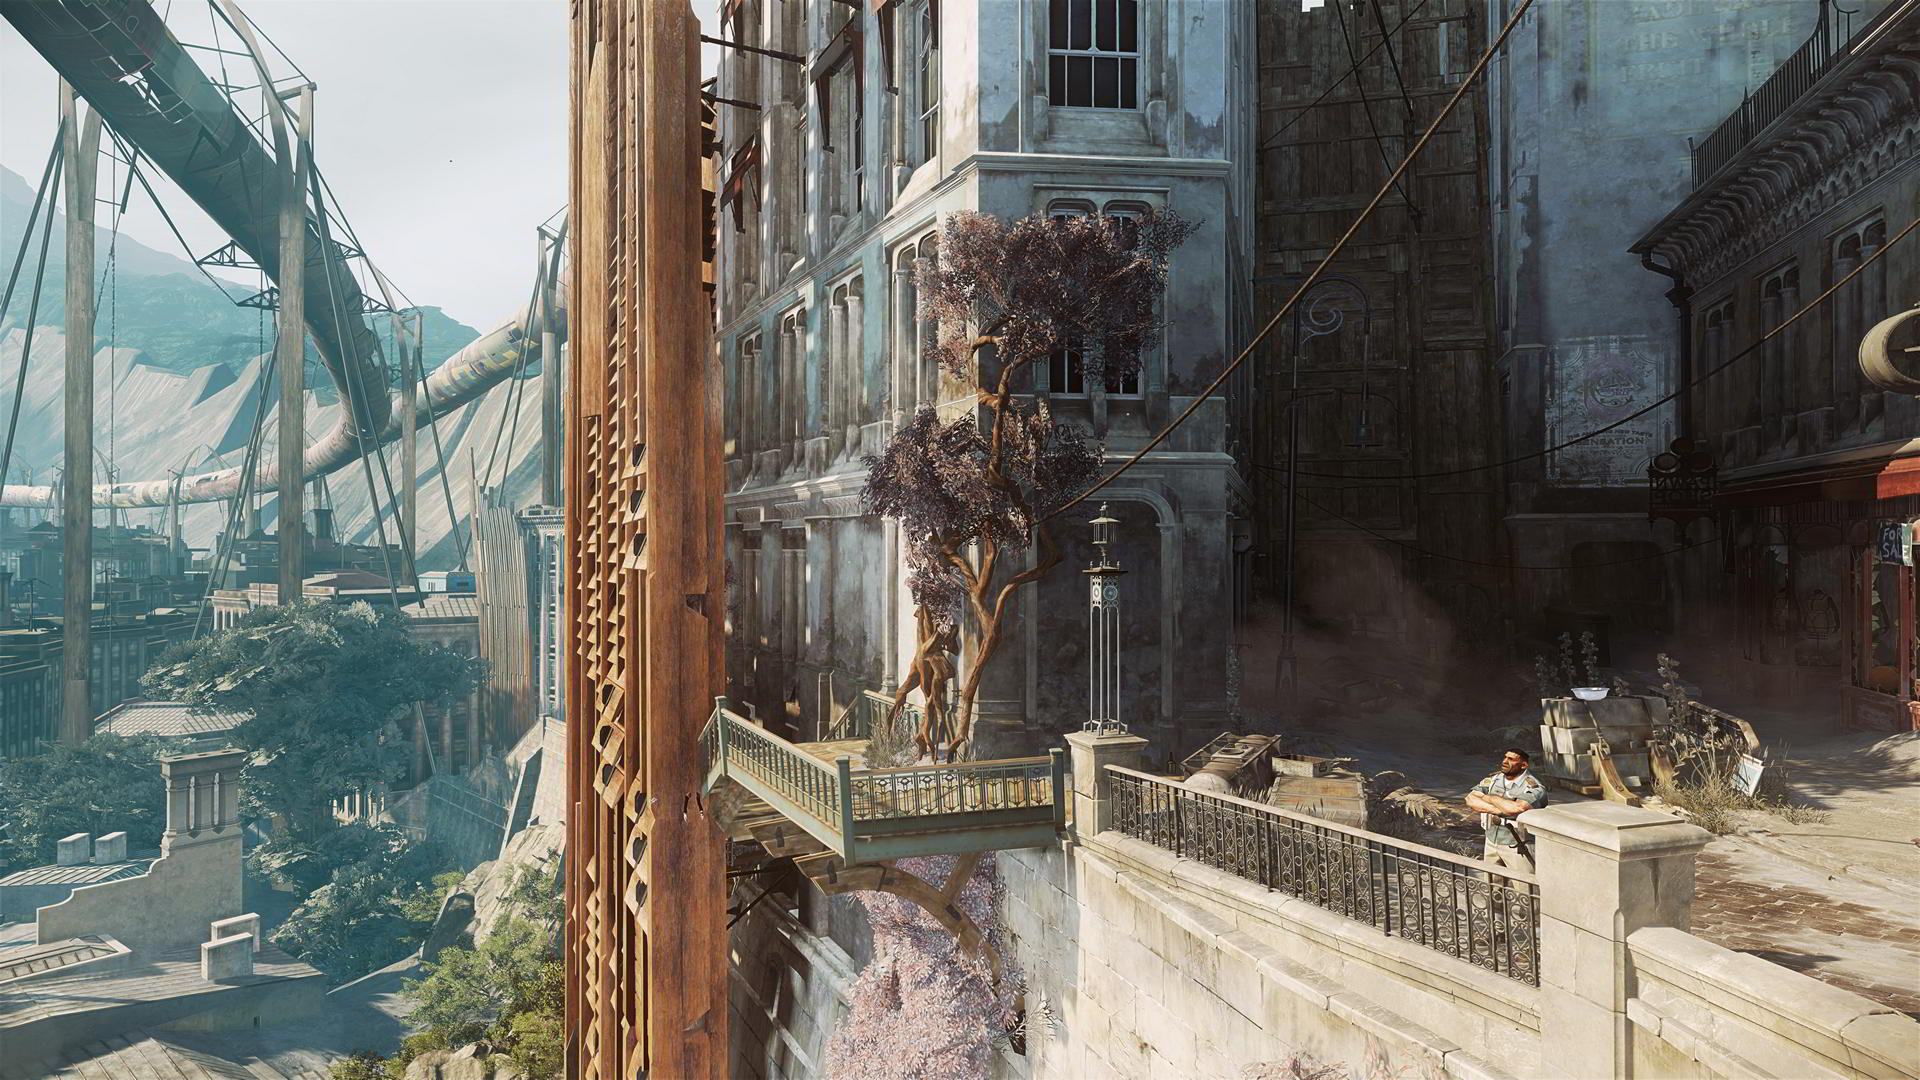
Listen to the duke relaying his latest dream as you advance towards the gate, but don’t go through: look up and right to spot an air con unit in the wall. Zip up to it and to the balcony beyond to get a good look at the area.
As you stand on the balcony with your back to the building, you’ll see the left end of the street has no guards. Make your way over there and look for a door at the far end of the lit area of shops - it’s a building full of bloodflies. There are four nests and no helpful stashes of flammable liquid, so if you’re out of incendiary bolts just tiptoe past them all, climbing over furniture where necessary. Make your way to the second floor for Book: Science Notes and some minor loot, then up to the third floor and a locked door. There’s a window just above and to the right of it, though. Inside you’ll find an Outsider Shrine with two runes.
Go back to ground level and walk along with the shops on your left, taking the first left into an alley. Eavesdrop on the two civilians then enter the building behind them. On the second floor you’ll find Document: Note from Correy Brockburn next to a combination safe. Two of three of the combination numbers are written on a blackboard in the hallway on this floor, behind a bottle of fig wine. Enter the two you have then spin the dial till the safe opens. You’ll get some tasty loot including silver ingots and Book: Gathering of the Regenters.
The door to the third floor is locked so go back outside and zip up to the building opposite, then turn around to reach a balcony. Grab Painting: The Spymaster’s Axis of Asymmetry as you re-enter, as well as Book: The Child Empress, the Bango Coastline chart, Book: The Southern Winds, by Caleb Manly, Natural Philosopher, and a black bonecharm. In the back room you can find Document: Conservatory Closure Extended.
Go back outside to follow the alley further around but stay high - there are five hostile gang members in this area: one in the middle as a decoy, two behind pillars on the far side, and two lurking in the shadows against separate walls. There’s a rune you want to take but there’s no way to approach it unseen without using powers or distracting the guards. I did it by using the nearby rooftop to get behind the pair behind the pillars, and taking them out with Domino and a sleep bolt. I then zipped around the area Domino linking the other three, and sleep bolt them, too. Loot or pickpocket all the Howlers for their cash and Document: End of Gray River before you leave, and don’t miss the howling bolts by the rune.
Go back out to the way you came, to the main street (if you want to explore further down this alley beware of the two tripwires in your path; you can loot the attached traps for free incendiary bolts). Cross the street and zip up to the balcony with the door; enter for a bonecharm in a smashable cabinet, Painting: Ramsey’s Stochastic Eyes, Document: Letter to Bonville, some minor loot and the Silver Medal loot item.
There are four guards at this end of the street, including the one in the guard kiosk below you, and zero reason to go down there for now. Cross the area, staying high, until you can go under an arch and into an unpatrolled area. Collect some minor loot from the dumpster, then give the beggar five coins for a tip.
Go down the stairs behind the dumpster and speak to the Black Market shopkeeper. Go hide under a table on the right side of the room (with your back to the shopkeeper) and stay out of line of sight until Paolo and the Howlers leave; they will spot you under the table when they turn around to go if you don’t keep the pillar between you. If you’re spotted you can walk away from the confrontation but it blocks your access to the shop for a while. You might want to use the heart on him while he’s here, but be careful.
- Special Action: Man of the People
Kill or knock out Paolo to unlock this special action. Don't even worry about it; it's fine! It won't remove him from the game. You get the special action regardless of whether you go lethal or non-lethal, and the shopkeeper doesn't care either way.
When you an use the Black Market, purchase any upgrades you want and buy the rewire tool if you don’t have supernatural powers or want to tick off the objective, but don’t pay for anything else - just like last time we can steal everything but upgrades, so let’s do that instead. Grab some incendiary bolts if you’re nervous of bloodflies, though.
Outside the Black Market Shop, use the rooftop opposite to reach the balconies on the building the Black Market is under. Climb to the fourth floor and enter. Be wary of three bloodfly nests as you explore, but feel free to ignore them - there’s only minor loot on this level and none of the nests drop blood amber. Head for the stairs and go down to the bottom floor for some raw whalebone and some minor loot, then stealthily approach the basement entrance just inside the locked gate at the front door.
In the basement you can eavesdrop on some burglars. Let them finish chatting and it’s much easier to take them out stealthily. I found it easiest to grab the nearer one and haul her all the way up the the apartment upstairs while the other one was kicking about in the small barred room. You’ll get Document: Letter from Bethy by looting them, and can grab the Apartment Key from the cabinet nearby. There’s some minor loot and raw whalebone in here, too.
Now we need an extra canister of whale oil to blow up the back wall, so we’ll have to clear the guards in the main street. Exit through the arch leading to the Black Market area and hug the right wall to come up near a grassy area; this makes it easy to ambush the one who patrols right down this way at long intervals. I elected to go across and use the hatch on the guard kiosk to take down the one inside next, then returned to the grassy area to take the second patrolling guard well out of view of the civilian area. The past guard was then very easy to knock out. Grab Document: Duke Abele Returns in Triumph from the corner.
To get into the station, zip up to the edge of the tracks in front of the wall of light (don’t step on the tracks themselves!) and then zip through to a high girder on the other side. You’ll have a fine view of a guard and an elite guard below. Taking them both down is easy with Domino; just link them, then drop down and strangle the elite as soon as the other one turns away. Grab the bonecharm and Document: Silver Spike - On Howlers nearby.
There are no other guards in here so drop to the bottom floor and take the whale oil canister out of its case at the end of the red cable. This disables the wall of light so you can carry it straight back through. Bring it down to the basement by the black market and place it with the others. If you’re trying to avoid deaths, take the unconscious burglars and move them a long way from the canisters, then stand well back and shoot them with your crossbow or pistol.
The shopkeeper will notice her back wall exploding but she won’t attack or alert even if she sees you. Open the shutters to take the rune, the ticket booth key and any other ammo or consumables you want. Loot the cash register and safe as well. Hooray! This completes special action Black Market Heist.
Return to the station and let yourself in to the ticket booth loot the safe and cash registers (there are two), and to collect Blueprint: Pyrosonic Casing and Document: Note to Employees. This completes special action Looted Aventa Station.
That’s everything of interest in this area - the back door just goes out to the Howler ambush area. Climb into the carriage and go to Upper Aventa district. You can come back though, so don’t worry about it.
Upper Aventa District
Don’t forget to engage stealth once you exit the carriage.
The easiest path through this area is to turn right as soon as you regain control and walk straight forward to a door. Go in and Blink or Far Reach past the main desk, then open the door and wander in to ambush the two guards. Collect Document: Doctor Hypatia to Resign says Grand Palace (or high chaos alternative) and some minor loot, then head upstairs.
There are two guards on the second floor. After they chat one sits at a desk and the other patrols nearby. Use the cover of the desks to nab the patrolling one while the other sits, oblivious. Loot them both to receive Document: Split the Take. Collect the bonecharm and some minor loot, as well as Book: The Astounding Clockwork Soldiers, Book: Get the Clankers off Karnaca’s Streets, Document: Interrogation Report and some ammo from around the rooms.
Don’t bother disabling the wall of light with the whale oil canister in this office; it upsets the guards and they come looking for you. Go to the third floor instead. Sneak around to find a sleeping elite guard. You can loot him three times to get the Side Alley Key, even if you don’t bother to knock him out. Be sure to collect Document: New Gate Code from his desk and then Blueprint: Alloy Polarization and the Old Roadway loot item from the tables in the other room.
Go all the way back downstairs and enter the gate code near the carriage. Don’t leave just yet; there’s plenty more to see and do in this district if you fancy it.
It’s up to you whether you take out the two guards and the elite guard in the carriage area or just sneak around them. It’s easy enough to avoid them and grab the map, and you can get past the lot of them by sneaking to the left from the carriage, past the guard kiosk, and looping back around to reach the side alley you can now unlock.
Ignore the three guards and the elite guard hanging around here; cross the street and sneak along the wall on the far side till you reach a door on your left right before the crawl space. There’s some minor loot and a rewire tool on the first floor. The second floor has several civilians who get upset if they spot you robbing them. Grab the Hound statue from behind the entrance door, then Blink or Far reach down the corridor to the back bedroom to grab a rune from the desk cupboard. You can also collect Book: The Duchess in Green, by Douglas Harwickle, Historian and pickpocket these guys, but it’s more trouble than it’s worth really.
There’s another building you can enter in this area and one of the easiest ways to get to it is from the balcony in this apartment - just zip across. It has two bloodfly nests but also a corrupt bonecharm and Painting: Jindosh Considers an Odd Numerator.
Down on the street below if you approach the broken railings you can climb down a chain to an area with some decent loot, and you’ll see a route to the mansion across the broken lower tracks. We’ll have to come back though, and so we want the carriage at the mansion - go back and climb in to sail up in style.
When you’re ready climb the stairs and enter the Clockwork Mansion itself.
You'll have a chance to return to and explore Aventa District further before the mission ends, so don't worry if you missed anything on this first run.