Lords of the Fallen guide: defeat the Tyrants
Find the Tyrant Hearts and defeat the Tyrants themselves as you continue your quest.

Lords of the Fallen guide: defeat the Tyrants
To progress the story, make your way back to Kaslo and pop through the portal. Go across the bridge, up the steps and wander over to the Crafter up here to trigger a cutscene. After a brief interrogation where you ask him just what a man like him is doing in a place like this, you’ll quickly establish that he’s a smith, as if the name didn’t already tip you off. Utilise his services then head upstairs to find a checkpoint and Yetka.
Save your game, catch up with Yetka, then head back down the steps and into the recess on the right, where you’ll discover a doorway that leads into a room with a chest that contains the head and chest piece for Wisdom armour. Carry on down the stairs and around the corner to the left to find a Hell Hound under the staircase, guarding a locked door. Put him down and move to the centre of the room for a second encounter with a Hell Hound. There’s a Forger at the side of the room who will use ranged incendiary attacks, so take him out next.
To the right of where the Forger was standing is a door that leads to a room with a locked chest and a lever, which you need to pull. Go back to the room you just came from, head up the right-hand stairs and fight off the Rogue, who will be using ranged incendiary attacks. Just behind the Rogue is a locked gate that you’ll be able to open once you vanquish the Tyrant and obtain the Small Western Antechamber Key. Once you’re able to pass through the door, you’ll find a chest containing an Attribute Point Shard and Cunning leg armour. The Ancient Plate that Yetka’s after will also be in here.
With the locked gate behind you, follow the path to the right to find another impassable door and a Poison Resistance Shard next to the fire. Retrace your steps back to the area with the checkpoint, head across the stairs and on through the door on the other side. If you jump across to the right-hand ledge, you can pick up a Magic Energy Shard. Now plop off the ledge and take on the Forger (ranged incendiary attacks) and 2 Rogues.
You’ll spot a door and 2 staircases in this room; you want to go up the stairs that do not take you back to the entrance. You’ll know you’re heading up the correct set when you spy an Energy Shard on a ledge over to the left. Take a running jump to land on the stone platform to the left of the stairs, and having successfully landed, proceed through the door on the left, where you’ll be set upon by a Rogue. Once he’s down, crack open the chest to obtain a Lost Pike polesword, then go back downstairs and through the door opposite.

Dispose of the Rogue and Marauder in here and smash up the furniture to reveal an Ancient Plate. Yetka won’t believe her luck! Pull the lever and return to the main set of stairs where you ran into Yetka. The gate here will now be open. Go on through to find the Tyrant, but before you engage him, smash the vase to your left to find the Tyrant Heart. If you neglect to pick it up, he’ll perpetually regain health when his HP is low by using it. Additional enemies will throw their hand in with the Tyrant if you wander too far into the room, so take care.
When the Tyrant is no more, you’ll receive the Small Western Antechamber Key, so hotfoot it back to the relevant door (where you faced the Hell Hounds an Forger), grab the goodies within and return to the room where you finished off the Tyrant to encounter a Forger and 2 Hell Hounds. Once they’ve been dispatched, pick up the Small Sealed Rune from the left of the room and the Empty Bottle from the right, before heading through the doorway on the left.
Take down the Marauder at the top of the stairs here, head right and take out another Marauder, then follow the pathway to the end where you can pick up another Small Sealed Rune. About face, proceed past the stairs, and deal with the 2 Rogues down here. Continue onwards to reach an open area with a Forger and a Dimensional Beast. Hang back while fighting the latter, and be wary of its charged explosive attack (preceded by it sticking its claws into the floor). It also has a ranged and jump attack, so you may prefer ranged combat to give you the space to dodge projectiles while staying ot of range of the explosions.
Once you’ve cleared out the area, open the chest on the right to obtain a Lurker Thrust Greatsword and grab the audio note from the left. Pop down the left-hand staircase, dealing with the Marauder along the way, and go through the right-hand gate at the foot of the stairs. Yank on the lever in this next room to open another shortcut that leads back to where you faced the Tyrant. The left-hand gate at the foot of the stairs will lead you to another shortcut that will bring you out near the main stairs.
Follow the corridor and you’ll eventually come across the Spellcaster guarding an Ancient Plate that will employ ranged attacks. When its HP is low, it will resort to draining your HP and will carry on doing so unless you give it a good thwack. When you do finally finish it off, back off immediately, as it explodes when it dies, in a final act of douchebaggery. If you’re lucky, the little sod will drop a Two-Horned Shield which is great against magic attacks.
Grab the Ancient Plate and unlock the gate to the right with a couple of Small Runes to find a chest containing an Empty Bottle. Carry on down the corridor and as well as finding a Temple Guardian, you’ll also find a room with a currently inactive portal inside. Go left and up the stairs, then left again and down the stairs (past the statue you saw earlier). There’s also a little surprise in the form of a Dimensional Beast.
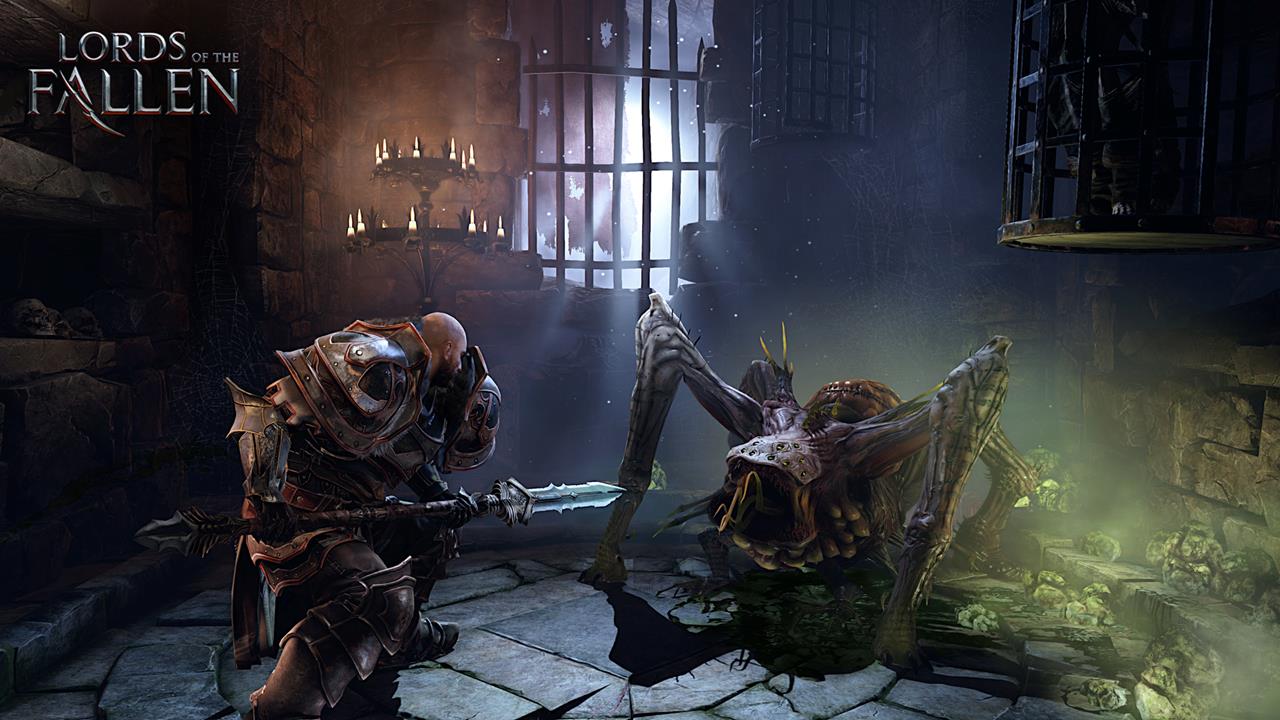
At the foot of the stairs, head right and save your progress at the checkpoint. Wander down the left-hand along the ledge, jump across to the ledge in front of you and make your way around the corner to find a chest containing Griffin leg armour, a Spell Point Shard and a Poison Resistance Shard. Proceed along the path and to the next ledge, and you’ll spot a giant spider that you can potentially take out with ranged Gauntlet attacks without approaching it, or having it retaliate.
Once it’s down, continue on and hop over to the next ledge to find an Ancient Plate. There’s a Fire Resistance Shard on the other ledge leading back the way you came (so not the ledge you entered the area from). Go left and make your way to the opening, but be on your guard as as a giant spider is lurking up near the ceiling waiting to do spidery things to you when you go through. Foil its plans by using the Gauntlet to dislodge it and beating it to death if necessary. Head through the opening and grab the Conceit staff from the chest to the left then return to the last checkpoint.

At the foot of the stairs near the checkpoint, take the left-hand path this time. There’s a Rogue on the path above you that you might as well use the Gauntlet to get rid of. There’s a Tyrant to your gith, but we need to find its heart before we engage, so head left, take care of the Dimensional Beast down here, then go left again to find a Magic Energy Shard in some bushes, guarded by a Golem. Get rid of him and grab the Shard, then about face and take on the Golem to the left, standing guard over a chest containing a Swing Greataxe and Wisdom wrist and leg armour.
Dispose of him, loot the chest, turn around and head left. There are 2 Hell Hounds and a Forger waiting for you down here and an audio note to the left of the dying fire, concealed in a bush. Carry on down the path, take care of the Rogue, then grab the Griffin head and wrist armour from the chest on the left. Smash the vase next to the fire to obtain the Tyrant Heart.
You can initiate the attack on the Tyrant from up here, by peeking over the cliff edge on the right and reeling off ranged attacks, before you drop down and finish it off. Once it’s down, head up the stairs, keeping an eye out for a small opening on the right where you can find an Energy Shard, and a path to the left that you can follow to the end for another Energy Shard.
Pull the lever at the top of the staircase to open the door, kill the Marauder inside and do the same to the Temple Guardian to the right. There’s a locked chest at the end of the path here that you won’t be able to open at present. With the locked chest behind you, proceed to the stairs at the other end of the path and pick up the Ancient Plate from the left.
There’s a Rogue and a Tyrant down here, and the all-important Tyrant Heart is near the end of the path in a vase to the left. Pull the lever to open the door here, defeat the giant spider on the left and open the chest containing a Poison Resistance Shard, Griffin chest armour and a Ghost Merge Shard. On the right is another spider and an audio note.
Go back through the door and straight ahead to find a checkpoint where you can save your game. Pop up the nearby stairs, kill the Rogue at the top and follow the path to the end, where you’ll see an inactive portal. Head down the stairs to trigger a cutscene followed by a boss fight.
Back to Lords of the Fallen guide: walkthrough and boss fight tactics