Zelda: Breath of the Wild - Divine Beast Vah Ruta Dungeon guide
Head into the belly of the water-spouting beast. to tackle the Zelda: Breath of the Wild water dungeon, Divine Beast Vah Ruta.
After that cool set-piece where you worked with Sidon to get aboard Vah Ruta by dodging attacks and rushing with the help of the Zora, Link manages to board the divine beast. This thing is massive, and you're alone. It's time to take it back.
In another Zelda game this would've been a Dungeon or a Temple, and though this is around as close as you get to those ideas in Breath of the Wild it's still very different. Some things are similar however, such as having a series of puzzles to solve and the dungeon being themed - think of this as the water temple.
If you want even more assistance with your adventure, check out our full and detailed The Legend of Zelda: Breath of the Wild walkthrough and guide.
The Legend of Zelda: Breath of the Wild Walkthrough - Main Quest: Divine Beast Vah Ruta Dungeon
Your first goal aboard Divine Beast Vah Ruta is to find a map. You won't be able to progress properly until you've obtained one. Once you've grabbed that your goal becomes to activate five different terminals scattered around Vah Ruta with your Sheikah Slate. Getting to these terminals or making them accessible is, of course, going to require some puzzle solving.
As well as being able to move objects and interact with parts of the dungeon with your items and rune powers, you have one other crucial ability - you're able to move the body parts of each giant beast. For Divine Beast Vah Ruta, it's the trunk, which constantly spouts water... and you can use that water to help yourself out. Consider this the water dungeon or temple, if you will.
Inside Divine Beast Vah Ruta: Getting a map
Head into the first room after the disembodied voice of the Zora's champion is done talking. There's a weakened baby guardian here, so pick it off. A Terminal can be found in a side room down a ramp. Just want to point out: there's a terminal in here but it's useless to you until you activate several sub-terminals.
Back up in the main room, first focus on the water in the middle of the room and the door that was pointed out to you as the dungeon began. I was real stupid here, but the solution is simple. Use Cryonis on the water underneath the door to raise the door, then go inside and download the map to Divine Beast Vah Ruta. Handy! This map not only gives you information on where you are, but lets you move Vah Ruta's trunk.
Inside Divine Beast Vah Ruta: Terminal 1
Back in the main entrance room look in the water either side of the map room door with your Magnesis Rune equipped. There's a metal chest here you can drag above water and open for some loot.
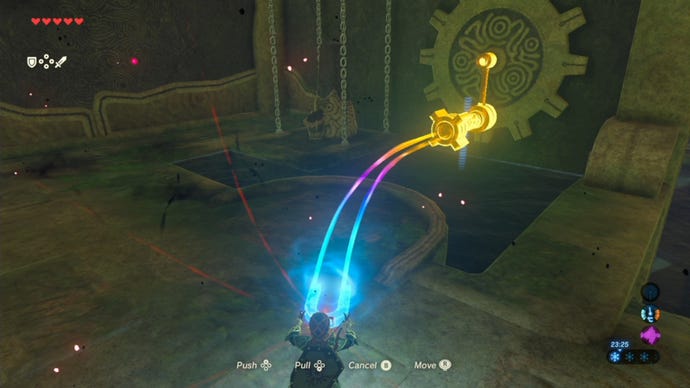
In this same room, look for the cogs in a corner. Use your Magnesis Rune to turn these cogs clockwise in order to raise a platform that holds the first of Vah Ruta's terminal points that you can use your Sheikah Slate on.
Raise the terminal and then use it - this is your first terminal, done! This shouldn't be so hard, right? Right?
Inside Divine Beast Vah Ruta: Terminal 2
Head upstairs and up the ramp via the side door. Upstairs there's a big water wheel and a guardian. Kill that guy, then survey this large central room of Vah Ruta.
There are two enormous water wheels in here - a smaller one that's turning and a larger one that's stationary.
You should be able to see your second terminal right in front of you - it's actually inside the smaller cog. The problem: the cog's base is flooded with water, and it's constantly moving.
Thankfully we have a power that can handle that. Wait for it to be in the bottom of the cog and then use Cryonis on where the water is coming from to freeze it solid. The water level in that part of Vah Ruta drops and the wheel stops turning, freeing up the terminal for use - it powers on automatically.
Take the opportunity to use the terminal when the terminal is available.
Inside Divine Beast Vah Ruta: Terminal 3
Ignore the second larger cog/wheel for now and simply head on over to the other side of the room and up the stairs to the next floor of Vah Ruta. When you see the Ganon corruption there's a portal thing that spits our endless enemies - look above this for the eyeball to shoot that'll get rid of the corruption and the spawner with it.
Carry on upstairs until you reach a locked gate on the water wheel at a standstill.
Now use your map screen to adjust the position of divine beast Vah Ruta's trunk, which is constantly spitting water. Here's what you need to do:
- Make water pour into the room so that the wheel turns so the orange ball falls into the blue slot. This opens the door, but now the door is out of reach.
- Freeze the ball into the slot with stasis, then quickly direct the trunk so that the door is turned back to face you before Stasis expires.
- With the door facing you and open, run in and activate that terminal, your third.
- Once this is done there are three optional chests to grab. The first is gained by climbing onto the larger water wheel's fins as it turns. Get to the apex, then look out towards the smaller wheel. There's a chest on a ledge - paraglide out there.
- The second chest is on one of the outer fins of the water wheel, so simply wait for the right bit of rotation and hop on.
- The third spoke of the large water wheel has a chest trapped between two stone blocks. The key here is to use rotation of the wheel your advantage, freezing the top block with stasis for long enough while the 'chest sandwich' is parted so that you can run up and open the chest.
Once you're done, ride the water wheel all the way up to the top and face the opposite direction of the previously mentioned chest - towards Vah Ruta's trunk. Hop and glide to this new platform, kill the guardian, and press the switch on the left to create a shortcut waterfall that you can swim up with the Zora armor.
Inside Divine Beast Vah Ruta: Terminal 4
Now you're up where the switch is and where you just killed a guardian, go on through the only passageway here - this leads outside, to divine beast Vah Ruta's trunk.
If you lower Vah Ruta's trunk all the way via your map screen you'll be able to get out to its end. Here you can shoot an eye to remove Ganon's corruption and open a chest, but then you should raise the trunk again and try to stay on the end as long as possible. When you get enough height, jump and glide so you're on top of Divine Beast Vah Ruta's body.
There's a hole atop Vah Ruta; drop down it and again find one of the corruption eyes to shoot on the ceiling. This frees up a mechanism. Grab this mechanism with your Magnesis rune and turn it clockwise to open a hole in the ceiling.
If your survey the room you'll now notice that divine beast Vah Ruta's lovely new sunroof has opened directly above a terminal surrounded by fire. Huh. You get the idea, I'm sure: once the hole is open, preposition the trunk so that it comes through the new hole and douses the flames.
Head on down to the newly extinguished area and use the terminal. This is your fourth terminal.
Turn back towards the cog room and drop down a level to find a chest on your way back down.
Inside Divine Beast Vah Ruta: Terminal 5 (Final)
For the final terminal, head back to the area where you can walk onto the trunk. Now, I'm not even sure if this is the intended way (it sure felt like a bit of a bodge), but here's how I did this:
- Bring the trunk all the way up into the position where water is pouring into Ruta.
- Stand ready at the doorway out onto the trunk.
- Make the trunk descend, then jump and paraglide towards the end of the trunk. You want to land on the part water is coming from.
- Now make the trunk curl all the way back up again, being careful to remain on the right side of the trunk in order to not fall and to access the terminal once it's the right way up - the fifth terminal is on a side of Vah Ruta's trunk only exposed when it's fully raised.
With this done, all that remains is to return to the main room and to head into the main control room - the very first terminal we pointed out that was useless before. Prepare yourself, then activate that terminal.
Boss: Waterblight Ganon
This boss is a big old beast made of Ganon's corruption and floats around the arena attacking. It has both ranged attacks and some nasty up-close and personal stuff with its enormous sword, but the fact that it's waterblight is a good clue.
This boss has two phases. In the first phase I found it easiest to get in close and fight; like with the Lynel earlier on in the Zora quest line a priority should be to equip a weapon that lets you have a shield (so not a trident or greatsword if you can help it) and then get in close.
Attack like the blazes and raise your shield any time he begins to look remotely threatening. Be sure to eat to power yourself up in terms of attack and defence. If he goes down, switch to a two-handed weapon briefly and go to town with heavy attacks.
For phase 2 Waterblight Ganon raises four pillars in the water. This is a bit of a pain as it impedes your ability to move around him. Usually he'll occupy one pillar and he'll occupy another.
If you didn't struggle too much on the boarding Vah Ruta mini-boss you now have a use for those other shock arrows - these wreck havoc on this water-based creature, so now you're separated by water, blast him from afar. Aim for the eye.
If he gets downed by the arrows, run, jump and swim (don't forget, the Zora armor helps you to move more quickly) to him and once again let rip with a heavier weapon.
The fight will soon be over, and you're treated to some cutscenes, learn some solemn story information, and are then deposited back into the open world... which is now significantly less rainy.
You'll also get a skill in for the bargain - this skill, Mipha's Grace, will revive you once when you run out of hearts. Once used it'll take some time - half an hour or so - to recharge, but it can be a lifesaver.
