Dishonored 2 M07: A Crack in the Slab - Aramis Stilton's Mansion

Dishonored 2 still has some tricks to play. Oh, it sure does.

- Key items and objectives
- Discover Delilah’s Secrets
- Under the Table (special action)
- Leaky Basement (special action)
- Collapsed Balcony (special action)
- Temporal Investigator (special action)
- A Mind Made Whole (special action)
- A Better Today (special action)
- Painting: The Commutative Rats and the Weeper
- Painting: The Torturer’s Quaternionic Groan
- Blueprint: Firing Chamber Pivot
- Runes x 3
- Rune x 1 (altered present only)
- Bonecharm x 3
- Bonecharm x 4 (altered present only)
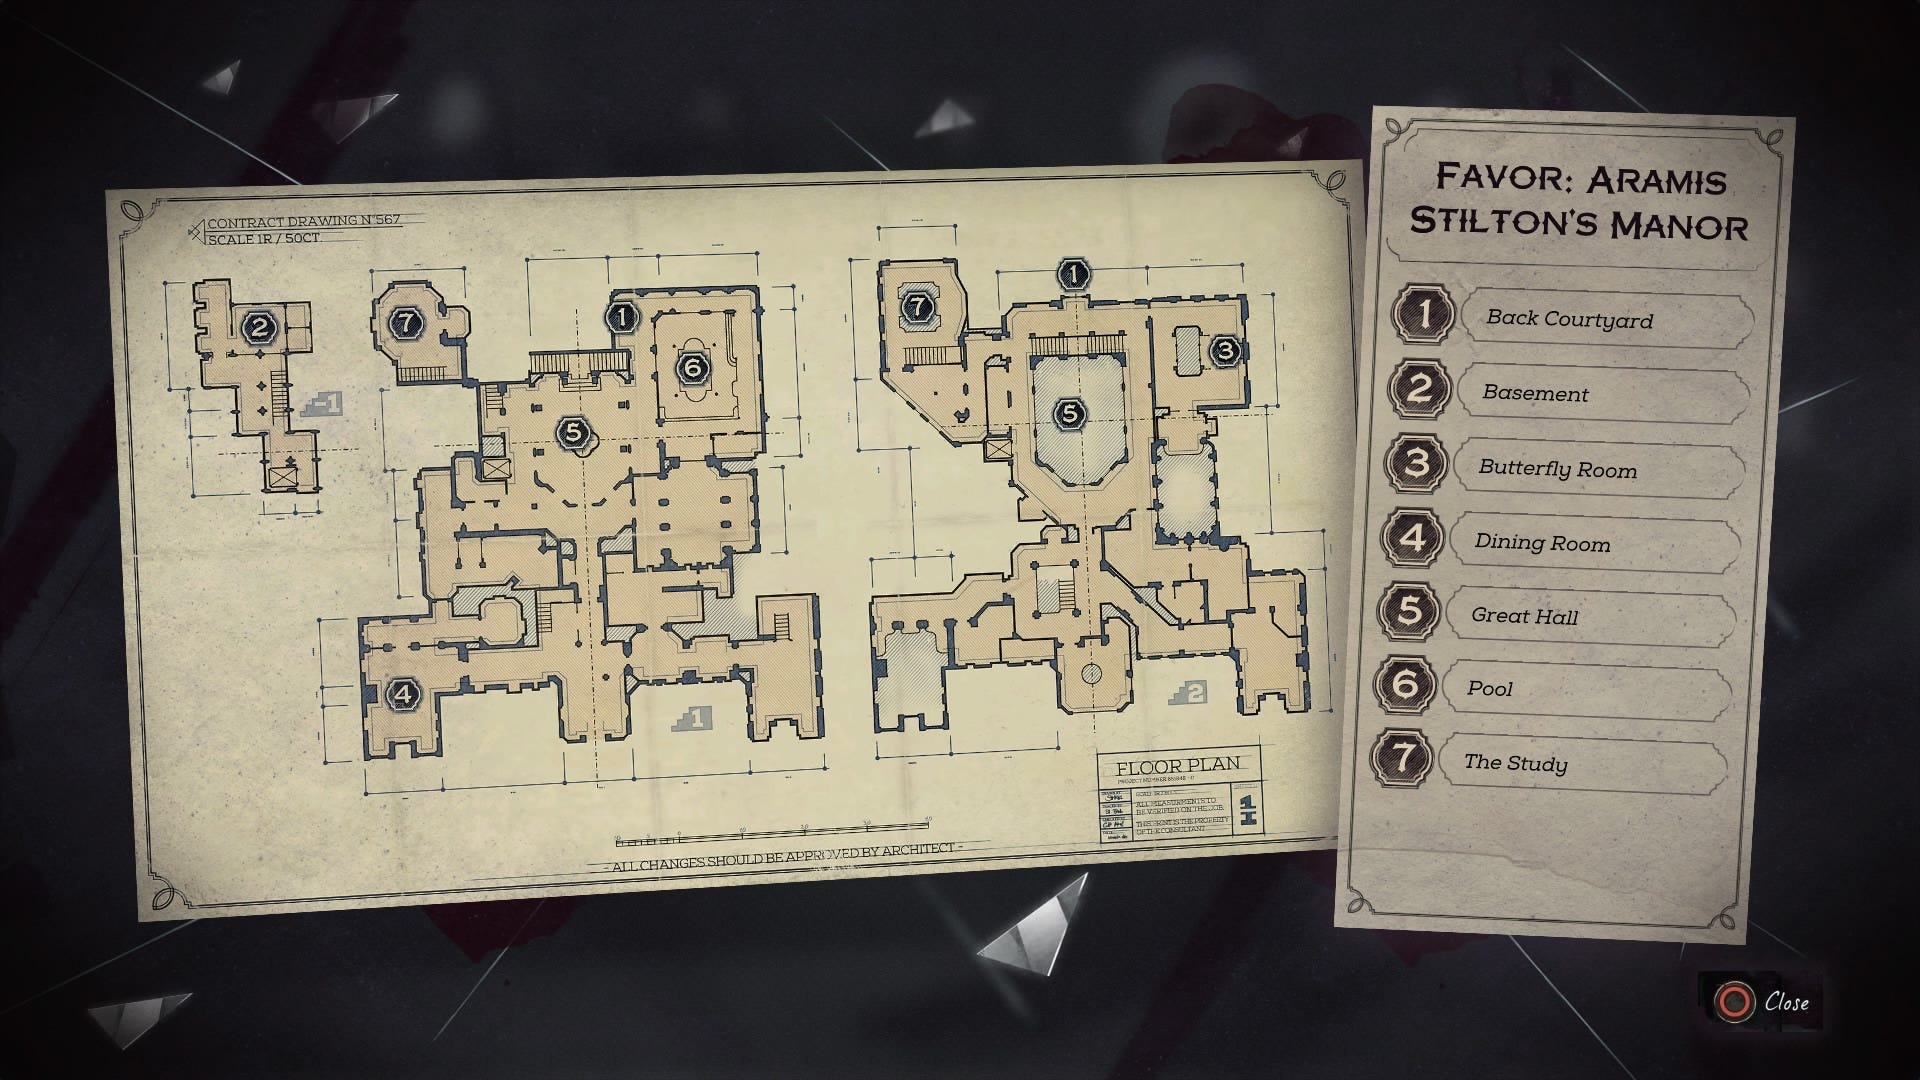
General layout and tips
The map above shows the layout of Stilton's mansion; here's the key-free clean version for your reference.
Supernatural powers are disabled here, although the Heart still functions. The key mechanic in this mission is the ability to move between the present and the past, allowing you to, for example, pass through doors that are blocked in one timeline but not the other. Additionally, certain actions in the past will shape the present. Optionally, you can open another timeline - an alternate present - which permanently replaces the original game state.
The key objective is to enter Stilton's study and observe the events of the past that took place there. There are two ways through the door: finding the combination and breaking in through the alternate present timeline, which awards the Temporal Investigator special action. You will also unlock A Mine Made Whole and A Better Today by unlocking the alternate present.
The other special actions - Under the Table, Leaky Basement and Collapsed Balcony - are all performed in the past. Under the Table is the only one you can lock yourself out of with your actions.
The present version of the mansion is home to one rat swarm, two hounds, two nestkeepers and numerous bloodflies. The past version is crawling with guards and elite guards and a few hounds. In the alternate present you'll meet civilians, including workers who will turn hostile if provoked.
There are two paintings and one blueprint to collect. The mansion holds three runes and three bonecharms, but you can also grab an additional rune and four additional bonecharms in the manor and Dust District if you bring about the alternate present.
Walkthrough
Feel free to have a good poke around in this mission. There's heaps of minor loot and when you have the ability to switch timeliesn you'll probably want to check the past and present version of every room to collect all the scattered coins, bathing salts and other goodies.
The starting area is totally safe so enter the mansion and climb the stairs, searching the upstairs rooms for the nearby rune. There’s really only one path, and it leads to Stilton’s prison. Speak to Stilton to advance the scene - or try using the heart on him for the same effect, but also a cool reaction from him. When the scene is finished you can chat to Stilton, use the heart on him, and take the Blood Amber Cameo loot item from the piano stool he’s sitting on.
Transition into the other timeline and collect the Blood Amber Jewellery Box loot item from the table near the door along with the Calendar from 1849 vanity item. Eavesdrop on the conversation outside the door - one of the key points to remember when transitioning between timelines is that chats won't start till you approach a group in their timeline, so you can often get much better ambush situations by triggering the conversations in the past, then switching back to the present once it's over to observe the patrols in safety through the lens of the device.
When you’re ready, return to the present and push forward to stand right behind the wire barrier. Go back to the past and bam - you’re past the door.
Return to the present and make your way all the way down the corridor you’re facing as you exit Stilton’s little prison, until you reach a door blocked by a couch. Unfold the timepiece and use it to ambush the two guards - get the guy standing still by grabbing him from behind as the other one patrols past heading left, then quickly grab the patroller.
With those two stashed, open the door from one side, where you won’t be spotted - it usually stirs up the two guards and elite guard inside. When they're calm again, go through the door and transition back to the present, then climb under the dining room table. Transition to the past and grab the Master Key from the low table near where the elite guard is sitting for special action Under the Table (nick his pouch, too), then transition back to the present so you can come out of hiding.
Explore the edges of this room to find a broken vault door. Pass through and transition to the past for Painting: The Communtative Rats and the Weeper, loot item Blood Amber Precious Urn and Document: Do Not Touch the Statue! In the safe here you’ll also find a stack of loot and Blueprint: Firing Chamber Pivot. To escape the dining room, go back to the present and stand by the door until the coast is clear, then go to the past and walk through. Transition back to the present ASAP to avoid detection.
Climb the stairs to the second story and hug the left wall to find a blocked door. Use the timepiece to be sure the elite guard isn’t looking, then go back to the past to get through the door. Go back to the present and through the door on the left. Hide in the bathroom and return to the past. When the guard finishes chatting and moves away, choke the civilian and then the guard, stashing their bodies in the bathroom. Loot the room, on both timelines, at your leisure.
Go back outside and look out across the dining room. See the three chandeliers? Our goal is to be on the furthest one, at its highest point but we need to rearrange them first. At the end of this corridor collect Book: Handbook For New Miners. Locate three levers nearby and pull the left and right ones. This should bring all three chandeliers to their highest positions - just keep fiddling if not. Jump from the balcony to the nearest chandelier and then hop across to the next and the next. Transition back to the present and hop to the nearby beam to climb up into the attic, where you can collect a bonecharm and some loot. There’s some raw whalebone in the past version of this room, too. You’ll need to be in the present to climb back down to the chandeliers, and in the past to hop back to the balcony.
Go back out of this wing and use the timepiece to clear the elite guard I mentioned earlier and two civilians. One of them will give you Document: Goodbye Trevor if looted. This leaves you pretty free to loot the past version of this floor. Notable items include Document: Holiday For Miners Granted in the little mining museum and Audiograph: The Ritual, Document: Aramis Stilton’s Diary, Document: Letter From Duke Luca Abele, Document: Letter from Duke Theodonis Abele and some raw whalebone in the bedroom, as well as the Blood Amber Snuff Box loot item around the gallery. Return to the lower floor and grab Document: Restricted Access to Great Hall from the doors, and loot out the past version of the lobby.
Now make your way to where you escaped Stilton’s prison and enter the double doors to find the kitchen. Knock out or avoid the two civilians and loot the room for Document: Instructions for Next Supper and some raw whalebone. Transition back to the present and look in a low cupboard a few steps from the double doors for the Kitchen Key (there’s some rotten fruit on the counter above it, if that helps you find it). Go back to the past and use the key to unlock the single door at the back of the kitchen.
Enter the small room beyond and go back to the present so you can hop through the window. Kill or knock out the two hounds in the next courtyard, then look for stairs down to a basement, slashing at the rat swarm that comes for you. Get behind some shelves and transition to the past. Ambush the two elite guards when they split up after a chat, then grab Document: Water Leak in the Basement. Collect the crankwheel nearby and chuck it through the hole in the ceiling. Go back to the present and dive into the water to grab the wheel and place it on a valve. Turn it to drain the basement and grab a rune.
Go to the other end of the basement, past the very bright light, and climb the nearby locker so you can jump to the ledge outside the hatch, which doesn’t open. Transition to the past, open the hatch, and go through just far enough that you’re clear. Transition again to grab the bonecharm from the present, then back to the past to get back out, before returning to the present again.
Go back outside to the hounds’ courtyard and look around for a door blocked by a board. Cut the board off and go through, turning right. Transition to the past and move towards the desk. Fiddle around a bit and you’ll find you can transition back to the present to be on the far side of the debris. Deal with the bloodflies, then return to the past. Collect Document: Can you take care of this dead hound? then pick up the dead hound and put it in the furnace in the same room. Close the doors and push the button, then wait for the doors to open again. Go back to the present and look at the broken safe on the floor, noting down the combination. Return to the past and enter the combination on the safe to receive a silver ingot, the Konos Star tables loot item, and a black bonecharm.
Return once again to the hounds’ courtyard and look for a door leading to the pool room (not that you can really tell in the present). Clear out the bloodfly nests for a stack of blood amber and if you fancy it take out some guards and grab the minor loot in this area. Return to the courtyard with the two hounds and climb over the balcony to get to another stash of bloodfly nests, with a nestkeeper. More blood amber awaits you. Go around the corner and clear yet another stash of bloodfly nests, and another nestkeeper, then grab Document: Replacement Windows and a rewire tool.
This bit’s cute. Use the timepiece to find the guard and two workers in this area, and transition to the past where they can’t see you. Approach them to make them chat, then wait for them to stop talking. The guard will then take off, allowing you to knock out the two workers; they should move apart after a while. Loot out the room - don’t miss Book: Traditional Serkonan Songs [3] - and return to the present to find the windows have gone - never repaired! Climb out the window space and use the fallen girders to move around the corner to another open window and drop in. Hide behind the furniture just inside the window and transition to the past - this triggers a chat between the three guards so the patrolling one sits down. Without powers I don’t think there’s any way to take them down without altering them, but you can go into the present, move behind the one rummaging in the trunks, come back to the past, grab the rune, and transition back to the present to escape without an alert if you’re quick enough.
Go back to the window area in the present and continue around the balcony to grab Document: Letter from Muranola Architecture and Aramis Stilton’s Manor map, then clear out yet another stack of bloodflies for the blood amber.
Our next goal is the balcony above the courtyard you can’t just walk up to. You can sneak over from the girders and pipes at the non-repaired windows, but to get special action Collapsed Balcony you want to do it the tricky way. Use the timepiece to locate an elite guard and go into the past to listen to her chat to a friend above. Knock her out when it’s over, then hide somewhere and use your crossbow to break the red canisters on the cables of the balcony supports. Back in the present, you can just climb up the debris of the inevitably collapsed balcony.
Grab Book: Traditional Serkonan Songs [2] and some minor loot in the present before scoping out the area using the timepiece. You’ll see an elite guard standing facing out over the balcony - he shouldn’t give you any trouble, but drop his body in the corner by the white folding screens for best results. More concerning are the guard and elite guard in one corner, right by Painting: The Torturer’s Quaternionic Groan, which you obviously want. Get close enough to trigger their chat and they will separate - the elite guard patrols off out of sight, making it easy to nab here by switching between times, and the other one sits in a chair. Grab the painting when the coast is clear, then loot out the past version of the area.
Apart from picking up minor loot around both versions of the manor we’re basically done here. Go up on the balcony above the hounds’ courtyard and have a poke around with the timepiece. I strongly recommend taking out the elite guard by the door, the guard right by him, and the two elite guards nearby. Do this by hiding in the side room and going to the past, to eavesdrop on the two elites. They separate and you can grab them one by one and drag them into the side room. Go for the single elite next, using the timepiece to get behind him on top of the bloodfly muck, then dropping down silently to choke him. Finally, grab the patrolling guard. Drag all their bodies away safely. This makes things easier later. Have a peek through the keyhole, if you like.
Now we can go to the backyard and get the combination for the door here. Make sure you've done everything you want to in the present, because you may never see it again. When you’re ready, just open the door to head to the next area.
Aramis Stilton’s Back Courtyard
Staying in the past for now, there’s a guard in the left corridor you should take out if you want the minor loot down here. The right corridor leads round to some scaffolding; follow it along to a gazebo where Stilton is pacing. If you fall down at any point, you can climb back into the scaffolding at the opposite end to where you entered it originally; when jumping back to the central platform by the gazebo, don't ignore the smaller platforms around the edge.
Your goal is the gazebo in the past, but switch into the present to take out the three hounds in case you need to transition to avoid an alert. You can also clear out the bloodflies, but there's not much blood amber in it and they're not really a problem. Do grab the present versions of the Document: Study Door Combination and Document: Make Your Decision while you're here, then position yourself on the platform behind the gazebo.
At the gazebo in the past, you have a choice to make. It's very easy to jump in, grab the documents, and transition to the past - but you can also optionally kill or knock out Stilton. Doing this has consequences for the present:
- If you ignore Stilton, nothing changes.
- If you kill Stilton, very little changes.
- If you knock Stilton out, he doesn't go mad, a lot of very nasty consequences are avoided, you can get a bunch of sweet loot, and you'll achieve multiple special actions
Clearly, we should knock out Stilton! Make a back up save here if you're not sure, then jump over, knock him out, grab the documents and transition to the present.
You'll see the difference immediately. Avoid the civilian and worker as you make your way back inside. There’s a second door you can use to get back in, leading to the pool room, but don’t be tempted - sneaking through this route is much harder than going back the way you came in both past and altered present. Besides, the main door drops you right back by the study doorway.
At the study door, you can enter the combination in the past or, in the altered present, just hack through the boards and go in - both lead the same place, as passing through this doors always transitions you to the past. Hacking through the door gives you the special action Temporal Investigator, even if you come back and do it after opening the door with the combination.
Go inside and observe the seance. You can't be detected, so keep moving deeper into the room to trigger the second half of it. Collect some minor loot, then leave once the scene starts repeating. If you used the combination to get in, immediately return to the altered present and hack through the door to get your special action.
There's more minor loot around the mansion in the altered present, as well as plenty of civilians, but if you don't care for coins there's only one important stop to make: Stilton's new study. Turn right from the old study doors and take the first right to find his new desk and the bonecharm there. You can also pick up Document: Stilton and Abele to Discuss Miner’s Fund and Document: Letter from Muranola Architects here, as well as some raw whalebone in the adjoining room. When you’re done collecting loot head back to the door to the Dust District - it’s easiest to get out the front door and across the yard if you transition to the past, as there are a few workers around ready to take their tempers out on you.
Dust District
Outside the Jindosh Lock you'll notice things have changed a little, because Stilton isn't a mad recluse in this timeline. Open the far door to the Dust District and - Oh? Well, just walk and look and listen, interacting with the portals when they open.
With that done, have another go at opening the door to the Dust District. Cross the square and enter the United Miners of Karnaca building to collect the bonecharm from the back room. Go back outside and pass through where the wall of light was to climb up into the scaffolding for a rune. Far Reach/Blink onto the roof of the nearby building for another bonecharm. Make your way back to the skiff, collecting a black bonecharm along the way. You can't get any of these in the original timeline or if Stilton is dead.
Speak to Sokolov at the skiff to return to the Dreadful Wale. You may notice some changes to Meagan. Whatever happened to her that day she went to talk to Stilton after the seance? Well, I guess it didn't, now.