Dishonored 2 M06: Dust District - Batista District

Dishonored 2 present you with a logic puzzle, and if you can actually solve it, this is the shortest mission in the game.

Key objectives and items
- Enter Aramis Stilton’s Manor
- Deliver One Leader to Another (optional)
- Find Another Way (optional)
- Investigate Durante (optional)
- The Jindosh Lock (special action)
- Power of the Streets/Theocratic Support/Another Solution/Uninvolved (mutually exclusive special actions)
- Black Market Heist (special action)
- Childhood Home (special action)
- Book of the Fallen (special action)
- Painting: Vera Moray and the Affix of Her Skin
- Painting: Paolo and the Inaccessible Cardinal
- Painting: Indiscrete Time Finds Aramis Stilton
- Blueprint: Spiked Grenade Housing
- Blueprint: Secondary Coiling
- Rune x 5
- Outsider Shrine x 1
- Bonecharm x 8
General layout and tips
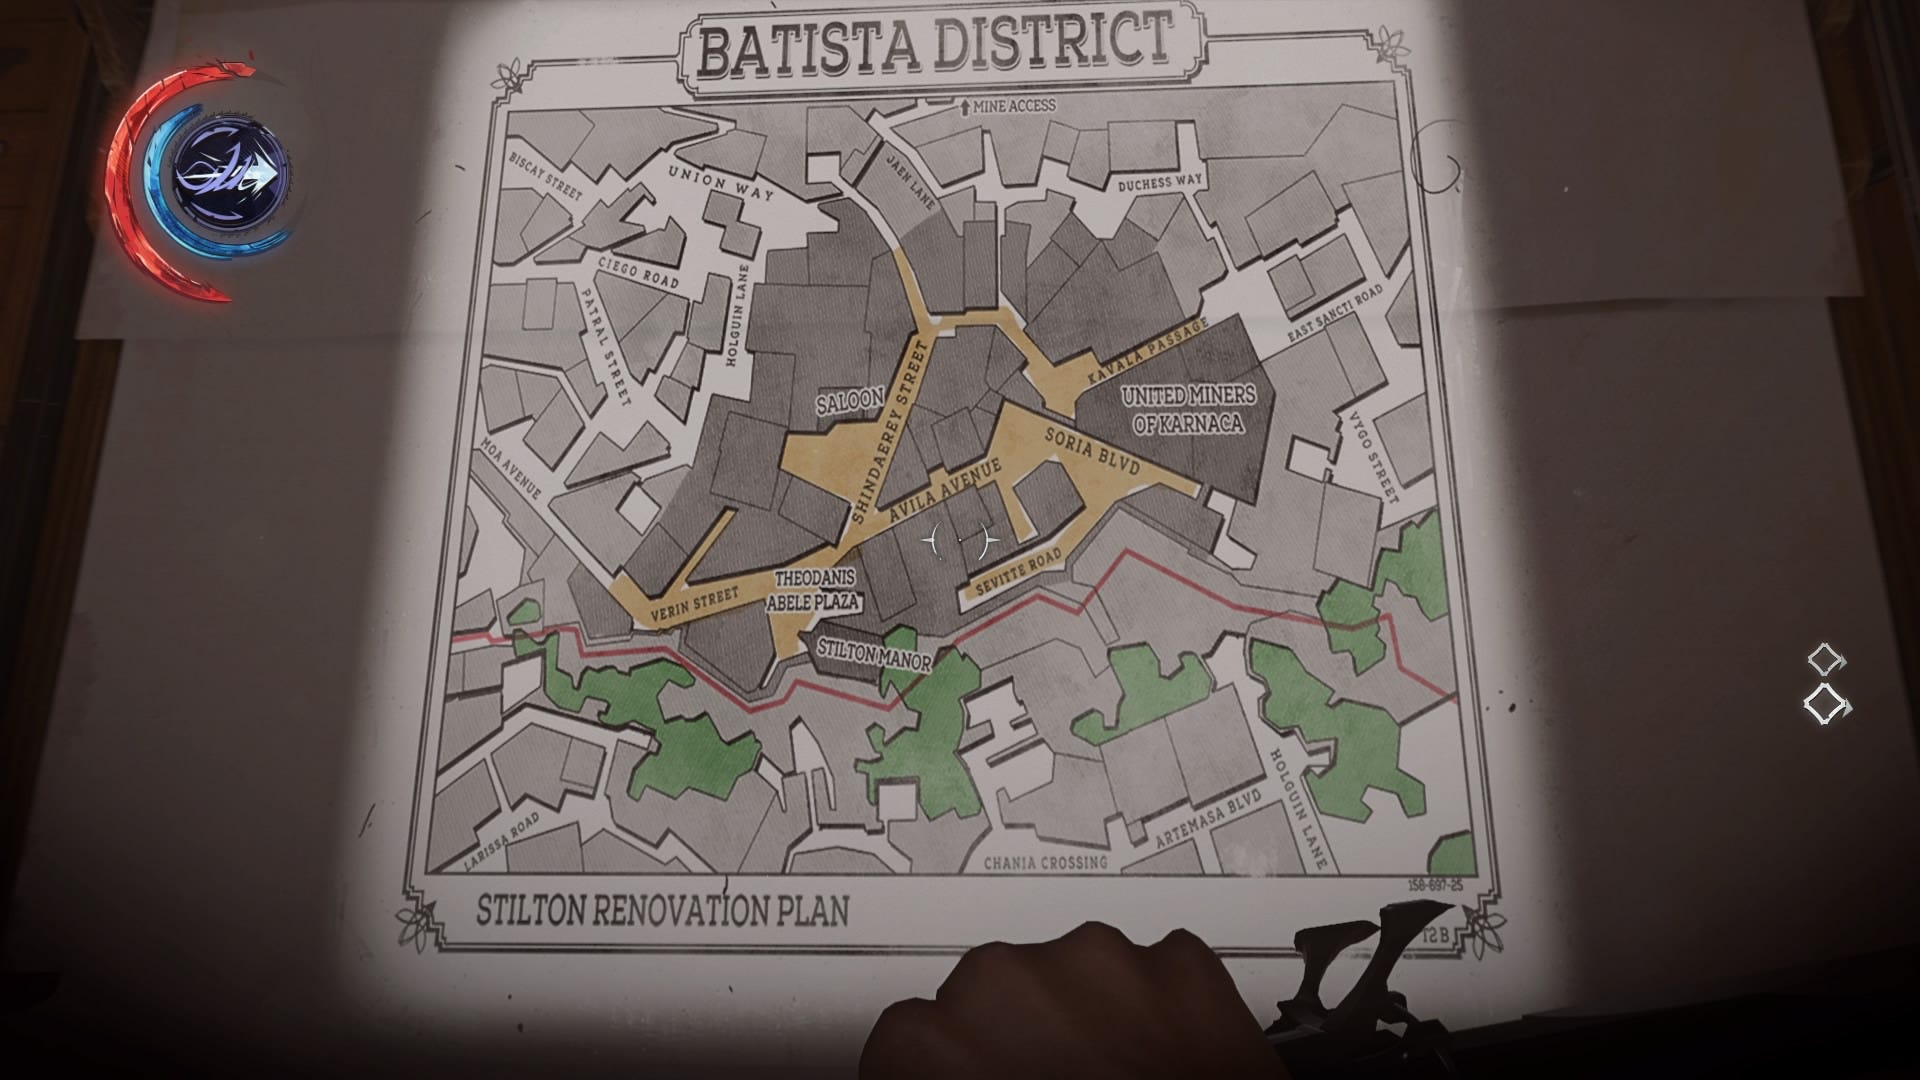
The map above shows the layout of Batista District. As usual here's the zoomed-in key-free version, but as a special treat there's an alternate map below, courtesy of the Church of the Everyman.
The first obstacle on the map is a wall of light blocking the start of the level off from your meeting with Meagan Foster. You can disable it or climb into the nearby ruin by other means.
Past the wall of light the area is divided into neutral territory, overseer territory and Howler territory. The Howlers have checkpoints around The Crone's Hand Saloon. Paolo lives above the saloon. The overseers have checkpoints around the Overseer's Outpost. Byrne is found in his office on the third floor of the Overseer's Outpost.
Right after the wall of light you'll find the Jindosh Lock, which blocks entry to the next mission. Opening this is the key mission objective, and there are several ways to find the solution and affect the balance of power in Batista District, each tied to various special actions. It is not possible to achieve every special action in one playthrough. Here are the main possibilities:
- Solving the logic puzzle yourself awards The Jindosh Lock special action.
- Opening the lock without interacting with either faction awards, either via the logic puzzle or a side mission, awards the Uninvolved Special Action.
- Eliminating both faction leaders by killing them or through a non-lethal side mission awards the Another Solution special action.
- Handing Paolo over to Byrne in exchange for the lock solution awards the Theocratic Support special action.
- Handing Byrne over to Paolo in exchange for the lock solution awards the Power of the Streets special action.
As you can likely see, these outcomes are mostly mutually exclusive; only The Jindosh Lock and Uninvolved have synergy.
As for the other special actions, the Black Market Shop is found after the Jindosh lock and as usual the Black Market Heist special action is awarded for breaking into it, which involves solving a combination puzzle. Childhood Home is completed in the vicinity of the Overseer's Outpost. I'm not sure how to achieve the Book of the Fallen special action yet, but give me two hours to load up my backup save and murder some people.
There are three paintings, two blueprints, five runes, one Outsider shrine and seven bonecharms to be collected during this mission.

Walkthrough
The Dreadful Wale
There's not much to do in your home base this time. Head right up to the top floor for Audiograph: Searching for Aramis Stilton. If Dr Hypatia has been onboard, she’s gone - collect Audiograph: Dr Hypatia’s Farewell from her cabin.
In the briefing room, grab Document: The Silver Spike - On Overseers from the noticeboard and Document: Note form Sokolov on the workbench. Eneter Sokolov’s room for Book: Anton Sokolov Diary - The Gears of Time.
Speak to Sokolov to initiate the briefing, then meet him by the skiff to kick things off.
Batista District
This is a branching mission. Your goal is to work out the combination for a lock. There are a number of ways through, and it's impossible to tick every box no matter what you do (see above for details). The route we've chosen is compatible with low chaos runs, does not promote the interests of either faction, punished both factions, and takes you on a tour of most of the loot in this mission area.
Collect some raw whalebone as you advance into the level from the skiff. Follow the linear path up some stairs to a street where three guards and an elite guard are chatting. Ignore them and sneak across the street to a derelict shop while they’re distracted.
Climb the stairs to find two guards. Zip over to shelter behind the crates by the seated one and wait. The dust wind will come up and the seated guard will make for the door. Grab him and stash his body behind the crates, then nab the other one before he remembers his friend exists. Easy. If you missed the Conductive Filaments blueprint earlier it’s on the bottom shelf of one of the tables here, apparently.
The easiest way past the guards below is to shut down the wall of light by disabling the windmill - one of the guards will eventually notice it’s offline but nobody ever actually makes it up to the roof to check. Climb down from the rooftop via some nearby crates and stuff to the alley you haven't explored yet, then climb up into some scaffolding curling around to the wall of light. At the end of the scaffolding just sneak past the guard standing still, pass through the wall of light, and spot a doorway into a derelict building. Move through the rooms looking for somewhere to climb up to the next level, then wander around until you find Meagan. Have a chat.
Go out the opening to the square with the statue and drop down, but immediately turn around. Smash a wooden barrier and enter to loot a rune from a cabinet. Go back but turn right as soon as you get outside, hugging the right wall, to find Document: The Crone’s Hand on a wall.
Cross the square and you can approach the door to Stilton’s manor. Sneak and hide so you can eavesdrop on the civilians; the lockpick can notice you as she paces around. This kicks off another path through the lock. When they’re done talking, interact with the Jindosh Riddle next to the door. When it opens, collect Document: The Jindosh Riddle. If you can solve this (randomised) logic puzzle on your own right now, feel free - but you’ll miss all the goodies in this mission, and won’t get to complete the associated quests. The only reward is special action The Jindosh Lock.
Still with us? Good. Pass through the gate decorated with overseer masks and collect the Batista District map. This is neutral territory but borders on the Howlers, so stick to the right wall to avoid an altercation. You can clear out Winslow’s Safes of minor loot, although the shopkeeper is so nice it feels a bit mean.
Stick to this side of the street and jump over the banister at the end of the pillared area to find some stairs leading down to a soup kitchen. Move forward and give the beggar some coins, then look for a blue shopfront right by him. This is the Black Market Shop, but it’s currently host to two Howlers. Eavesdrop through the keyhole and hide when they leave. Enter the shop and, as usual, only buy upgrades - we’ll steal the rest.
Go back outside the shop and turn left, back towards the soup kitchen. Hug the left wall to find a blocked crawlspace. Break the boards and advance. This is overseer territory, so be careful; there's usually nobody here but if you move through too quickly you may be spotted. Move out the other side of the enclosed area and turn left. Disarm the tripwire and look through the barred windows on your left. Shoot the boards on the door you can see inside - with your crossbow, so as not to alert anyone.
Return to the Black Market Shop and go out its side door. Head upstairs and open the door you just unblocked. There’s some minor loot in here but you’re aiming for the desk to grab Document: Unsent Letter and then Document: Wedding Silvergraph from the shelves behind it. Note that it mentions a month. Now look for a calendar in the hallway. Find the month name and note what number it is (month of rain, forth from the top, is 4, for example) and look for a circled date in that row. Now go downstairs and examine the door on the ground floor for a combination dial. Enter the date you just found in MDD/MMD format - so Month of Rain 13 is 413, for example. This gets you into the Black Market Shop backrooms. As usual, knock out the shopkeeper and help yourself to loot. There’s a bonecharm in the cupboard of a desk near the shutters, and a Map of Stilton’s Home in the shutters. There’s not much else in here, alas, but it completes special action Black Market Heist.
Go right back up to the upper street level, past the soup kitchen, near where you first crossed into Howler territory. Right by the pack of Howlers is an empty building with a big SIEZED sign on it. Zip up there by moving past Winslow’s Safes right to the end of the pillared area, then Far Reach/Blink up to the balcony. There are two bloodfly nests inside - so what else is new? - but also a rune in a cupboard and some minor loot.
There’s nothing below so head up to the top story and go out the back window. Climb the pipes opposite to enter the next building over. There are two nestkeepers here - as usual, sleep dart is the best option for these guys, and remember not to set them on fire burning nests if that's your jam. There’s minor loot and Book: Doctor’s Accounting Book in here.
Climb out the window above The Crone’s Hand Saloon - you’ll get a district notification when you’re in the right place. Look left and up to spot an open window. Zip in and take out the one Howler up here. Be quiet as you move down to the next floor - there are two howlers below who will come up at any sound.
In Paolo’s apartment, collect Painting: Vera Moray and the Affix of Her Skin, and check out the Outsider shrine for two runes. Collect Painting: Paolo and the Inaccessible Cardinal from near the desk in the corner, and grab Document: Paolo’s Concern from the desk itself. The Kivo Narrows loot item is on the table in the planning room.
Sneak down one level further and deal with the two guards I mentioned earlier - one on the bunk and another wandering around. Enter the bedroom and open the chest for a gold ingot, silver ingot, and silver pocket watch. Take all the glasses off the metal crate in the middle of the room so you can open it and take Blueprint: Spiked Grenade Housing.
Go outside to the balcony overlooking Paolo. Circle clockwise and take out one Howler then collect Document: Durante’s Room from the door.
Backtrack through Paolo’s apartment, the nestkeeper’s apartment and the derelict apartment to the soup kitchen near the Black Market Shop. Go through the little tunnel we used to get behind the Black Market Shop earlier and move further up. Take out two overseers, being careful of the tripwire they’re attempting to disarm.
As you approach the next area you’ll hear and see two overseers staging an execution. If you’re quick, you can use Domino or Slow Time to take out both, along with the nearby patroller, and save the accused. There is no reward for doing this and it will bring other nearby overseers running to find the bodies, so it’s not really worth the hassle. Still, if you can get away with it, why not? The victims don’t always make it to safety, unfortunately. In any case, the balcony overlooking this scene is a good spot to have a look round and work out your next steps.
Look out over the view of the city below, and you’ll spot a balcony on the left, right where the buildings join the balustrade. Zip over and climb to a second, higher balcony, then bash the boards to enter the room. Grab the silver decor plate loot item hidden in the crate, right by the typewriter. In this room you’ll also find some raw whalebone, minor loot and Document: Unsent Letter.
Go out the window and down to take shelter behind the scaffolding. Advance a little and you’ll see a platform above you can zip to. Walk along, eavesdropping on the overseers below, and go through the window, zipping along the ledge to your left to avoid the gaze of an overseer on the right. At the top of the stairs you’ll be right by the entrance to a barracks or sick room. Take out the patrolling overseer here; it’s easiest after he stands at the doorway for a while, looking out, and then turns around and patrols back - but be aware of his weird little forward motion before he heads back in, which will result in an alert if you move too fast. Loot the two sleeping overseers twice each for some coins and the Overseer Confiscation Room Key.
Go outside and ambush the overseer on the stairs (the one that was staring at your window earlier), then check the office he had his back to take out one more overseer. With the area clear, collect Document: Contraband, then use your new key on the white door here. The metal crate has some silver ingots and a rewire tool as well as a rune, and there’s some raw whalebone on the shelves.
There’s a set of stairs by the barracks entrance. Go down to the bottom floor and you can collect Document: Detainee Durante from a door. Head back up the stairs past the barracks. Pause on the third floor and eavesdrop on the overseers, then continue up to the fourth floor.
Panting: Indiscrete Time Finds Aramis Stilton is on this level, on your right as you enter from the stairs. You have to either move along the central loft and back through a broken window to reach it, ot circle around the level entirely. You might want to easvesdrop on vice-overseer Byrne as you do this. Audiograph: Welcoming Speech is in the same room as the painting and may alert any conscious overseers below.
Byrne's office initially contains three overseers, and he doesn’t wear a helmet, so it’s easy to Domino and sleep dart if nothing else. If you do this while they’re all still chatting you’ll end up with the door still shut, so you don’t even need to clear the lower level first.
In Byrne's office take Document: Vice Overseer’s Report and Durante’s Key. There’s a bonecharm in the cupboard of the same desk.
Search the side rooms on this level (floor 3) for Book: Book of Sermons, Book: Everyman’s Face, some minor loot and consumables. Book: Book of the Fallen is found in the room where one overseer mercy kills another, but I haven't figured out the special action attached to it yet. Update coming soon.
Now that you know the route between Paolo and Byrne, it’s easy enough to take one out and then Far Reach/Blink between them to deliver one to the other. If you'd rather stick to the neutral route and punish them both (non-lethally), stick with us.
Go out the window in the vice overseer’s office and look right. See the road leading off to the right? Get down that way and search for a side alley. Look up to spot an air condition unit you can zip up to, then break the boards over the windows right by it. Enter to discover it's Corvo's childhood home. In the small bedroom, remove a couple of bricks to collect some raw whalebone and a trophy. In the large bedroom, look for Book: Paloma Attano's Diary. This completes special action Childhood Home.
Go back to the window outside Byrne's office. If you're confident in your route and stealth abilities, grab Byrne's dead or unconscious body and bring it with you for the non-lethal resolution we unlock in a bit. Face out the window and zip across to the pillar below, then the awning, and in the open window. There’s a stack of minor loot and Document: Duke Hosts Inauguration Celebration in here, and only two pretty oblivious civilians. You will need to deal with them if you want to loot the cash register by them, though.
Go outside onto the balcony - not the window you came in by - and look across the street to a boarded up pair of windows. Shoot out one of the windows with your crossbow and zip through. Collect the Silver Ore Prism loot item and a bonecharm, plus some raw whalebone and Document: Amadeo Monte. Search carefully enough and you’ll also find Document: Love Letter (phew! I’d climb the writer like a tree) tucked under the bed and a stack of minor loot - even some sleep darts. That’s pretty much it for overseer territory. Leave Byrne's body here for now if you brought it with you.
Head back to Paolo’s place (via the derelict apartment and nestkeeper’s apartment) and open Durante’s door. Collect Document: Code to Stilton’s House, which gives you the combination to the Jindosh Lock, as well as Document: Our Two Cuckoos, the Silvergraph Studio Key, and the bonecharm tucked behind the Mulberry Mead on the desk.
While you’re here, go out on the balcony outside Durante’s room and peer across the lower courtyard to see an alley in the right corner (close to the wall of Paolo’s place). Zip over there and crawl in to deal with a single Howler. Collect Blueprint: Secondary Coiling, a bonecharm, some raw whalebone and Book: Old Widow’s Recipes.
Picking up one of the documents in Durante’s room opens another objective to eliminate the two leaders, so let's take out Paolo. As you have heard several times now I'm sure, you must kill or knock him out twice before he'll go down, which makes this tricky. If you lob a headshot at him in the crowd of four howlers, for example, they all go on the alert, and that makes taking paolo down a second time tricky - even though he teleports away.
What I did here was chuck a bottle down into the courtyard, so the party broke up. Eventually one of the Howlers will patrol up the stairs and past Durante's apartment. With her down, you should find the other four arrange themselves in such a way that it's pretty easy to take them all down or just go for Paolo. (Domino and Slow Time are, as usual, terrific here).
Paolo vanishes and reappears on the floor above his apartment, where he pauses for a few moments before walking slowly back to the saloon. You can easily ambush him by going to the middle floor and standing inside the apartment, right, so that when he walks past you can pop out and ambush him. When he goes down, loot him for a short scene and three bonecharms.
Now we need to get Paolo to the silvergraph studio, which isn’t too hard, Go out the front window of his apartment on the lower level (not the Crone’s Hand side) and zip to the high ground in the middle. Turn left to spot some more high ground. Keep along this high path until you reach the edge of Howler territory at a tall green building you can’t get past up high. Put Paolo down on a balcony and take out the two Howlers below - easy pickings - then pick him back up and walk through before zipping over to the door of the studio just past this chokepoint. You have the key now, so bust on in.
Place Paolo in one of the crates and grab the loot and Document: Here’s the Payment nearby. There’s nothing else of note in here except a cash register and Book: Silvergraph Studio Notebook. Now go grab Byrne and do the same with him; if you left him in Mindy's tattoo studio this takes no time at all. This grants you the special action Another Solution.
Return to the Jindosh Lock. Check your mission journal for the answer and enter it, the first name listed corresponds to the left tumbler. You can then kick off the next mission.