Dishonored 2 M01: A Long Day in Dunwall part 2 - Dunwall Streets

After escaping Dunwall Tower, our hero must make their way down to the docks to find a way to escape the city.

- Dunwall Streets key items and objectives
- Meet with the Captain of the Dreadful Wale
- Painting: Curtis, Morgan and the Postulate Child
- Painting: The Obtuse Arguments of Lady Boyle
- Dr Galvani's Safe (special action)
- Freedom of the Press (special action)
General layout and tips
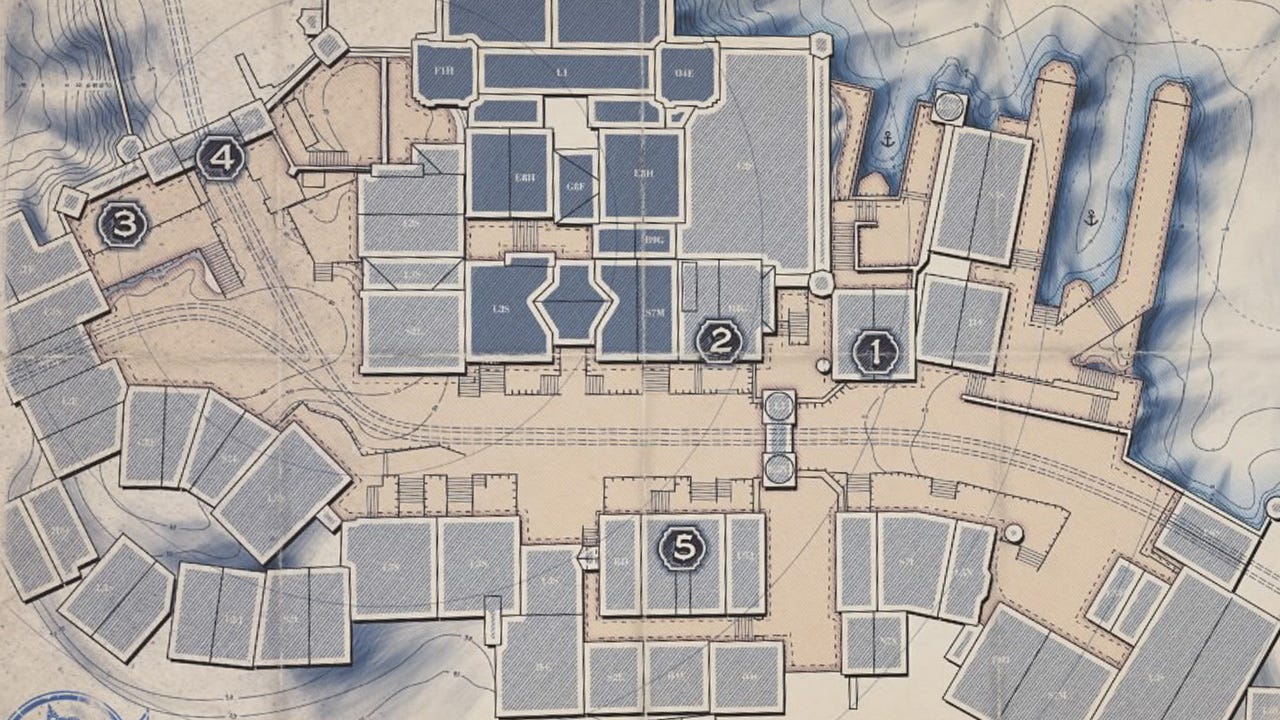
The map above shows the basic layout of the Dunwall Streets area and a few points of interest: here's a zoomed-in version without the key if you want finer detail to work with.
The mission begins near the Tower Gate (3) and ends on a ship just past the end of the dock shown at the right edge of the map. There is a heavily guarded checkpoint between the Dunwall Courier (2) and The Black Pony Pub (1).
An elevated cart track runs above the curved central street that forms the backbone of the level. At intervals a cart will appear and travel west to east across the area. The tracks are electrified and will kill you very quickly, but you can ride the cart safely. However, you will be knocked off the cart onto the tracks at the checkpoint in the centre of the map.
There are several buildings, including some not marked on the map, with good loot opportunities for those who like to explore: City Watch Armory, Dr Galvani's Laboratory, Robbed Apartment, Dunwall Courier, Boyle Industries, Warehouse.
There are two painting collectibles in this area, and two special actions. Both special actions are completed in side rooms before passing through the central checkpoint.
Walkthrough
Collect Book: Old History Textbook, Painting: Curtis, Morgan and the Postulate Child, Book: The Tower of Dunwall, Book: Empress Jessamine Kaldwin and some coins before unlatching the door at the far end of the corridor. You can't return here once you proceed to the next area.
Follow your waypoint west across the rooftops to find a safe path of descent. At the bottom is a courtyard patrolled by one guard.
Climb the wall to survey and access the next area. Beware of the three guards below. One will stand facing down the street. One will patrol the street in front of the still guard. A third guard patrols the stairs on a parallel route. There's a guard kiosk right below you with a hatch on the roof; inside you'll find Document: Stay Ready.
Drop to the kiosk and enter through the hatch. Move to the door of the kiosk and wait for both patrolling guards to face away from you. Take down the still guard, dragging him into the kiosk and hiding him under the table. Wait for the guards to give up their search, then cross the street, go past the armoury and head all the way to the west wall to climb up to a better vantage point. From here you'll easily see how to ambush the guard on the stairs at the bottom of his patrol route using some nearby bushes as cover, which makes taking out the third guard very easy.
-
Loot opportunity: City Watch Armory
The City Watch Armory is accessible via a door in the northewest of the map. There is one guard inside, along with ammo, some minor loot and Document: Captain Ramsey's Orders.
-
Loot opportunity: Dr Galvini's Laboratory
Look for a door on the east side of the street before it turns a corner. There is one guard inside. Collect Painting: The Obtuse Arguments of Lady Boyle and note the number written on the wall inside the frame - for us it was 451. Enter this number to open the safe in the laboratory for a tidy sum of cash. This also completes the hidden Dr Galvani's Safe objective. There's some other minor loot here, and don't miss Book: Dr Galvani's Journal.
-
Loot opportunity: Robbed Apartment
Look for a door on the south side of the street just where it begins to turn. Inside you'll find some one guard, decent loot and Audiograph: Robbed Apartment.
Around the corner: Dunwall Courier, Boyle Industries
Proceeding along the street as it turns, you'll see the central checkpoint in the distance. There are five guards in this area. One guard patrols on each side of the street close to the bend. Two guards stand still near the checkpoint in full view of each other. One guard patrols right by the checkpoint.
As well as the obvious route right through the checkpoint itself, there are two side paths - one to the north, via the Dunwall Courier building, and another to the south, around Boyle Industries. You must enter the Dunwall Courier building to achieve optional objective Freedom of the Press.
Use the short dead end corridor on the south side of the street as a hiding place and ambush the guard on this side. Cross to the north side and drop down behind the low wall to ambush the guard over here, too. Take an empty bottle from the dead end corridor (or wherever). Proceed east along the street until you reach the two still guards. Wait for the patrolling guard to move away, then chuck the bottle to the far side of the street so the guard on the far side looks away; on lower difficulty settings you can also just sneak past and he won't have time to alert fully. Sneak around the corner into the alley leading north.
Collect Document: Dunwall Anticipates Sad Anniversary from the east dumpster. Enter the Dunwall Courier building from the alley and immediately take shelter just inside the door. Ambush the guard who appears almost immediately once he begins heading up the stairs. Proceed to the third floor and eavesdrop on the conversation. Ambush the guard before he hurts the journalist, then speak to the journalist to complete Freedom of the Press. Collect Document: Woes Plague Beleaguered Dunwall and Document: Note from the Chief Editor as well as the valuable Northern Star Chart loot item before exiting onto the balcony.
Facing the street, turn left and climb over some pipes to drop down safely by the checkpoint. Climb onto the checkpoint itself on the docks side, and jump across the gap in the middle to reach the other side. Climb up into the upper ledge and ambush one guard.
-
Loot opportunity: Boyle Industries
Sneak into the alley behind Boyle Industries and eavesdrop on the civilians. Enter Boyle Industries via the stairs and proceed to the far side to find a stairwell. Collect Document: Letter to Laura and set the alarm clock off before retreating back to the main room. After a lengthy wait one guard will come to investigate; ambush him. Drop down to the ground floor from the balcony above to ambush the other guard. Be sure to search around for loot, and don't miss the statue in the glass case. Return to the alley behind Boyle Industries and head back to the area near the checkpoint.
From the south side of the street by the checkpoint, you can easily drop to the ground below via a nice handy pile of mattresses.
The docks
As you move into this area it triggers a couple of lines of dialogue. Let it play out and wait a moment so the guards return to their normal routines.
There are six guards in the street and work yard nearby, as well as one on the docks who can spot you later on. There are two guards who stick close to the pub, two who stick to the far end, one in a kiosk and one on the south side of the street away from the others.
Sneak through the lower area on the south side of the street; there's one guard who may be standing still or patrolling into the work yard in the southeast corner of the map. Ambush him and loot the work yard.
Return to the street via the gate at the far east end and ambush one guard while the other has patrolled away. Enter the guard kiosk and take out the guard here in order to collect Document: Order to Clear the Docks, but be wary of the guard on the docks just below who sometimes spots you in here. You may want to deal with him.
Take out the second patrolling guard at this end, then sneak up on the final two near the pub - again, be careful the one on the docks. The easiest way to take out the two pub guards is to wait for the patrolling one to walk away from the pub, then quickly ambush the still one before sprinting up to subdue the other before he turns around again. Watch for a while to be sure you get the timing right.
When it's safe, enter the pub. The door on the far side leads you out to a balcony above a beer garden of sorts. Take out the two gang members.
-
Loot opportunity: Warehouse
Under the pub you'll find a warehouse with a stack of minor loot - and the more valuable Southern Star Chart loot item.
Exit the warehouse and go around or over the buildings to the docks proper. There are two guards patrolling a good distance apart, and two guards facing the ship, which is your destination. You can either walk around the docks, taking out the two patrollers, or cross over on the cables above and just deal with the two by the ship when it's safe to do so.
Approach the ship, aiming for any of the ladders, in order to meet with the captain. As long as you don't mash the keys during the cutscene, you can do this safely without immediately teleporting to the next mission, A Strange Visit and The Dreadful Wale.
After the cutscene, choose whether to end the mission or not. You can return to dry land to collect anything you missed, if you like.